
Quick install MacOS


A one-click notarized installer of Bol Processor BP3 is available. It is called "BolProcessorInstaller.pkg" and it can be downloaded from here (unique location).

The Bol Processor on MacOS is now a standalone application "BolProcessor.app" (based of PHP Desktop) that no longer requires an additional installation. The option to use "BolProcessor.app" is offered each time you run the installer (unless MAMP or XAMPP are installed). You will then be asked to select the Applications folder or any other location on your computer.

If you would like to use "BolProcessor.app" instead of the MAMP or XAMPP installation, you will first need to deactivate the Apache servers by renaming them in the Applications folder. For example, replace "MAMP" with "MAMP(off)". The installer will then search all the mounted disks for an existing "BolProcessor.app" which will be replaced with the update. If it cannot find it, you will be asked to select the Applications folder or another location on your computer.

The installer (or the script) is used for both initial installation and updates. Each time you run it, it will download the latest versions of the BP3 console source files, the precompiled 'bp' console, the interface PHP files and the sample set contained in the 'ctests' folder. Data, grammars and scripts that you've created will not be deleted. However, if you have modified files in the 'ctests' folder, they will be reverted to the current distribution version.

👉 If you have installed "BolProcessor.app", you can ignore the rest of this page. Enjoy using the Bol Processor!

Geeks may prefer an equivalent method using a script included in this package, see below.

Install MAMP or XAMPP

👉  Using the standalone application "BolProcessor.app" does not require MAMP or XAMPP Apache servers. So you can skip this section.

The installer of the Bol Processor will first check that a local Apache server (either MAMP or XAMPP) has been installed. If no Apache server is available, it will install the standalone application "BolProcessor.app". Therefore, the first step in installing the Bol Processor using an Apache server is to install MAMP or XAMPP. Read this page for details.

For MAMP (and MAMP PRO), the "htdocs" folder is in Applications/MAMP. For XAMPP, it is in Applications/XAMPP/xamppfiles. The Bol Processor installer will find it in both cases.

To stop, start or restart MAMP Apache, use these Terminal commands:

/Applications/MAMP/Library/bin/apachectl stop
/Applications/MAMP/Library/bin/apachectl start
/Applications/MAMP/Library/bin/apachectl restart

To check whether MAMP Apache is running, use this Terminal command:

pgrep -fl '/Applications/MAMP/Library/bin/httpd'

To stop, start or restart XAMPP Apache, use these Terminal commands:

sudo /Applications/XAMPP/xamppfiles/xampp stopapache
sudo /Applications/XAMPP/xamppfiles/xampp startapache
sudo /Applications/XAMPP/xamppfiles/xampp restartapache

To check the status of XAMPP Apache, use this Terminal command:

/Applications/XAMPP/xamppfiles/xampp status

Install the Bol Processor

Run the installer "BolProcessorInstaller.pkg" — or the "install_bolprocessor.sh" script, as both are equivalent.

By default, all Bol Processor program, documentation and data files will be created in a folder called "bolprocessor" and will be contained in the "htdocs" folder created by XAMPP or MAMP, or inside the "BolProcessor.app" package. In the first case, on your startup disk. This is not a problem as the whole set does not take up much space, typically less than 60 Mb when installed, and the Bol Processor data is basically pure text.

However, you may wish to install the "bolprocessor" folder to a different location, including an external device. In this case, follow the instructions for Relocating "bolprocessor" before running the installer or the script.

Using the installer

Download "BolProcessorInstaller.pkg" from here and double-click it.

👉  If you have previously downloaded an older version of the installer, your browser may be pointing to the old version instead of the latest. It is safe to check the size of "BolProcessorInstaller.pkg" in your Downloads folder (read below the Security section). If necessary, use a different browser for the download.
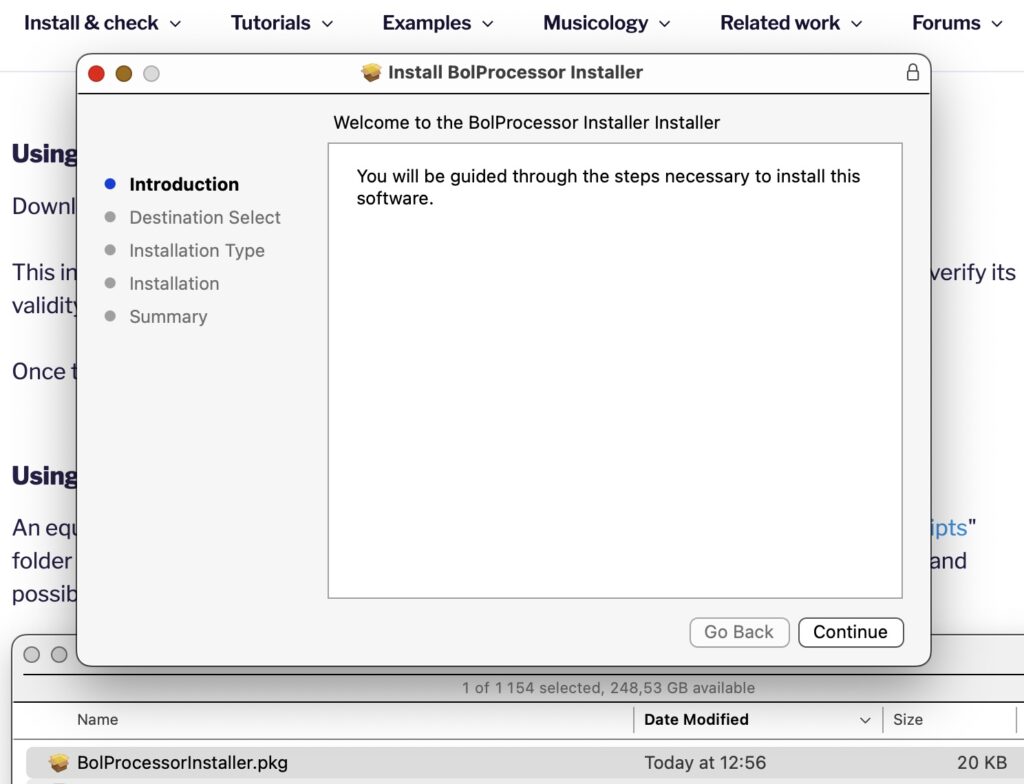
This installer has been notarized, which means it contains information that allows Apple to certify its validity. The only changes you will have to confirm are usual software installation procedures.

If you have chosen the option of the standalone application called "BolProcessor.app", the installation is now complete. You can proceed to install Csound if you need it. Otherwise, follow the guided tour on page Bol Processor ‘BP3’ and its PHP interface.

For geeks using XAMPP or MAMP: The installer sets up user/group parameters in the "bolprocessor" folder: "daemon:admin" if XAMPP is the Apache server. If MAMP is used, the "<user_id>:admin" setting is retained.

Once that's done, go down to the section Start the Bol Processor interface.

Using the script (geeks only!)

An equivalent method is to run the "install_bolprocessor.sh" script found in the "macos-scripts" folder downloaded here. This makes it possible to understand each step of the installation and possibly suggest improvements.

After downloading "macos-scripts.zip", open the Terminal and type:

cd Downloads
unzip -qo macos-scripts.zip
cd macos-scripts
sudo ./install_bolprocessor.sh

Installation issues

There are currently no known installation issues with the standalone "BolProcessor.app" application. A minor problem that we hope to resolve soon is that on rare occasions a page may need to be reloaded to display.

If the installer (or the script) does not find a "htdocs" folder created by XAMPP or MAMP, it will suggest installing the standalone "BolProcessor.app" application.

👉 The installer will create or feed a "bolprocessor" folder in the "htdocs" folder used by XAMPP or MAMP. If you have used XAMPP in the past and want to switch to MAMP, you will need to rename the "XAMPP" and "xamppfiles" folders before running the installer.

Start the Bol Processor interface

Assuming that the installation was successful, and the Apache server is running, start XAMPP or MAMP and type  localhost/bolprocessor/php/ in the address bar of your web browser, or (if it doesn't work) to localhost:8888/bolprocessor/php/.
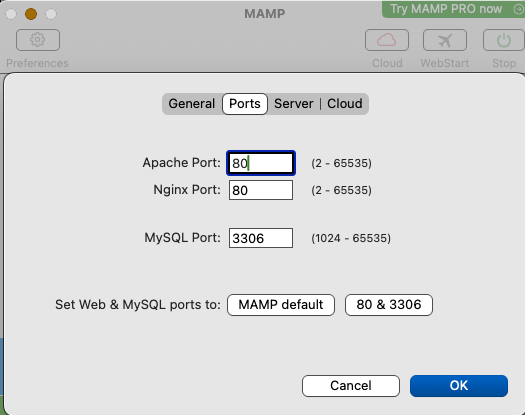
MAMP setting of the port

One of these will display the home page of the Bol Processor. The default port used by the free MAMP is "8888", but you can change it to "80" in MAMP settings (see picture), so that the ":8888" option is no longer required.

Compile the 'bp' console

The compiled 'bp' console is installed (or updated) by the install script. So, normally this step is no longer needed, except for geeks who wish to modify the source files in the "bolprocessor/source/BP3" folder.
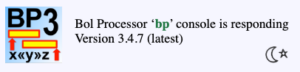
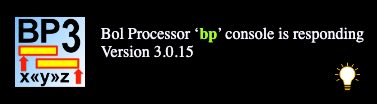
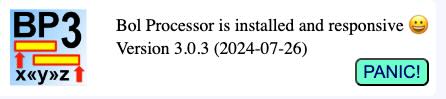
If you see this frame in the image at the top right of the page, the console is already compiled and running. Skip this section!

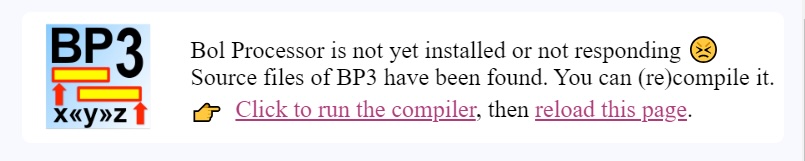
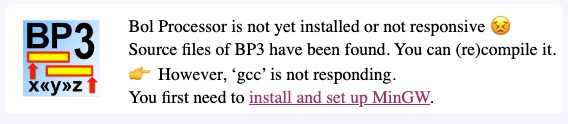
If you see this frame in the image at the top right of the page, your life will still be easy! All you have to do is click on the link to compile the console, which will take a minute or two.

It is very unlikely that the compilation will fail. If it ever happens, please contact us!
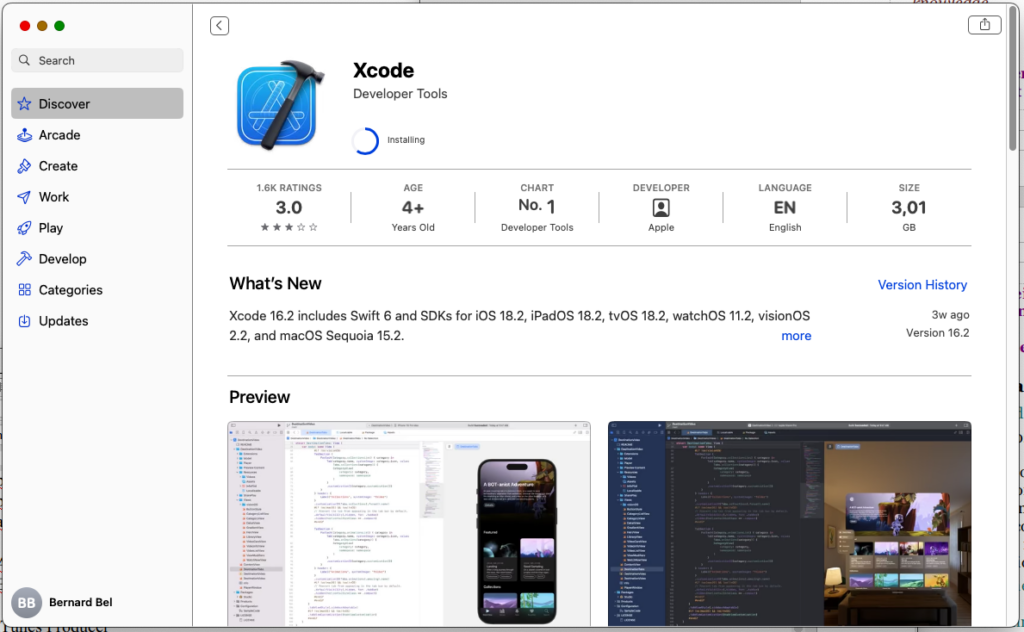
Installing Xcode via the Mac App store. No charge!

If you don't see the link to compile, and instead a mention that 'gcc' is not responding, you may need to install the Xcode toolkit on your machine (link to App Store).

Install and launch Xcode (free) to enable the compilation. Click "Cancel" when Xcode asks you to "create a project", go back to the Bol Processor page and reload it.

Now, you should see the compilation link.

👉  There are other methods of installing 'gcc'. Fans of Terminal commands can simply try the command:

brew install gcc

Install Csound

Csound is not required to run the Bol Processor, as you can work with MIDI files and real-time MIDI, including microtonal corrections. However, it will give you access to a different approach to sound synthesis.

Just download a pre-built installation of Csound from its download page. It enables real-time communication with Csound, as well as the conversion of Csound scores to sound files. It also handles microtonality in its own way.
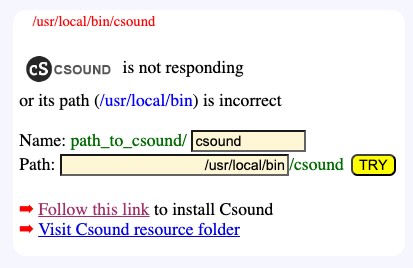
A frame asking for a correction of the path to Csound

The BP3 interface should be able to figure out the location of "csound" and fix its path accordingly. If it does not respond, you will be asked to change the path and perhaps the name of the Csound console (see image).

😀  Now, the Bol Processor is fully operational! You can try examples contained in the 'ctests' folder, or follow the guided tour on page Bol Processor ‘BP3’ and its PHP interface.

Updating to new versions

To update the Bol Processor console, its PHP interface and examples (the contents of the "ctests" folder), simply rerun "BolProcessorInstaller.pkg". Using the latest version is safe!

The installer will download and install current versions of the software and data.

Updating will not modify or delete any data you have created in the "ctests" folder or outside it. However, if you have modified a sample file without changing its name, it will be reverted to its distribution version.

The installer will also preserve the "_settings.php" file (if it exists), which contains your project settings.

For geeks only!

Geeks using the "BolProcessor.app" standalone application can modify its PHP interface, its C source code, and recompile it.

All files are in this location:

BolProcessor.app/Contents/Resources/www/

Obviously, if you run again the "BolProcessorInstaller.pkg" installer, these files will be replaced with the (latest) distribution.

Security

You are right to be concerned about security. Can you be sure that you have downloaded the correct (and latest) version of "BolProcessorInstaller.pkg"? Normally yes, this installer is safe because it has been notarized.

The size of the "BolProcessorInstaller.pkg" file is exactly 21651 bytes and its SHA-256 is
449ef74917bbba1132495fc1cfac7f26850c55608d5d786771f1b4a0f44a804a. You can calculate the SHA-256 checksum on this page. In the Finder, select the file and choose
File > Get Info to check its size. These numbers will indeed be subject to change with the release of new versions of the installer. Current version: 3 March 2025.

Please DO NOT SHARE THE INSTALLER, only its link: https://bolprocessor.org/misc/BolProcessorInstaller.pkg

Geeks may want to customise it for their own use. Just download this folder which contains the script files (install_bolprocessor.sh and postinstall) along with instructions on how the installer has been built.

For readers not conversant with Unix shell scripts, the following is a description of the process in human language:

Check that an Apache server MAMP or XAMPP is installed by finding either MAMP/htdocs or xampp/htdocs on the computer (not case-sensitive). If it is not found, install "BolProcessor.app" at the desired location.

Download the latest distribution files from GitHub:
https://github.com/bolprocessor/bolprocessor/archive/graphics-for-BP3.zip
https://github.com/bolprocessor/php-frontend/archive/master.zip
https://github.com/bolprocessor/bp3-ctests/archive/main.zip

Unzip these three files. They create folders with names:
bolprocessor-graphics-for-BP3
php-frontend-master
bp3-ctests-main

If MAMP or XAMP are used, create a folder named "bolprocessor" (if it does not yet exist) inside the "htdocs" folder of the Apache server. If "BolProcessor.app" is installed, the "bolprocessor" folder is replaced with "www" in the BolProcessor.app/Contents/Resources/ package.

Copy bolprocessor-graphics-for-BP3/source to bolprocessor/ (or www/).
If there is already a "source" folder, delete it

Copy bolprocessor-graphics-for-BP3/Makefile to bolprocessor/ (or www/)
Copy bolprocessor-graphics-for-BP3/BP3_help.txt to bolprocessor/ (or www/)
Copy bolprocessor-graphics-for-BP3/Credits.txt to bolprocessor/ (or www/)
Copy bolprocessor-graphics-for-BP3/BP3-To-Do.txt to bolprocessor/ (or www/)
Copy bolprocessor-graphics-for-BP3/License.txt to bolprocessor/ (or www/)
Copy bolprocessor-graphics-for-BP3/ReadMe.txt to bolprocessor/ (or www/)

Copy bolprocessor/php/_settings.php to bolprocessor/ (or www/) (if it exists)

Copy php-frontend-master/php to bolprocessor/ (or www/)
If there is already a "php" folder, delete it

Copy bolprocessor/_settings.php to bolprocessor/php/ (if it exists)

Create a folder bolprocessor/csound_resources if it does not yet exist

Copy the content of php-frontend-master/csound_resources to bolprocessor/csound_resources
Files that already exist should be replaced with their updated versions

Create a folder htdocs/bolprocessor/ctests if it does not yet exist

Copy the content of bp3-ctests-main to bolprocessor/ctests
Files that already exist should be replaced with their updated versions

Delete the temporary download directory

Set permissions of the bolprocessor folder recursively to "775", and owner/group to <your_id>:admin if MAMP is used, or daemon:admin if XAMPP is used.

➡ There is no security risk in setting "775" permissions, as the MAMP or XAMPP Apache server will be running on your private computer. The Bol Processor never creates/modifies files outside of its  "bolprocessor"  folder.

Delete bolprocessor/bp (or www/bp) if it exists and replace it with the current 'bp' console.

Relocating "bolprocessor"

👉  Apparently, relocated installations do not work with XAMPP after a reboot, unless the "BolProcessorInstaller.pkg" installer is run again.

If you are using the "BolProcessor.app" standalone application, just move it to the desired location, as it contains all data and settings.

The Bol Processor can also be installed outside the "htdocs" folder created by MAMP or XAMPP (on your boot drive). You might want it near related projects, or use extra space from an external hard drive. There may also be situations where creating files on the boot drive is restricted to the super admin.

Fortunately, the process of relocating is simple.

If you have already created a "bolprocessor" folder by running the installer, drag it to the desired location and delete it from the "htdocs" folder. If not, create an empty "bolprocessor" folder in the desired location.

Then, open the Terminal (in the Applications folder) and point it to the "htdocs" directory. For those unfamiliar with Unix commands, you will need to type "cd " (followed by a space) and drag the "htdocs" directory to the end of this command, then press "return". You can type the instruction "ls -al" to see the contents of "htdocs", which is normally empty.

Let's say you've created an empty folder "bolprocessor" inside a folder called "MUSIC" on an external drive called "EXT". The instruction creating the symbolic link is:

ln -s /Volumes/EXT/MUSIC/bolprocessor bolprocessor

Make sure that the symbolic link you created points to the correct location: you will now see a "bolprocessor" icon with a small arrow in the bottom left corner. Double-click it, it should open the destination folder.

👉 You may wonder why symbolic links are used instead of MacOS aliases, which do not require the use of the Terminal. The reason is that the Apache servers don't accept alias redirections.

You can now safely run the installer (or install script) and, if necessary, proceed to compile the 'bp' console. Make sure you use the latest version of the installer as it is designed to work with symbolic links.

👉 Never change the names of the "bolprocessor" folder and symbolic link, otherwise the installation will fail.

The first time you run the Bol Processor, MAMP or XAMPP may ask your permission to display files outside its "htdocs" folder. Please contact us if you're experiencing issues with this relocation!

If you're not afraid of symbolic links, you can use the same technique to relocate some data files outside the "bolprocessor" folder, for example to a location in your Dropbox (including shared folders), as explained here.

Uninstall the Bol Processor

Uninstalling the Bol Processor, and all the data downloaded or created for its use, is very simple: delete the "bolprocessor" folder, and the "bolprocessor" symbolic link if you have created it.

If you were using the "BolProcessor.app" standalone application, just delete it, as it contains all your data and settings.

Bernard Bel
Creation: August 2024

Quick install Windows


A one-click installer of Bol Processor BP3 is available. It is called "BolProcessorInstaller.exe" and it can be downloaded here (unique location).

This installer is used for both initial installation and updates. Each time you run it, it will download the latest version of the BP3 console, including its source files, the interface PHP files, and the sample set contained in the 'ctests' folder. Data, grammars and scripts that you've created will not be deleted. However, if you have modified files in the 'ctests' folder, they will be reverted to the distribution version.

This installation has been checked with Windows 10 running on an HP Intel Core i5-6200U(64-bit, 8 Gb RAM) and MAMP (free) running PHP 8.3.1. It should work fine with Windows 11, please check it and report!

👉   26 January 2025: The "BolProcessorInstaller.exe" installer has now been signed. It should no longer display a "malicious software" warning. However, before starting the installation, you may see a message saying that the creator is "unknown". This can be safely bypassed.
Contact us if it doesn't work on your computer!

First install MAMP or XAMPP

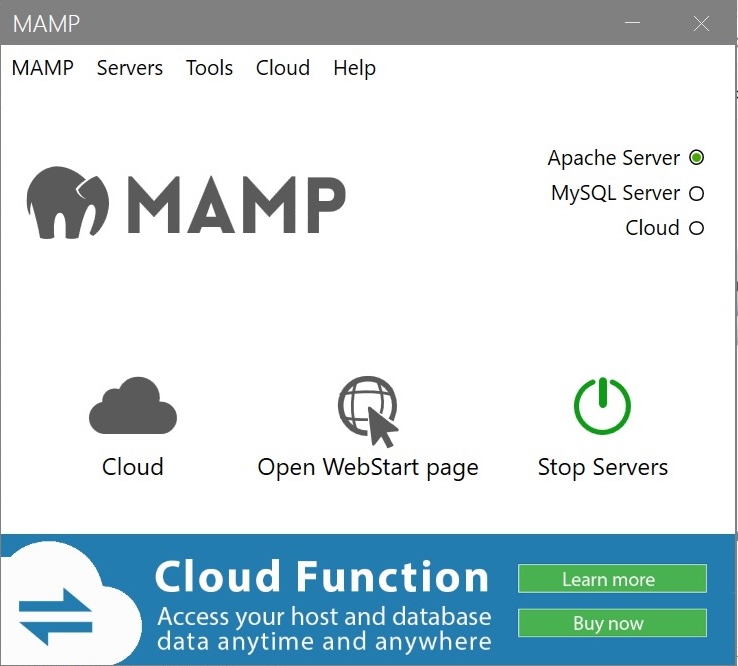
The (free) MAMP device running on Windows 10 (July 2024). Note that Apache Server is active. You can click "Open WebStart Page" to check that it is effective.

If you try to run the installer (see below), it will first check that a local Apache server (MAMP or XAMPP) has been installed. Both are suitable since the Bol Processor interface contains exclusively HTML, PHP and JavaScript code. No database is required.

if you choose the (free) MAMP version, both MAMP and MAMP PRO will be installed, and the interface will occasionally invite you to "upgrade" to MAMP PRO. But you don't need it for the Bol Processor!

For MAMP on Windows, the "htdocs" folder is in "C:\MAMP".
For XAMPP on Windows, the "htdocs" folder is in "C:\xampp\htdocs".

If you want Apache to start automatically when you start your computer, this process is easy with MAMP, but a bit more complex with XAMPP: try this method.

Run the 'bp.exe' console

After installing MAMP or XAMPP, run the installer "BolProcessorInstaller.exe" downloaded here.

👉 The installer creates a "bolprocessor" folder in the "htdocs" folder used by MAMP or XAMPP. Make sure that there is only one such folder on your machine, notably if you tried both MAMP and XAMPP in the past. It is safe to rename any unused "htdocs" folder before running the installer.

If you plan to install the "bolprocessor" folder outside the "htdocs" folder, follow the instructions in Relocating "bolprocessor" before running the installer.

If you get a warning that "BolProcessorInstaller.exe" is from an "unknown source", click on the option to ignore it. If you don't feel confident about doing this, please read the section on Security below.

All steps of the installation are displayed to ensure that they are successful. At the end you'll be asked to press a key.

Now start MAMP or XAMPP. There is an Open WebStart Page button on MAMP (free) which will display a page confirming that the Apache server is running. Probably you will find a Go to Application button on XAMPP manager.

You will need to use a web browser to run the Bol Processor in its MAMP or XAMPP environment. Not all browsers are the same on Windows! We have noticed that the Wave Browser can sometimes become very slow. Try using Microsoft Edge instead.

Point your browser at localhost/bolprocessor/php/. This will display the home page of Bol Processor BP3. Otherwise, check that MAMP or XAMPP is set to use port #80 by following MAMP > Preferences > Ports.

If you see this image at the top right of the page, the console is ready. The version number you see is indeed higher. Click on the lamp if you prefer to use the light mode for the interface.

You can ignore the next section. 😀

Compile the 'bp.exe' console (if necessary)

The Windows installation of Bol Processor includes the pre-compiled console (named 'bp.exe' ). If, for some reason, the console is not responding, or if you modified its source code (in the source/BP3 directory), you may need to recompile it.

If you see this image at the top right of the page, your life will be easy!

All you have to do is click on the link to compile the console, which will take a minute or two.

If the frame says that 'gcc' is not responding (see picture) you need to install MinGW. This is the main drawback of Windows: its default installation does not handle 'gcc' (the standard C compiler). You need 'gcc' to compile the Bol Processor console, and perhaps other applications to come. So, install MinGW, carefully following instructions on this page. It is simple, but you shouldn't miss a step!

Once 'gcc' is responding, reload the Bol Processor home page and click on the link to compile the console.

Install Csound

Csound is not required to run the Bol Processor, as you can work with MIDI files and real-time MIDI. However, it provides access to a highly productive approach to sound synthesis. Its installation enables real-time communication with Csound, as well as the conversion of Csound scores to sound files. Csound also handles microtonality in its own way.

Just download a pre-built installation of Csound from its official download page. Then click the downloaded 'zip' file and the installer. Tell your machine that you trust the manufacturer because you may see multiple warning messages against the installation…

The BP3 interface will be able to figure out the location of "csound.exe" and fix its path accordingly.

😀  Now, the Bol Processor is fully operational!

You can try examples contained in the "ctests" folder, or follow a guided tour on the page Start with Bol Processor.

Updating to new versions

To update the Bol Processor console, its PHP interface and examples (the contents of the "ctests" folder), simply rerun the installer. It will download and install the latest versions of the software and data. It will also delete and replace the precompiled "bp.exe" console.

The installer will not modify or delete any data you have created in the "ctests" folder or outside it. However, if you have modified a sample file without changing its name, it will be reverted to its distribution version.

The installer will also preserve the "_settings.php" file (if it exists), which contains your project settings.

Security

You are right to be concerned about security. Can you be sure that you have downloaded the correct version of "BolProcessorInstaller.exe"? As this executable is certified, there is no known risk of malicious modification.

The size of this file is exactly 1811159 bytes and its SHA-256 is
f7b3e203bd3098c7474455c1c0bbb200f01dd86ce9ad07f0937dcca4183652ec. You can calculate the SHA-256 on this site, or running the PowerShell command:

CertUtil -hashfile BolProcessorInstaller.exe SHA256

These numbers will indeed be subject to change with the release of new versions of the installer. The current version is dated 14 July 2025.

👉  Please DO NOT SHARE THE INSTALLER, only its link: https://bolprocessor.org/misc/BolProcessorInstaller.exe

You may also want to know all the details of how it works. Geeks may want to customise it for their own use. Just download this folder which contains the source files (installer.ps1 and setup.iss) along with a summary of how to build the installer.

For readers not conversant with Windows PowerShell, the following is a description of the process in human language:

Check that an Apache server MAMP or XAMPP is installed by finding either MAMP\htdocs or xampp\htdocs on the computer (not case-sensitive). If it is not found, exit with the warning that either MAMP or XAMPP should be installed.

Download the latest distribution files from GitHub:
https://github.com/bolprocessor/bolprocessor/archive/graphics-for-BP3.zip
https://github.com/bolprocessor/php-frontend/archive/master.zip
https://github.com/bolprocessor/bp3-ctests/archive/main.zip

Unzip these three files. They create folders with names:
bolprocessor-graphics-for-BP3
php-frontend-master
bp3-ctests-main

Create a folder named "bolprocessor" (if it does not yet exist) inside the "htdocs" folder of the Apache server

Copy bolprocessor-graphics-for-BP3/source to htdocs/bolprocessor/
If there is already a "source" folder, delete it

Copy bolprocessor-graphics-for-BP3/Makefile to htdocs/bolprocessor/
Copy bolprocessor-graphics-for-BP3/BP2_help.txt to htdocs/bolprocessor/
Copy bolprocessor-graphics-for-BP3/Credits.txt to htdocs/bolprocessor/
Copy bolprocessor-graphics-for-BP3/BP3-To-Do.txt to htdocs/bolprocessor/
Copy bolprocessor-graphics-for-BP3/License.txt to htdocs/bolprocessor/
Copy bolprocessor-graphics-for-BP3/ReadMe.txt to htdocs/bolprocessor/

Copy bolprocessor/php/_settings.php to bolprocessor/ (if it exists)

Copy php-frontend-master/php to htdocs/bolprocessor/
If there is already a "php" folder, delete it

Copy bolprocessor/_settings.php to bolprocessor/php/ (if it exists)

Create a folder htdocs/bolprocessor/csound_resources if it does not yet exist

Copy the content of php-frontend-master/csound_resources to htdocs/bolprocessor/csound_resources
Files that already exist should be replaced with their updated versions

Create a folder htdocs/bolprocessor/ctests if it does not yet exist

Copy the content of bp3-ctests-main to htdocs/bolprocessor/ctests
Files that already exist should be replaced with their updated versions

Delete the temporary download directory

Replace htdocs/bolprocessor/bp.exe with the updated version.

Relocating "bolprocessor"

The Bol Processor can be installed outside the "htdocs" folder created by MAMP or XAMPP (on your boot drive). You might want it near related projects, or use extra space from an external hard drive. There may also be situations where creating files on the boot drive is restricted.

Fortunately, the process of relocating is very simple.

If you have already created a "bolprocessor" folder by running the installer, copy it to the desired location and delete it from the "htdocs" folder. If not, create an empty "bolprocessor" folder in the desired location.

Let's say you've created an empty folder called "bolprocessor" inside a folder called "MUSIC" on an external drive labelled "D", and MAMP is installed on drive "C". Right-click the start icon at the bottom left of the screen, and select Windows PowerShell (admin) — also called Terminal (Admin) on Windows 11. Then type the following command to create a symbolic link — in fact a junction (/J instead of /D):

cmd /c mklink /J "C:\MAMP\htdocs\bolprocessor" "D:\MUSIC\bolprocessor"

If you are using XAMPP, replace "\MAMP\" with "\xampp\".

Make sure that the symbolic link you created points to the correct location: you will now see a "bolprocessor" icon in the "htdocs" folder. Double-click it, it should open the destination folder.

You can now safely run the installer. Updates to new versions will be the same way.

Make sure you use the latest version of the installer, as it is designed to work with symbolic links.

👉 Never change the names of the "bolprocessor" folder and symbolic link, otherwise the installation will fail.

The first time you run the Bol Processor, MAMP or XAMPP may ask your permission to display files outside its "htdocs" folder. Please contact us if you're experiencing issues with this relocation!

You can use the same technique to relocate some data files outside the "bolprocessor" folder, for example to a location shared by Dropbox.

You can also use symbolic links to relocate folders outside the "bolprocessor" folder, as explained here.

Uninstall the Bol Processor

Uninstalling the Bol Processor and all the data downloaded or created for its use, is very simple: delete the "bolprocessor" folder and the "htdocs\bolprocessor" symbolic link, if you have created one.

Bernard Bel
Created: August 2024
XAMPP startup

👉  For the users of Linux

If you need to start XAMPP automatically after a reboot, here's a basic way to do it using systemd, which is the init system for most Linux distributions:

1) Create a systemd service file

Open a text editor to create a new file, for example:

sudo nano /etc/systemd/system/xampp.service

Add the following content to the file:

[Unit]
Description=XAMPP Control Panel
After=network.target

[Service]
Type=forking
ExecStart=/opt/lampp/lampp start
ExecStop=/opt/lampp/lampp stop
ExecReload=/opt/lampp/lampp reload
RemainAfterExit=yes

[Install]
WantedBy=multi-user.target

Save and close the file (Ctrl+X, then Y to confirm, and Enter to save).

2) Enable the new service

Reload the systemd manager configuration:

sudo systemctl daemon-reload

Enable the XAMPP service to start at boot:

sudo systemctl enable xampp

3) You can now start XAMPP using:

sudo systemctl start xampp

Real-time MIDI


In May 2024, the Bol Processor BP3 acquired the ability to manage the input and output of MIDI events. This allows it to "communicate" in real time with external MIDI devices (keyboards, synthesizers) and even with other instances of BP3 running on the same machine.

For geeks and programmers: This feature had already been implemented in the earlier (MacOS only) version called 'BP2'. However, the implementation in a C language 'console' to work in MacOS, Linux and Windows environments was more technical. In addition, the concept of "real time" in the current MIDI setup is different from the previous one using Opcode Music System.

The following examples will work the same in MacOS, Windows and Linux. They have been tested on a recent PowerBook running MacOS (Sonoma) with 16 Gb RAM, and an HP Intel Core computer with 8 Gb RAM running Windows 10 (64-bit) and LinuxLite 7.0 (in Ubuntu). Memory size can become critical if many MIDI devices or virtual ports are connected. 

Using microtonal scales is now possible in real-time MIDI. Read the Check MIDI microtonality page for details.

Setting up the MIDI environment

Let us assume that you have successfully downloaded, installed and compiled the Bol processor BP3, as described on the page Bol Processor ‘BP3’ and its PHP interface.

In Bol Processor jargon, a 'project' is either a grammar (with a '-gr' prefix) or a set of data (with a '-da' prefix). So, create or load a simple project, e.g. "-da.acceleration" which can be found in the "ctests" folder (download it here).

An output

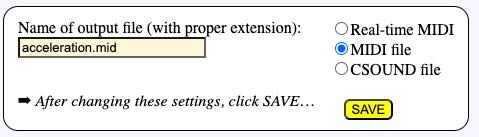
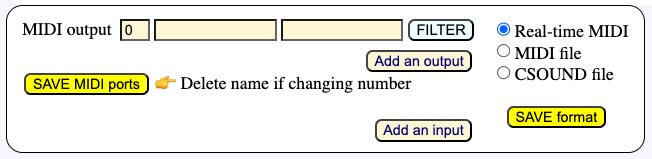
By default, a project is set up to create MIDI files, as shown on the selector (see picture). Make sure your project is working! Then select Real-time MIDI and click SAVE format.

The selector will now display a different image, as shown below:

By default, the MIDI output used for sending events is numbered '0' — and the MIDI input used for receiving events will be numbered '1'. This is a common situation. In MacOS and Windows, these numbers are taken as 'ports'. In Linux they are considered as 'clients', each 'client' having its own 'ports', so certainly numbers '0' and '1' won't work… Never mind this issue, BP3 will take care of it when scanning real or virtual devices and trying to connect. Read more below.

We cannot rely on "port numbers" alone because they change when we turn on and off MIDI devices connected to the computer. In Linux, the client number is more specific to a MIDI device. In fact, the only reliable identification is its name, which is empty by default: the next field at the right of the input/output number.

Let us check the MIDI output. Windows does this automatically. The good news is that Windows 10 (and presumably later versions) comes with a built-in MIDI device called Microsoft GS Wavetable Synth. The Bol Processor will automatically detect it and connect to it if no other device is connected to the system.

Linux also connects, by default, the output to a virtual device whose client number is '0', but it won't produce any sound in the basic installation of Ubuntu. So, to try real-time MIDI on Linux, you need to connect an external MIDI device via its USB/MIDI interface, or to install a software synthesizer. Read more below.

Clicking Add an input will create fields for you to select an input device. We'll use this later.

To connect external MIDI input/output devices to Windows, you may need to install an environment similar to IAC on MacOS. Read details below. However, most tests shown on this page can be performed on Windows without any additional installation.

The following paragraphs are for MacOS users. Windows and Linux users can happily jump to the next section.

Turn on a MIDI device (synthesizer, piano, etc.) connected to the computer. On my personal Mac, I usually use the Pianoteq synthesiser, which produces a physical model synthesis of various keyboard instruments. It communicates with BP3 via a device called the Inter-Application Communication (IAC) architecture — read this if you need details.

The IAC driver is installed by default on recent MacOS systems. (It is a part of the CoreMIDI framework provided by Apple.) It allows you to create virtual MIDI ports that enable MIDI applications to communicate internally within the same machine. Equivalent devices exist in the Linux and Windows environments, see below.

The IAC also communicates with external MIDI devices via the USB ports, BlueTooth and possibly more network protocols. We'll try it later.

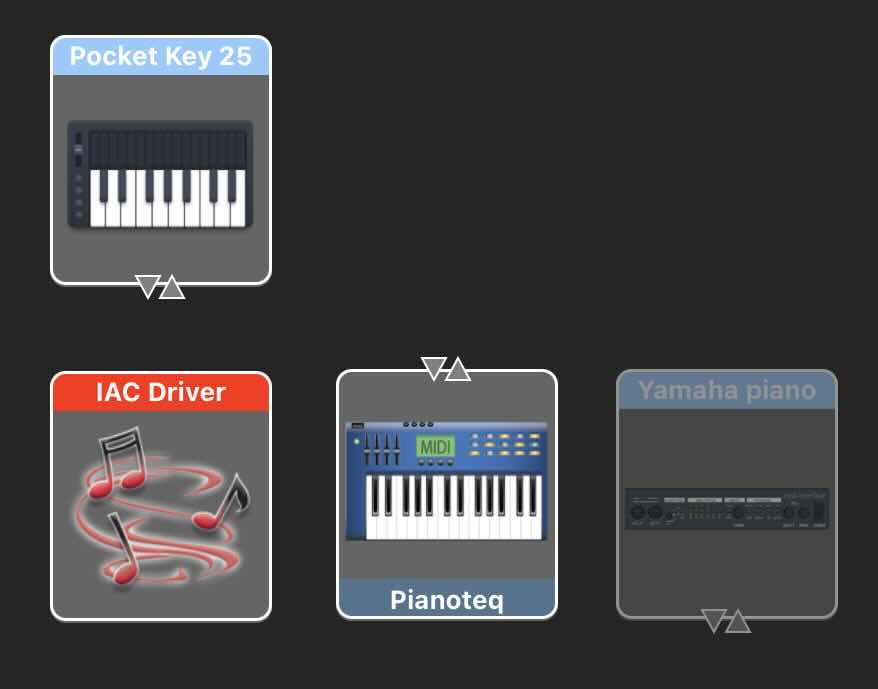
To set up the IAC, run the Audio MIDI Setup application (in the Utilities folder). Ask it to show "MIDI Studio". On my personal computer, it looks like this: the IAC driver, the Pianoteq synthesiser, a Pocket Key 15 keyboard connected to a USB port, and a Yamaha piano connected by standard MIDI cables and a USB MIDI interface. The Yamaha piano appears grey because it is switched off.

On active MIDI devices you will see triangles indicating input/output ports. These are used to connect devices directly by drawing a 'cable' to connect them. We don't need to use these 'connectors' as BP3 communicates via the IAC MIDI ports.

Check output options

(MacOS, Linux and Windows)

The easiest way to proceed now is to run any project in the Real-time MIDI mode, and see if sounds are produced… Whatever the result, at the end of the (potentially silent) performance, you will see a Show all … messages button along with a blinking red signal "=> 1 warning". Click on the button to read detailed explanations of the failure (or success):

🎹 Setting up MIDI system
MIDI output = 0: “Bus 1” 👉 the number of your choice

MIDI settings saved to ../temp_bolprocessor/trace_974dd9ab22_-gr.tryTimePatterns_midiport
🎹 Name(s) of MIDI input or/and output changed and will be updated when saving the page of your project

(For MacOS users)

This all makes sense given the Audio MIDI Setup shown above. The Bol Processor scanned all output (and input) MIDI ports. Given port '0' as an output by default, it assigned it to "Bus 1" which the 'port' set up in IAC.

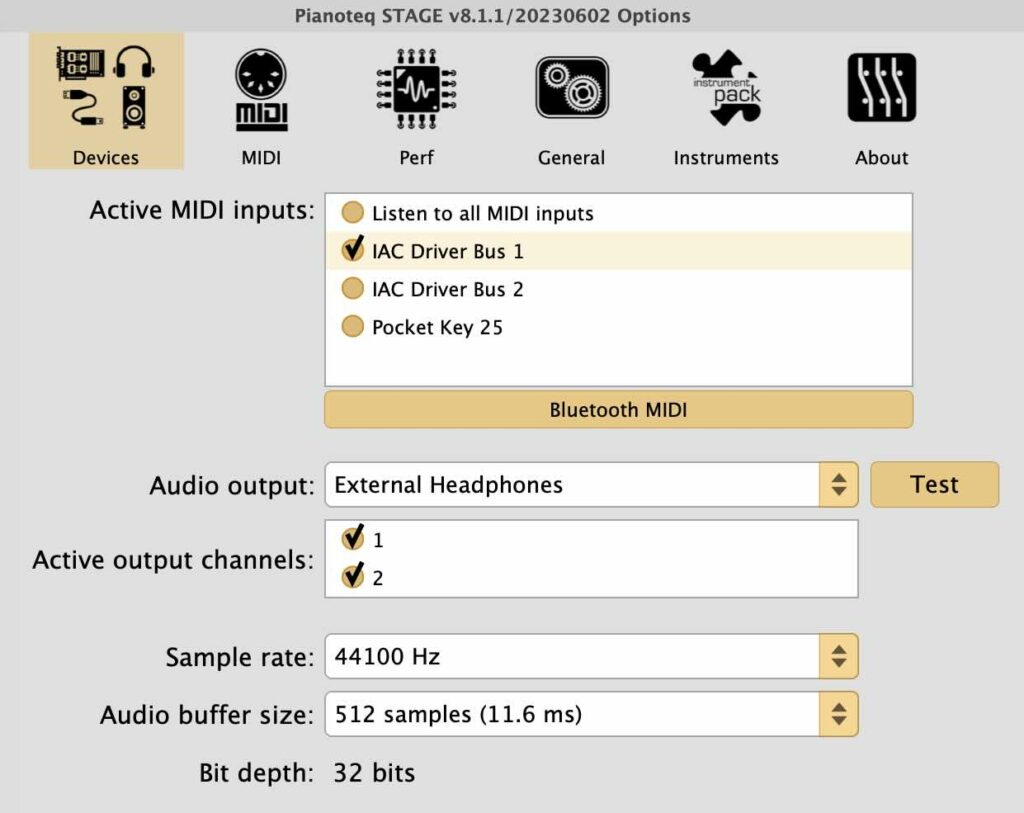
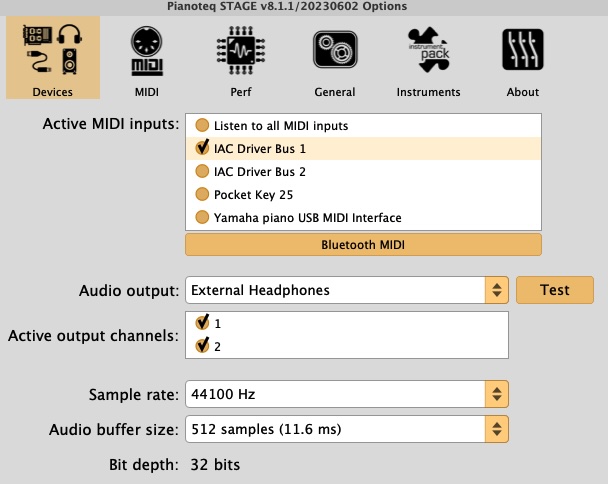
If your synthesiser happens to be connected to "Bus 1", you will hear sounds and the problem is solved. Let us suppose that you are running Pianoteq and hear nothing. Open the settings of Pianoteq and select "Devices". All you have to do is check "IAC Driver Bus 1". You might also check other inputs, including Pocket Key 25 if you want to connect your small keyboard directly to Pianoteq, but these are extra procedures.

Opening Pianoteq settings informed us that it is communicating with IAC, and it suggested to use a IAC 'Bus' for this communication. The 'Bus 1' port is technically called a virtual port.

Screenshot

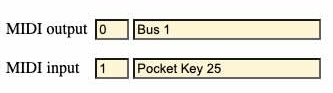
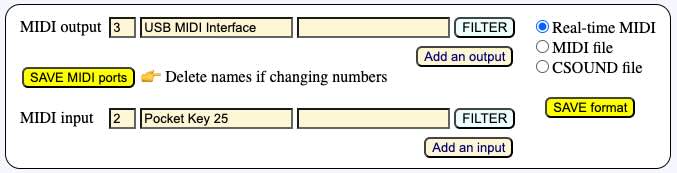
All you need to do to ensure that the connection remains correct when more devices are switched on/off and MIDI port numbers change. The only reliable way is to write the name "Bus 1" as the MIDI output. You can also write "Pocket Key 25" (or whatever is detected as your input MIDI device) to the MIDI input, as we will use it later. Note that MIDI port numbers are now irrelevant, as names take precedence. BP3 will correct them automatically.

Click the SAVE MIDI ports button to store this setting. Clicking on the SAVE format does the same thing, so don't worry about confusing buttons!

To the right of the MIDI port name is an empty field where you can enter a comment. For example, write "Pianoteq synth" to the right of "Bus 1".

Let us now switch on a Yamaha piano which is connected via a USB MIDI interface. The interface I use has a green light that indicates it has power. If the piano is actually communicating with it, we should see a flashing red light. In MacOS, sometimes it is necessary to restart the computer after switching on the piano… But in Windows and Linux the red light flashes immediately.

As soon as the red light flashes, open the Pianoteq settings. Great! We can now see that the Yamaha piano is recognised and connected to the IAC.

The easiest way to connect the Yamaha piano to BP3 is to click PLAY. Whatever happens, we'll get a warning and see the following diagnosis:

🎹 Your real-time MIDI settings:
MIDI output = 0: “Bus 1” -
MIDI input = 1: “new input” -

🎹 Setting up MacOS MIDI system
MIDI output = 0: “Bus 1” 👉 the name of your choice
Trying to assign ports to 1 input(s) without names but possibly with numbers
MIDI input = 1: “Bus 2” 👉 the number of your choice
MIDI input 1 makes BP3 interactive

🎶 More MIDI output options are available:
MIDI output = 1: “Bus 2”
MIDI output = 2: “Pocket Key 25”
MIDI output = 3: “USB MIDI Interface”

🎶 More MIDI input options are available:
MIDI input = 0: “Bus 1”
MIDI input = 2: “Pocket Key 25”
MIDI input = 3: “USB MIDI Interface”

MIDI settings saved to ../temp_bolprocessor/trace_974dd9ab22_-gr.tryTimePatterns_midiport
🎹 Name(s) of MIDI input or/and output changed and will be updated when saving the page of your project

The MIDI input identified as "Pocket Key 25" is correctly connecting to port '2'. But the Yamaha piano is identified as "USB MIDI Interface". This is the name we need to copy to the MIDI output, then SAVE MIDI ports and PLAY. Another option is to leave the name empty and enter the MIDI output number '3'.

We hear the output on the Yamaha piano, although port numbers were incorrect on the interface. The inconsistency is resolved by the MIDI driver selecting ports by name in order of priority. Port numbers (and names) are updated as soon as you save or reload the project (data or grammar). Then you get:

Why does the name "Yamaha piano" appear in Pianoteq settings, but not in the MIDI ports scanned by BP3? This is a mystery that expert users of a MIDI studio could probably solve… For the time being, just write "Yamaha piano" in the comment field at the right of "USB MIDI interface". 

The Pause and Continue buttons

During real-time playback, Pause and Continue buttons are displayed. These are self-explanatory. Clicking the Continue button will resume the performance with the exact timing.

These buttons affect all instances of BP3 that are playing together, if any (see below).

The _part() command

It is possible to send parts of a Bol Processor score to separate outputs. Parts are identified by the "_part(x)" command in which 'x' is an integer in range 1..30. We will be able to handle more than 30 parts if it turns out to be necessary.

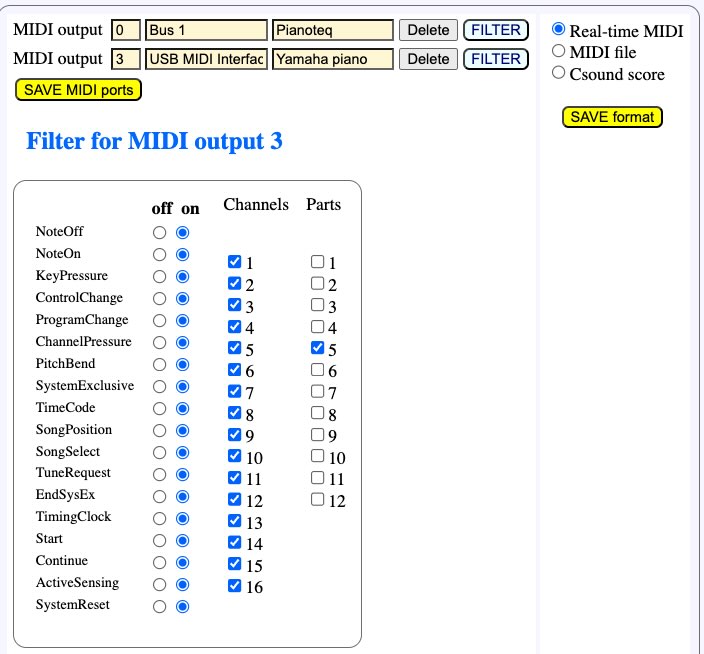
The "_part(x)" command directs MIDI messages to a specific MIDI output, which in most cases will be an instrument. The image on the side shows the mapping of port #3 (USB MIDI interface) to part #2, as set up in its filter.

By default, MIDI outputs "hear" all 30 parts, but here we've restricted this one to part #2.

For MIDI port #0 (Bus 1) we've restricted the output to part #5.

Let us play the following score:

C3 D3

This sequence of notes is heard on both instruments. As there is no "_part()" command in the score, all outputs send the MIDI messages.

Now let us try:

G2 _part(5) C3 _part(2) D3

Note G2 is heard on both instruments. But, as expected, the note C3 is heard on Bus 1 and D3 is heard on the USB MIDI interface.

The "_part()" command has exactly the same syntactic behaviour as "_chan()" and "_ins()". For example, it "follows" the score along the fields of polymetric structures:

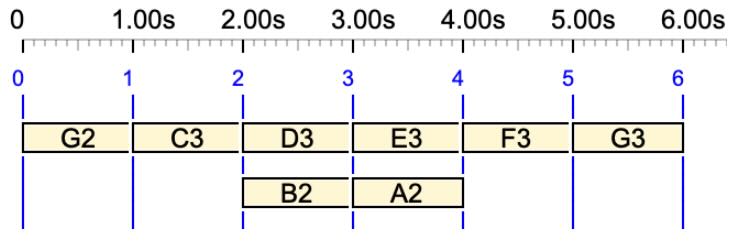
G2 _part(5) C3 {D3 E3, _part(2) B2 _part(5) A2} F3 _part(2) G3

In this example, G2 is heard on both instruments. Then C3 is sent to Bus 1, as well as D3 and E3, since they are the first field of the polymetric structure. In the same time, B2 is sent to the USB MIDI interface, then A2 to Bus1. At the output of the polymetric structure, F3 is sent to Bus 1 which was the mapping before the structure. At last, G3 is sent to the USB MIDI interface.

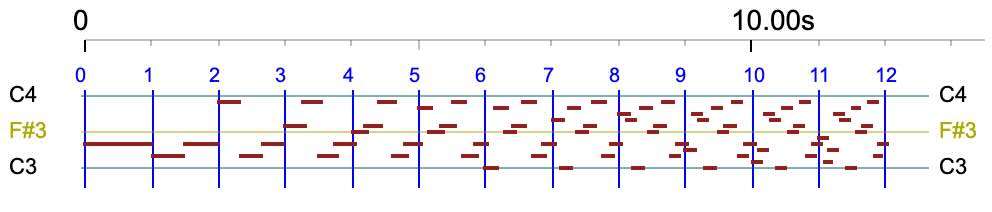
The sound-object graph shows that D3 and B2 are played together, although on different instruments, and E3 and A2 are played together on the instrument connected to Bus 1.

Parts are mostly relevant when importing digitised scores. They are used to declare instruments in MusicXML files. When importing a score, the Bol Processor will optionally place "_part()" or "_chan()" commands in the imported score, so that it can be played on the same set of digital instruments.

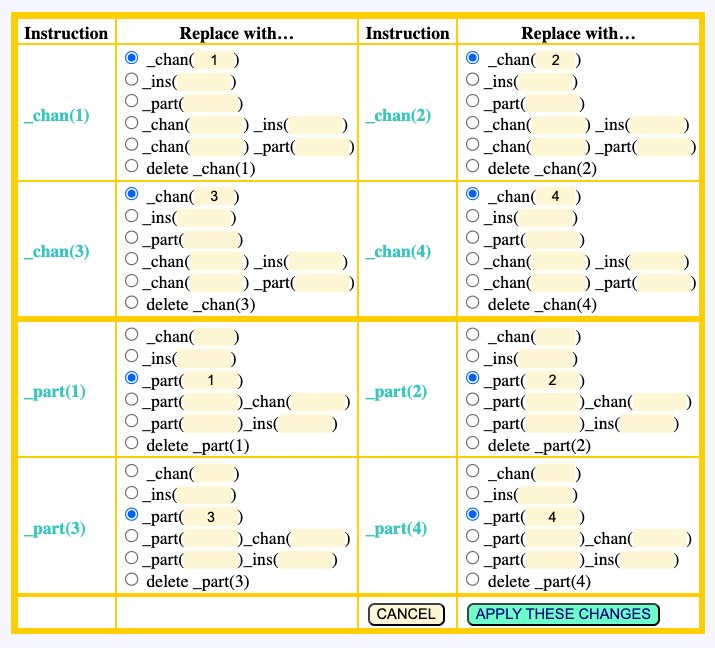
Using "_part()" is a better option than "_chan()" to name an instrument, because MIDI channels can be modified to handle microtonal adjustments. On the Data page, there is a MANAGE _chan(), _ins(), _part() button that opens a dialog for converting parts to/from channels, parts to/from instruments, etc.

An input

Setting up an input follows exactly the same protocol as setting up the output. For example, we can set up the input on "Pocket Key 25” as shown above. “USB MIDI Interface” (the Yamaha piano) is another possible choice. Let us continue with Pocket Key 25.

Windows users can simply plug their external MIDI keyboard (e.g. "Pocket Key 25”) to a USB port of their computer, as it will be automatically recognised and set up by the system.

Connecting an input to BP3 is of little interest if BP3 does nothing with input events. The instructions it can handle are listed in the section List of scripts for dealing with real-time MIDI below. "Wait for note…" means that BP3 will stop playing until it receives a NoteOn of the note in question — even with velocity zero.

Let us program this on a Data page for example:

_script(Iwait for C3 channel 1) _transpose(12) _vel(60) E2 • D2 E2 • _vel(65) B2 D2 E2 • G2 B2 D2 E2 • _vel(70) F#2 G2 B2 D2 E2 • Bb2 F#2 G2 B2 D2 E2 • _vel(75) C2 Bb2 F#2 G2 B2 D2 E2 • _vel(77) G#2 C2 Bb2 F#2 G2 B2 D2 E2 • _vel(80) A2 G#2 C2 Bb2 F#2 G2 B2 D2 E2 • _vel(85) Eb2 A2 G#2 C2 Bb2 F#2 G2 B2 D2 E2 • _vel(87) C#2 Eb2 A2 G#2 C2 Bb2 F#2 G2 B2 D2 E2 • _vel(90) F2 C#2 Eb2 A2 G#2 C2 Bb2 F#2 G2 B2 D2 E2

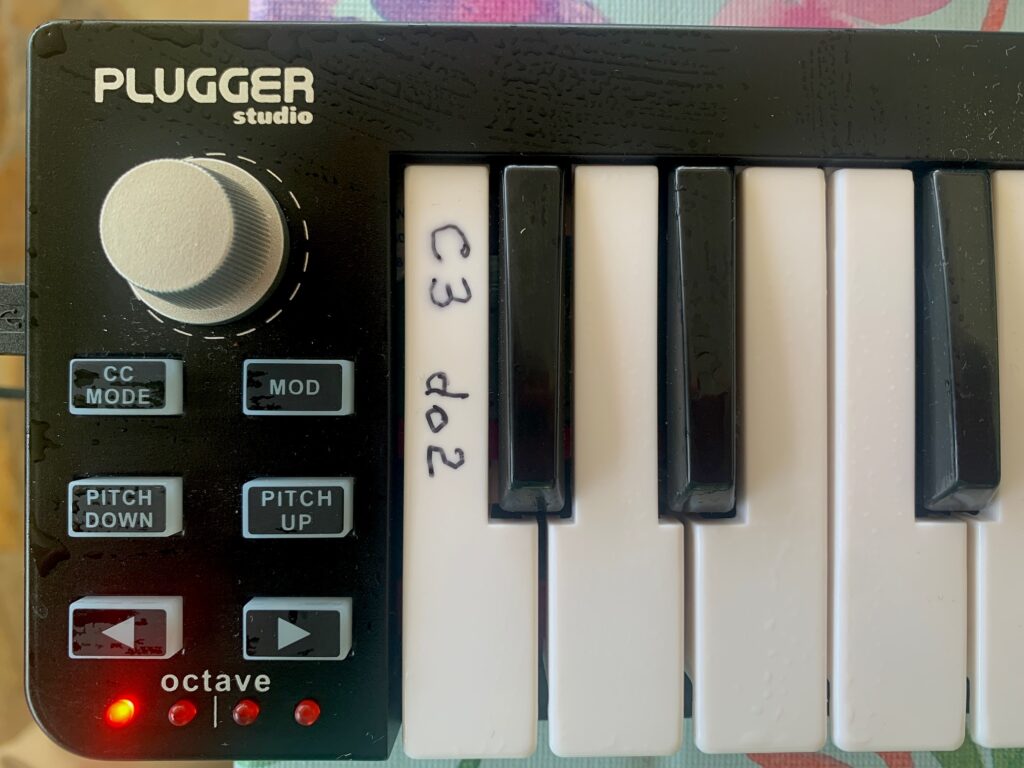
The script command tells that the performance should start when note C3 is received on MIDI channel 1. To avoid any confusion about octave numbers, I have written the name on the lowest key of my Pocket Key 25 (see photo). This confusion is made worse by the fact that the Italian/Spanish/French convention uses lower octave numbers!

So, the labelled key is the one we need to press to start this show. Let's try it…

When the PLAY button is clicked on the Data page, a flashing STOP button is displayed. The machine would wait forever unless the correct MIDI event has been received. The STOP button — or the PANIC button at the top right — can be used to abort the process cleanly. If all goes well, pressing the C3 key should produce this sound:

Harm Visser's '-da.acceleration' example
Notice that the _transpose(12) instruction plays notes one octave higher!

(This little "acceleration" piece was composed by Harm Visser to illustrate the period notation. Read his tutorial.)

Multiple interruptions are of course possible. Try this:

_script(wait for C3 channel 1) _transpose(12) _vel(60) E2 • D2 E2 • _vel(65) B2 D2 E2 • G2 B2 D2 E2 _script(wait for C4 channel 1) • _vel(70) F#2 G2 B2 D2 E2 • Bb2 F#2 G2 B2 D2 E2 • _vel(75) C2 Bb2 F#2 G2 B2 D2 E2 • _vel(77) G#2 C2 Bb2 F#2 G2 B2 D2 E2 • _vel(80) A2 G#2 C2 Bb2 F#2 G2 B2 D2 E2 • _vel(85) Eb2 A2 G#2 C2 Bb2 F#2 G2 B2 D2 E2 • _vel(87) C#2 Eb2 A2 G#2 C2 Bb2 F#2 G2 B2 D2 E2 • _vel(90) F2 C#2 Eb2 A2 G#2 C2 Bb2 F#2 G2 B2 D2 E2

Now the machine will start its performance after receiving a NoteOn of C3. It will then stop after three beats and wait for a NoteOn of C4. A noteworthy detail is that one second after an interruption, AllNotesOff is sent to all MIDI channels and the pedals are set to off. This prevents notes waiting for their NoteOff from being heard. This "All Notes Off" feature can be turned off in the preferences file.

MIDI input filters

Let us play with the continuous improvisation "Mozart’s musical dice game" (called "-gr.Mozart" in the "ctests" folder). If this project is set for real-time MIDI, the improvisation will not stop until we click on the STOP or PANIC button. Inserting a "wait for note…" at the beginning would of course stop the performance at the beginning of every variation. Beware that you will have to write "do2" instead of "C3" due to the note convention!

But let's try something else, using the external keyboard (the Pocket Key 25 or Yamaha piano) to play notes on top of the performance. How strange! We don't hear any notes played on the external keyboard unless it's connected directly to the output device.

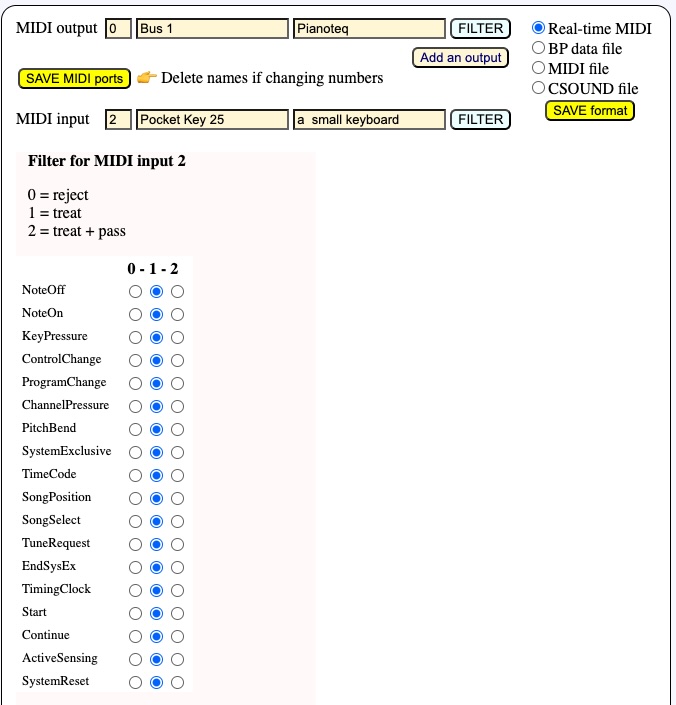
The reason for this becomes clear after clicking on the FILTER button for MIDI input 2:

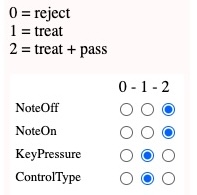
All types of MIDI events are listed along with how they are processed by BP3. Here we are only interested in NoteOn/NoteOff events. The default setting is '1', which means that they can trigger script commands, but are not forwarded to the MIDI output. This is why 'C3/do2' was able to start the performance, although we could not hear it.

To play notes over the performance, we need to set the status of NoteOn and NoteOff to '2'. Note: If we only set the NoteOn status, BP3 will automatically set the NoteOff status to avoid confusion. Once you have changed the settings, click SAVE MIDI ports, then PRODUCE ITEM(S).

Since the Pocket Key 25 keyboard sends only NoteOn/Noteoff messages, we could as well set other event filters (KeyPressure, etc.) to '0'.

These filter settings are stored, together with the MIDI port names or numbers, in a temporary file whose name depends on both the session number (created by your browser) and the project name. A copy of these settings is stored in the (permanent) folder "midi_resources". This storage makes it possible to launch several instances of BP3 on the same browser or on different browsers, as we will now see.

Continue reading: Interactions in MIDI and Csound.

Install MinGW

👉   An earlier version of this page recommended w64devkit. This was a wrong choice, as its downloadable files are signalled with viruses or malicious code.

Look at the warning displayed at the top right of any page of the Bol Processor. In the Windows environment you can read:

Top right warning in Windows environment indicating that a 'gcc' installation is required.

The installation of MinGW will allow "gcc" to run on a Windows machine. This may not be necessary if it has already been installed by another application. In this case, there will be no such warning at the top right of Bol Processor pages:

Clicking on the "run the compiler" link will create the "bp.exe" console. After reloading the page you are ready to use BP3:

👉  The PANIC button is used to get silence when you are running more than one instance of BP3.

Download MinGW-w64:

Install MinGW-w64:

  • Open the MinGW file with 7-Zip, telling it to extract files and store them to a folder, by default "x86_64-13.2.0-release-win32-seh-ucrt-rt_v11-rev0" in your Downloads folder.
  • Save the path to this folder in a text file, for instance (if the user is named "berna"):
    C:\Users\berna\Downloads\x86_64-13.2.0-release-win32-seh-ucrt-rt_v11-rev0\mingw64
  • 👉  For geeks and expert Windows users: It is not good practice to keep executable files in the Downloads folder, as they may be deleted when optimising disk space. You should move them to a suitable location like other applications. I keep the Downloads location for the demo.

Set up the Environment Path:

  • Right-click on 'This PC' or 'Computer' on the desktop or in File Explorer, and select 'Properties'.
  • Click on 'Advanced system settings' and then 'Environment Variables'.
  • In the System Variables section, find and select the variable 'Path', then click on 'Edit'.
  • Click on 'New' and add the path to the directory 'bin' of your MinGW-w64 installation, such as "C:\Users\berna\Downloads\x86_64-13.2.0-release-win32-seh-ucrt-rt_v11-rev0\mingw64\bin" if you haven't changed the location.
  • Click 'OK' to close all dialogues.

Verify Installation:

  • 👉   The BP3 interface does this verification automatically. If ‘gcc’ responds you will be offered to (re)compile the console. The following instructions are for an additional check.
  • Open Command Prompt (cmd.exe) and type:
    cd C:\MinGW\bin
    gcc --version
  • The first command opens a Unix "shell". The second command should output the GCC version installed and include 'x86_64', indicating it's set up for 64-bit.
    Ignore the win32 segments you see in file and folder names. They are there to confuse you!

Additional Tips

  • Choosing a Shell: MinGW-w64 works with standard Windows command prompt and also with more Unix-like terminals like Git Bash or Cygwin if those are already installed.
  • Using Make: To use 'make' with MinGW-w64, make sure that package 'mingw32-make' is selected during installation. It might be named differently like 'mingw-w64-make' based on the version. You might need to rename 'mingw32-make.exe' to 'make.exe' in the bin directory to make it recognizable as 'make'.

By following these steps, you should be well-equipped to compile 64-bit applications — not only BP3 — using GCC on Windows via MinGW-w64. This setup is useful for developers who need a lightweight GCC environment without needing a full Linux setup or the bulk of Visual Studio.

Publications

These publications explain the theoretical basis and research behind the Bol Processor project throughout its long lifetime. They also highlight the algorithmic foundations of the software design, particularly with regard to the polymetric model and the time-setting of sound objects.

👉 Follow the links to access pages containing abstracts and informative AI reviews.

Bol Processor

Kippen, James & Bernard Bel (1989)
https://hal.science/hal-00275429v1
Can a computer help resolve the problem of ethnographic description?
Anthropological Quarterly, 62 (3): 131-144.

Bel, Bernard (1996)
https://hal.science/hal-02986066
A flexible environment for music composition in non-European contexts
Journées d'Informatique Musicale 1996, Caen (France).

Bel, Bernard (1990)
https://doi.org/10.1080/09298219008570560
Time and musical structures
Interface, 19 (2-3): 107-135.

Bel, Bernard (1990)
https://theses.hal.science/tel-00009692
Acquisition et représentation de connaissances en musique
(Knowledge acquisition and representation in music)
Thèse de doctorat en sciences. Université de droit, d'économie et des sciences - Aix-Marseille III.

Kippen, James & Bernard Bel (1992)
https://hal.science/halshs-00004506v1
Modelling music with grammars: formal language representation in the Bol Processor.
In A. Marsden & A. Pople (eds.) Computer Representations and Models in Music, London, Academic Press, 1992: 207-238.

Kippen, James & Bernard Bel (1992)
https://hal.science/hal-00256386v1
Bol Processor Grammars
In Mira Balaban, Otto Laske et Kemal Ebcioglu (eds.) Understanding Music with AI, American Association for Artificial Intelligence Press, Menlo Park CA: 366-400.

Kippen, James & Bernard Bel (1992)
https://dl.acm.org/doi/10.5555/133905.133909
Symbolic and sonic representations of sound-object structures
In Mira Balaban, Otto Laske et Kemal Ebcioglu (eds.) Understanding Music with AI, American Association for Artificial Intelligence Press, Menlo Park CA: 64-110.
Extended version: Two algorithms for the instantiation of structures of musical objects

Kippen, James & Bernard Bel (1992)
https://hal.science/hal-00256385v1
Modelling improvisatory and compositional processes
In Denise Penrose & Ray Lauzanna (eds.) Languages of Design, 1. Elsevier Science Publishers, Amsterdam: 11-26.

Bel, Bernard (1992)
Time-setting of sound-objects: a constraint-satisfaction approach
International Workshop on Sonic Representation and Transform, Trieste (Italy), 26-30 October.

Bel, Bernard (1998)
https://hal.science/hal-00250274
Migrating Musical Concepts - an overview of the Bol Processor
Computer Music Journal, Vol. 22, 2: 56-64.

Bel, Bernard (2001)
https://hal.science/hal-00134179v1
Rationalizing musical time: syntactic and symbolic-numeric approaches
In Clarence Barlow, (ed.) The Ratio Book. Den Haag: Royal Conservatory - Institute of Sonology: 86-101.

Bel, Bernard (1987)
Grammaires de génération et de reconnaissance de phrases rythmiques
(Grammars for the production and recognition of rhythmic sentences)
Actes du 6e congrès AFCET/INRIA, Antibes, 1987b: 353-366.

QAVAID

Kippen, James & Bernard Bel (1989)
https://hal.science/halshs-00004505
The identification and modelling of a percussion ‘language', and the Emergence of Musical Concepts in a machine-learning experimental set-up
Computers and the Humanities, 23 (3): 119-214.

Bel, Bernard (1990)
https://hal.science/hal-00275789v2
Inférence de langages réguliers
👉  Follow link to read an abstract and review in English
Journées Françaises de l'Apprentissage, Lannion, France : 5-27.

MUSICOLOGY

Arnold, E. James (1982)
A Mathematical Model of the Shruti-Swara-Grama-Murcchana-Jati System
Journal of the Sangit Natak Akademi, New Delhi 1982.

Bel, Bernard (1988)
A Mathematical Discussion of the Ancient Theory of Scales according to Natyashastra
Note interne, Groupe Représentation et Traitement des Connaissances (CNRS), Marseille.

Bel, Bernard (1988)
https://hal.science/hal-00008280v1
Raga : approches conceptuelles et expérimentales
Actes du colloque "Structures Musicales et Assistance Informatique". Marseille.
👉  Download an English translation

Arnold, James (1985)
https://hal.archives-ouvertes.fr/hal-00373725
L'intonation juste dans la théorie ancienne de l'Inde : ses applications aux musiques modale et harmonique
Revue de musicologie, JSTOR, 71e (1-2), p.11-38.
👉  Download an English translation

Modelling music with grammars

James Kippen & Bernard Bel

Modelling music with grammars: formal language representation in the Bol Processor. In A. Marsden & A. Pople (eds.): Computer Representations and Models in Music, London, Academic Press, 1992, p. 207-238.

Abstract

Improvisation in North Indian tabla drumming is similar to speech insofar as it is bound to anunderlying system of rules determining correct sequences. The parallel is further reinforced by the fact that tabla music may be represented with an oral notation system used for its transmission and, occasionally, performance. Yet the rules are implicit and available only through the musicians’ ability to play correct sequences and recognise incorrect ones. A linguistic model of tabla improvisation and evaluation derived from pattern languages and formal grammars has been implemented in the Bol Processor, a software system used in interactive fieldwork with expert musicians. The paper demonstrates the ability of the model to handle complex structures by taking real examples from the repertoire. It also questions the relevance of attempting to model irregularities encountered in actual performance.

Excerpts of an AI review of this paper (Academia, June 2025)

Summary of the Work

The manuscript explores the use of formal grammar theories to model improvisational structures in North Indian tabla drumming. Drawing an analogy to language, the authors discuss how grammar-based representations can capture the rhythm, structure, and constraints of tabla musical sequences, which often rely on mnemonic syllables (“bols”) rather than Western script. By introducing and detailing the Bol Processor software, the authors demonstrate how the tool can generate, analyze, and compare tabla phrases in ways that blend both deterministic and probabilistic approaches. Throughout the work, real-world examples from performances and teaching traditions bolster the theoretical explanations.

Strengths

Clear Theoretical Rationale

The authors provide a thorough background for why linguistic concepts—particularly grammatical formalisms—are suitable for analyzing tabla compositions. They effectively frame the similarities between language rules and musical rules, especially regarding how musicians differentiate “correct” from “incorrect” sequences.

Comprehensive Treatment of Formal Grammars

The discussion includes multiple types of grammars (context-free, context-sensitive, marking of structural positions, and pattern grammars) and shows how each can be adapted or extended to capture nuances of tabla music. The step-by-step explanations of grammar derivations, contexts, parsing, and membership tests are detailed and instructive.

Practical Demonstration via the Bol Processor

By anchoring the discussion in a working piece of software, the manuscript transcends theory and illustrates practical methodology. Concrete examples of how the Bol Processor is used—both in generation (modus ponens) and membership checks—highlight the value of the tool for ethnomusicological fieldwork and analysis.

Engagement with Complex Musical Realities

The manuscript acknowledges that musical performance often deviates from neatly defined theoretical models. The authors address how irregularities and “maverick” variations might still be captured or reconciled within the formal framework, although at the cost of increasingly complex grammars.

Probabilistic Extension

The move from purely deterministic grammars toward probabilistic grammars is a notable contribution, especially given improvisational contexts. Assigning weights to production rules captures more realistic musical scenarios, enabling the software to suggest typical (rather than merely possible) musical phrases.

Overall Assessment

The manuscript provides a robust, methodologically sound illustration of how formal grammars can be adapted to model and analyze the complex world of North Indian tabla improvisation. Its detailed exploration of grammar types and parsing approaches is commendable and is supported by real-world musical examples that demonstrate both the potentials and the evolving nature of such computational models. The Bol Processor, as presented, appears to be a valuable contribution not only for ethnomusicologists and computational musicologists but also for any scholar interested in structural approaches to musical improvisation. The incorporation of probabilistic reasoning further deepens the system’s applicability to performance-based context and highlights how formal language models can be refined through interactive feedback with expert practitioners.

Download this paper

Skip to PDF content

Pattern grammars

Bernard Bel

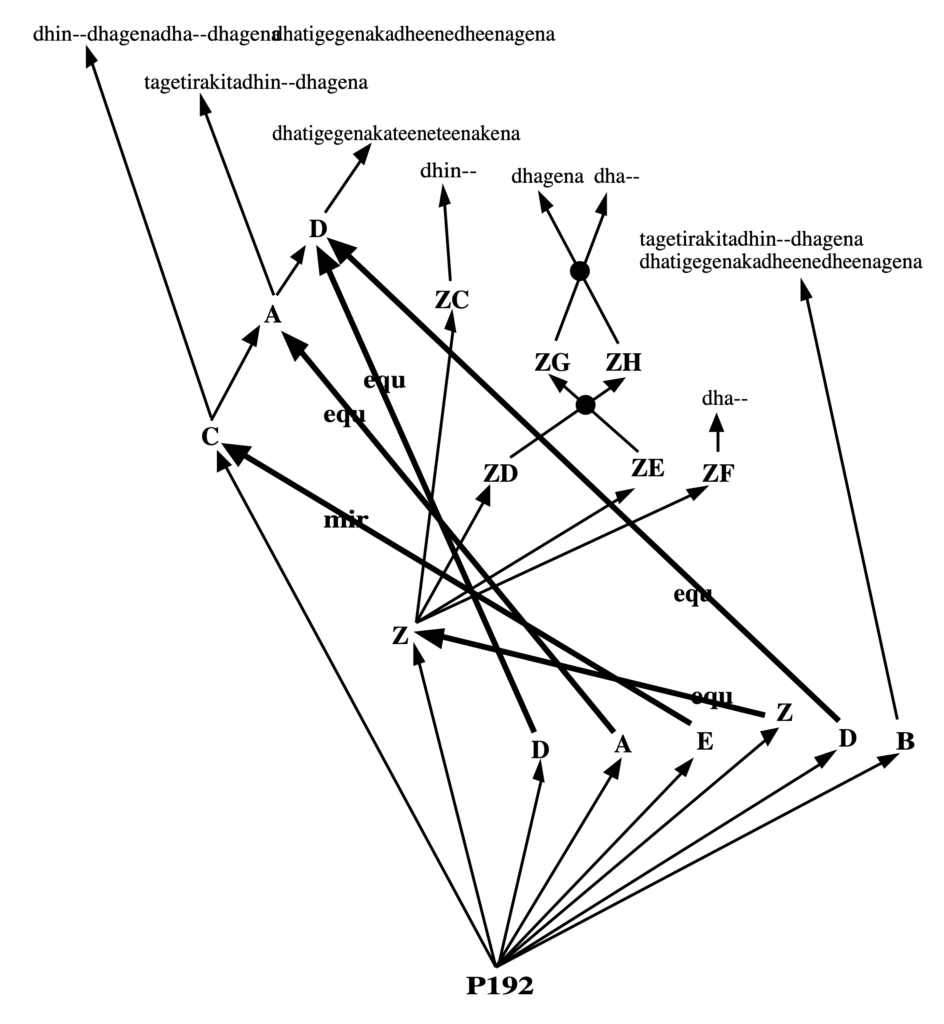
Pattern grammars in formal representations of musical structures. 11th International Joint Conference on Artificial Intelligence, Workshop on AI & Music, 20 August 1989, p.113-42

Abstract

This paper introduces several formal models of pattern representation in music. Polyvalent multimodal grammars describe partially overlapping sound events as found in polyphonic structures. Bol Processor grammars are characterisations of sequential events in terms of substring repetitions, homomorphisms, etc. Parsing techniques, stochastic production and recent developments of BP grammars are briefly described.

Excerpts of an AI review of this paper (June 2025)

Summary

This paper presents a thorough exploration of pattern grammars and their applicability to musical structures, specifically focusing on polyphonic and homophonic aspects. It introduces Polymodal Multivalent Grammars (PMGs), demonstrates how temporal and structural relationships in music can be modeled using a lattice of time relations, and draws parallels with formal language theory. The discussion also extends to Bol Processor (BP) grammars, offering insights into pattern rules, membership tests, and stochastic production for music generation and analysis. The work’s illustrations, which delve into North Indian tabla sequences and Western musical examples (notably Bach), add concrete demonstrations of how these grammars can capture and replicate real-world musical practices.

Major Strengths

Methodological Clarity and Formal Rigor

  • The paper provides a clear formal framework for understanding music as an algorithmic process. This is exemplified by precise definitions of pattern grammars, rewriting rules, and homomorphisms.
  • The use of mathematical notation (e.g., partial orders, lattices, homomorphisms) lends a rigorous backing to the arguments.

Comprehensive Treatment of Time Overlaps

  • The conceptual separation of out-time and in-time structures, and the ensuing treatment of 13 distinct possible temporal relations, is notable. This approach tackles many of the complexities found in polyphonic and partially overlapping musical events.

Insightful Practical Applications

  • Educating readers on how grammars can be used for music composition, improvisatory modeling, and performance practice is highly valuable.
  • The examples of North Indian tabla repertoires and Bach’s polyphonic compositions concretely illustrate the potential breadth of these models.

Contribution to Epistemological and Analytical Discourse

  • By addressing existing debates (e.g., parallels with linguistic theory, ethnomusicological criticisms, and generative approaches), the paper bridges a gap between traditional analytical methods and computational modeling.

General Comments

This work makes a solid theoretical contribution by bringing together formal language theory and concise examples of musical structures. It is equally relevant to researchers in computational musicology, ethnomusicology, and music theory. The paper may also be of broader interest to anyone studying the intersection of artificial intelligence and creative processes. Overall, its strengths lie in its theoretical depth, its range of illustrative applications, and its attempts to unify diverse perspectives under a single formal modeling framework for musical representation.

Download this paper

Skip to PDF content

Time-setting of sound-objects

Bernard Bel

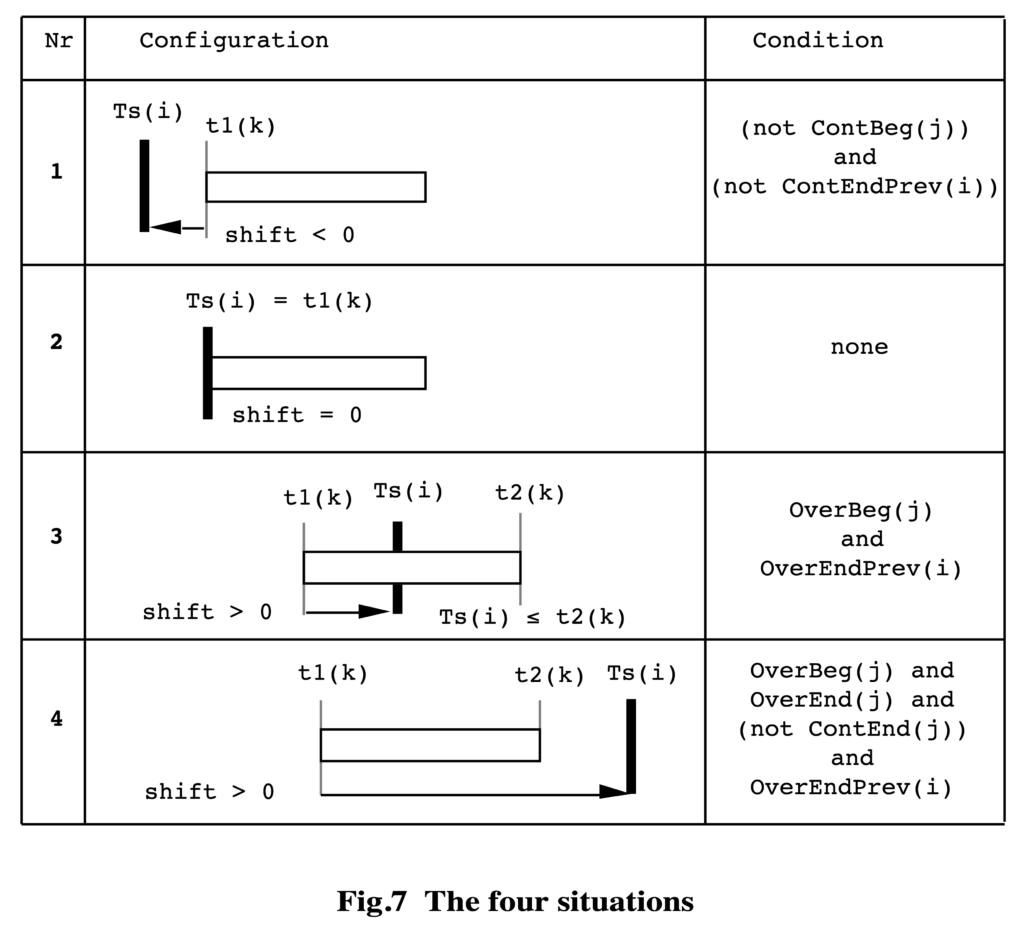
Time-setting of sound-objects: a constraint-satisfaction approach. Invited paper, Workshop on Sonic Representations and Transforms. INTERNATIONAL SCHOOL FOR ADVANCED STUDIES (ISAS), Trieste, 26-30 October 1992.

Abstract

This paper deals with the scheduling of “sound-objects”, hereby meaning predefined sequences of elementary tasks in a sound processor, with each task mapped to a time-point. Given a structure of sound-objects completely ordered in a phase diagram, an “instance” of the structure may be obtained by computing the dates at which each task should be executed. Time-setting the structure amounts to solving a system of constraints depending on (1) metric and topological properties of sound-objects, (2) contexts in which they are found, and (3) parameters related to the performance itself (“smooth” or “striated” time, speed, etc.). This may require relocating/truncating objects or delaying part of the sound-object structure. A constraint-satisfaction algorithm is introduced, the time complexity of which is O(n.k) in most cases, where n is the number of sequences and k the maximum length of a sequence. In the worst case it remains better than O(n2.k3). Other fields of applications are proposed, including multimedia performance and computer-aided video editing.

👉 A detailed description of the current implementation of this algorithm is on this page: Time-setting an item: how TimeSet() works.

Excerpts of an AI review of this paper (Academia, June 2025)

Summary of the Work

The manuscript details a computational approach to the scheduling and instantiation of “sound-objects,” which are defined as sequences of elementary tasks in a sound processor. The crux of the work is an algorithm that solves a system of constraints arising from topological and metrical properties of these sound-objects, as well as from contextual performance parameters. The algorithm balances local changes (relocation and truncation of objects) against global shifts (delays) to ensure that all constraints within sequences of sound-objects are met. In addition to musical applications, such an approach could be extended to other time-based media, including multimedia scenarios and video editing.

Core Contributions

Explicit Discussion of Time and Constraints

  • The paper frames time not just as a universal metric but as a structure of discrete “time streaks” or beats. In this sense, the work bridges formal representations of time (from discrete pulses to “smooth” continuous flow) with performance-related constraints.
  • The formulation of constraints (e.g., overlapping or disjoint objects) is systematically addressed through definable properties (e.g., overBeg, overEnd, truncBeg, truncEnd), which are then used in a constraint-satisfaction process.

Algorithmic Design and Complexity Analysis

  • The step-by-step “Locate()” function is well described with a clear flowchart, detailing how the algorithm attempts corrections through local or global drifts, as well as partial truncations of the sound-objects.
  • A worst-case time complexity of O(n²·i³) (under certain conditions) is established, yet it often performs more efficiently, showing that this method is viable for real-world musical and multimedia applications.

Applicability to Broader Contexts

While the examples focus primarily on musical objects, the paper recognizes potential applications in any setting where time-based data need to be scheduled, such as multiple-screen video editing or live multimedia performances. This generalizable framework underscores the versatility of the approach.

Strengths

  • Comprehensive Motivations: The work demonstrates a solid understanding of music composition needs and how strict time-based approaches can benefit from greater flexibility.
  • Thorough Explanations: The background and rationale for each component of the constraint-satisfaction process are well articulated, guiding readers step-by-step.
  • Foundational for Further Development: The text provides ample conceptual and algorithmic foundations for more advanced timing algorithms, potentially inspiring other constraint-based scheduling research in music and multimedia domains.

Overall, the paper provides a structured and flexible method for representing and manipulating time-synchronized objects, showing promise not only for music composition but also for a wide variety of multimedia applications requiring coordinated playback and sequencing. The detail in constraint codification, strategies for local and global corrections, and emphasis on computational complexity will be particularly valuable to those working with large-scale or complex performance setups.

Download this paper

Skip to PDF content

The Well-tempered Clavier


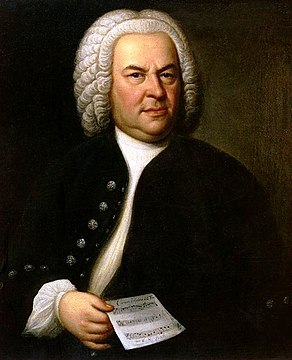
Below is the complete set of Preludes and Fugues by J.S. Bach known as The Well-Tempered Clavier, Books II and II, published around 1722 and 1742 respectively.

What was the composer's intention when he used the term "well tempered"?

All the scores in this corpus have been converted from MusicXML to Bol Processor syntax — see Importing MusicXML scores. This paved the way for tonal analysis using Bol Processor's tonal batch processing tool, described in detail on the Bach Well-tempered tonal analysis page.

Each musical work has been compared with a set of tuning schemes implemented on the Bol Processor. These include temperaments documented by Pierre-Yves Asselin ([1985], 2000) and "natural" scales systematically constructed — see pages Microtonality and Creation of just-intonation scales.

The matching algorithm selected the tuning scheme(s) that best matched the definitions of 'consonant' and 'dissonant' melodic and harmonic intervals. Two sets of definitions were used: "standard" and " alternative". Obviously, under any hypothesis, some tuning schemes are more suitable than others for achieving the composer's presumed perception of 'consonance'. Therefore, the following sound productions of the Preludes and Fugues, with their "best" tuning schemes, should not be taken as a definitive answer to the question of temperament discussed by Bach's students and followers. They may, however, come closest to what the composer intended, within the limits of the ear's ability to discriminate between intervals.

Note that if several tuning schemes ranked first for matching a piece, only one of them was used for the demo. It is possible that another may sound better.

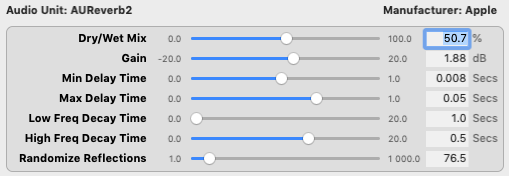
Settings of an audio unit for the post-processing

All the pieces were played and recorded on a Csound instrument, similar to a harpsichord, allowing a clear appreciation of the tonal intervals. This kind of "magnifying glass" view of the tonal intervals produced harsh sounding versions, available in the Standard (raw) and Alternate (raw) folders. These have been post-processed with a bit of reverb to produce softer attacks. The post-processed sound files are the ones accessed in the tables below. Readers familiar with sound editing are invited to download the raw files and suggest better post-processing options.

The last two columns of each table contain recordings of human interpretations of the same works by outstanding harpsichordists. These explore dimensions of musicality that the mechanical interpretation of the score with perfect tonal intervals could not reach. It remains that the challenge of accurate tonality was a priority for this corpus, as evidenced by the title "well-tempered" given by its composer.

Book I sound examples

These Bol Processor + Csound recordings may be reused under the Creative Commons Attribution-NonCommercial-ShareAlike 4.0 International (CC BY-NC-SA 4.0) licence. Attribution includes links to the present page, to Csound and to the author/editor of its MusicXML score (listed on the Bach Well-tempered tonal analysis page).

➡ Listen with headphones or a very good sound system!

The recordings of Wanda Landowska's (1879-1959) are from YouTube. Other interpretations are courtesy of Wikimedia Commons.

As explained on the Bach Well-tempered tonal analysis page, the D'Alambert-Rousseau temperament was found to be equivalent to H.A. Kellner's BACH in terms of scale intervals.

Standard
(favourite: Sauveur)
Alternate
(favourite: D'Alembert-Rousseau)
Humanperformance   
KeyPreludeFuguePreludeFuguePreludeFugue
1BWV 846CmajSauveurSauveurRameau en sibMarpurgMartha GoldsteinMartha Goldstein
2BWV 847CminSauveurSauveurD'Alambert-RousseauD'Alambert-RousseauWanda LandowskaMartha Goldstein
3BWV 848C#majAbmajZarlino naturalD'Alambert-RousseauD'Alambert-RousseauWanda LandowskaWanda Landowska
4BWV 849C#minWerckmeister 4Werckmeister 4CminCminWanda LandowskaWanda Landowska
5BWV 850DmajSauveurSauveurD'Alambert-RousseauRameau en doMartha GoldsteinMartha Goldstein
6BWV 851DminSauveurSauveurD'Alambert-RousseauD'Alambert-RousseauMartha GoldsteinMartha Goldstein
7BWV 852E♭majRameau en sibRameau en sibRameau en sibD'Alambert-RousseauWanda LandowskaWanda Landowska
8BWV 853E♭min/D#minEbminMarpurgEbminDminWanda LandowskaWanda Landowska
9BWV 854EmajSauveurWerckmeister 4EmajD'Alambert-RousseauWanda LandowskaWanda Landowska
10BWV 855EminSauveurSauveurD'Alambert-RousseauD'Alambert-RousseauWanda LandowskaWanda Landowska
11BWV 856FmajSauveurSauveurD'Alambert-RousseauD'Alambert-RousseauWanda LandowskaWanda Landowska
12BWV 857FminZarlino naturalSauveurD'Alambert-RousseauD'Alambert-RousseauWanda LandowskaWanda Landowska
13BWV 858F#majMarpurgF#majD'Alambert-RousseauD'Alambert-RousseauWanda LandowskaWanda Landowska
14BWV 859F#minSauveurSauveurFminD'Alambert-RousseauWanda LandowskaWanda Landowska
15BWV 860GmajSauveurSauveurD'Alambert-RousseauD'Alambert-RousseauWanda LandowskaWanda Landowska
16BWV 861GminSauveurSauveurRameau en sibRameau en sibWanda LandowskaWanda Landowska
17BWV 862A♭majAbmajZarlino naturalD'Alambert-RousseauD'Alambert-RousseauWanda LandowskaWanda Landowska
18BWV 863G#minGminAbminGminDminWanda LandowskaWanda Landowska
19BWV 864AmajSauveurSauveurD'Alambert-RousseauD'Alambert-RousseauWanda LandowskaWanda Landowska
20BWV 865AminSauveurSauveurD'Alambert-RousseauD'Alambert-RousseauWanda LandowskaWanda Landowska
21BWV 866B♭majSauveurSauveurRameau en sibMarpurgMartha GoldsteinWanda Landowska
22BWV 867B♭minSauveurMarpurgAminAminWanda LandowskaWanda Landowska
23BWV 868BmajBmajMarpurgD'Alambert-RousseauEbmajWanda LandowskaWanda Landowska
24BWV 869BminSauveurSauveurD'Alambert-RousseauD'Alambert-RousseauWanda LandowskaWanda Landowska
➡ Click a scale or a performer's name to listen to the recording

Book II sound examples

The recordings of Ottavio Dantone are from YouTube.

As explained above, D'Alambert-Rousseau temperament was found to be equivalent to H.A. Kellner's BACH.

Standard
(favourite: Sauveur)
Alternate
(favourite: D'Alembert-Rousseau)
Humanperformance 
KeyPreludeFuguePreludeFuguePreludeFugue
1BWV 870CmajSauveurSauveurMarpurgD'Alambert-RousseauOttavio DantoneOttavio Dantone
2BWV 871CminRameau en sibSauveurD'Alambert-RousseauD'Alambert-RousseauOttavio DantoneOttavio Dantone
3BWV 872C#majMarpurgDbmajD'Alambert-RousseauD'Alambert-RousseauOttavio DantoneOttavio Dantone
4BWV 873C#minSauveurWerckmeister 4D'Alambert-RousseauD'Alambert-RousseauOttavio DantoneOttavio Dantone
5BWV 874DmajSauveurSauveurD'Alambert-RousseauD'Alambert-RousseauOttavio DantoneOttavio Dantone
6BWV 875DminSauveurSauveurD'Alambert-RousseauD'Alambert-RousseauOttavio DantoneOttavio Dantone
7BWV 876E♭majRameau en sibRameau en sibRameau en sibRameau en sibOttavio DantoneOttavio Dantone
8BWV 877D#minMarpurgMarpurgD'Alambert-RousseauDminOttavio DantoneOttavio Dantone
9BWV 878EmajSauveurWerckmeister 4Werckmeister 4Werckmeister 4Ottavio DantoneOttavio Dantone
10BWV 879EminSauveurSauveurD'Alambert-RousseauD'Alambert-RousseauOttavio DantoneOttavio Dantone
11BWV 880FmajSauveurSauveurMarpurgD'Alambert-RousseauOttavio DantoneOttavio Dantone
12BWV 881FminZarlino naturalZarlino naturalD'Alambert-RousseauD'Alambert-RousseauOttavio DantoneOttavio Dantone
13BWV 882F#majF#majBmajD'Alambert-RousseauD'Alambert-RousseauOttavio DantoneOttavio Dantone
14BWV 883F#minSauveurSauveurD'Alambert-RousseauD'Alambert-RousseauOttavio DantoneOttavio Dantone
15BWV 884GmajSauveurSauveurD'Alambert-RousseauD'Alambert-RousseauOttavio DantoneOttavio Dantone
16BWV 885GminSauveurSauveurRameau en sibD'Alambert-RousseauOttavio DantoneOttavio Dantone
17BWV 886A♭majZarlino naturalAbmajD'Alambert-RousseauD'Alambert-RousseauOttavio DantoneOttavio Dantone
18BWV 887G#minAbminAbminD'Alambert-RousseauD'Alambert-RousseauOttavio DantoneOttavio Dantone
19BWV 888AmajSauveurSauveurRameau en doD'Alambert-RousseauOttavio DantoneOttavio Dantone
20BWV 889AminSauveurSauveurD'Alambert-RousseauD'Alambert-RousseauOttavio DantoneOttavio Dantone
21BWV 890B♭majSauveurSauveurMarpurgMarpurgOttavio DantoneOttavio Dantone
22BWV 891B♭minBbminMarpurgAminAminOttavio DantoneOttavio Dantone
23BWV 892BmajBmajBmajD'Alambert-RousseauD'Alambert-RousseauOttavio DantoneOttavio Dantone
24BWV 893BminSauveurSauveurD'Alambert-RousseauBbminOttavio DantoneOttavio Dantone
➡ Click a scale or a performer's name to listen to the recording

More examples?

Interestingly, similar classifications of tuning systems apply to another famous corpus by J.S. Bach: the Goldberg Variations (1741). Read the Bach well-tempered tonal analysis page.

➡ Listen to the synthesis of Goldberg Variations with Sauveur's meantone temperament.
➡ Listen to the synthesis of Goldberg Variations with D'Alembert-Rousseau temperament.
➡ Listen to the Aria on a harpsichord tuned with Werckmeister III meantone temperament.

In the same period (1730), the French musician François Couperin composed Les Ombres Errantes, for which our tonal analysis suggests a Rameau en sib temperament:

François Couperin's “Les Ombres Errantes” interpreted by the Bol Processor + Csound
with a “Rameau en sib” temperament ➡ Image
Source: MusicXML score by Vinckenbosch in the MuseScore community

Classical guitarist Brandon Acker has provided a comprehensive, practical explanation of how temperament was used in Baroque music instead of modern "equal temperament" tuning (https://www.youtube.com/watch?v=tiKCORN-6m8). He said: "Guitars today all have fixed metal frets but not only was this not always the case, in fact, guitars with tied on gut frets (made of sheep intestine) allowed guitarists 300 years ago to play MORE in-tune than guitars can today." Listen, for instance, to his interpretation of Bach's Prelude in G (BWV 1007), which was originally written for the cello:

Despite reducing tonality issues to the distinction of enharmonic notes and temperament to 1/4 comma classical meantone 'pure major thirds' (Asselin, 1985, p. 76), Acker's empirical, ear-based approach is fully consistent with ours. Both methods are based on perceiving intervals in terms of consonance/dissonance rather than speculating about ratios of integer numbers.

Conclusive remarks

The title of this corpus, The Well-Tempered Clavier, suggests that its composer intended to demonstrate the suitability of one or more temperaments for the performance of musical works in any tonality. As previously stated, this does not imply that they were all intended to conform to the same unique solution; however, it makes sense to hypothesize that the same instrument and tuning scheme were utilized for the entirety of the set. This has led to speculation by J.S. Bach's pupils, who were not instructed on how to proceed. In those days, part of the prestige of great artists was based on their ability to withhold information…

It would be illogical in the context of human musicians and physical instruments to play a prelude in one tuning and then retune the instrument solely for the purpose of playing the fugue. Consequently, these audio examples are not intended to emulate a genuine performance. They can, however, assist in evaluating the suitability of a preferred tuning scheme for each musical work.

A "deaf musicologist" employs a method of tonality assessment that involves measuring melodic and harmonic intervals in terms of frequency ratios. The results of this assessment depend on the values (weights) assigned to certain ratios in advance. Our findings demonstrate that equally meaningful sets of hypotheses can lead to completely different results, which only trained ears can distinguish. The combination of hypotheses may not elucidate the situation. An apparent preference for a tuning scheme may be the result of a numerical artefact rather than proof of its validity.

Bach's family tree, unknown artist (source)

A meticulous listening to these recordings, with the exclusion of the somewhat inelegant rendering of fast trills in the lower octave, reveals a musical dimension that cannot be reduced to the concept of 'intervals'. Each piece can be likened to a precious stone, exhibiting an astonishing regularity in its tonal structure. The listener is invited by the artist to explore all sides of the crystal and to appreciate its purity: a 'tonal landscape'. In this approach, the slightest imperfection, such as a few cents up or down, is amplified by our awareness of the structure. In short, the most important feature may be less the choice of a structure than its consistency in rendering each musical phrase.

It is unclear whether J.S. Bach intended to create a specific musical temperament when composing The Well-Tempered Clavier. As suggested above, the highest rating in terms of intervals may not be the most appropriate. Therefore, this question remains for art historians and musicologists to answer. However, based on the sound examples, playing this repertoire on instruments that are not properly tuned in terms of consonance is akin to displaying imitation diamonds.

As a departure from this rather normative statement, I recommend listening to the beautiful interpretation on the piano by Marta Czech of Franz Liszt's transcription of Bach's Prelude and Fugue in A minor, BWV 543. This is a convincing indication that musical works composed for instruments that highlight their tonal structure lend themselves to innovative, rich interpretations on instruments that offer a wider range of expressive features. Even when tuned in equal temperament, the lack of a well-tempered tonal structure goes unnoticed in the piano.

Reference(s)

Asselin, P.-Y. Musique et tempérament. Paris, 1985, republished in 2000: Jobert. Soon available in English.

Musicians interested in continuing this research and related development can use the Bol Processor BP3 to process musical works and implement further tuning procedures. Follow the instructions on the Bol Processor ‘BP3’ and its PHP interface page to install BP3 and learn its basic operation. Download and install Csound from its distribution page.

Bernard Bel — January 2022

Please join the BP users help forum , BP open discussion forum and/or the BP developers list to stay in touch with the progress of work and discuss related theoretical issues.

« Translate