This is a presentation of Bol Processor ‘BP3’. Install it and try these examples in your environment: MacOS, Windows or Linux.
👉 ‘BP3’ produces real-time MIDI events, BP scores, standard MIDI files and Csound scores.
👉 Capturing and interpreting incoming MIDI messages is a work in progress. Importing MusicXML scores is fully functional.
👉 MIDI files are instantly audible thanks to a built-in MIDI player, while Csound scores are used to create sound files sent to a standard HTML5 audio player.
This page provides an overview of interactions with the Bol Processor console. The objective is to verify its operation in any environment. Musical examples are of low artistic value as their purpose is to be a comprehensive demonstration of technical aspects.
Once you have completed the installation of BP3 (and optional Csound), you can check these features in any order you like. A preview of the help file is available here.
Real-time MIDI was implemented in May 2024. It works beautifully in the three environments… After installing BP3, visit the Real Time MIDI page to enjoy the full range of possibilities it offers!
BP3 is currently being tested with MAMP (see below) on computers running MacOS Tahoe 26 and Windows 10, and with XAMPP on MacOS and LinuxLite 7.0 (Ubuntu). It hasn't yet been checked on Windows 11. A standalone "BolProcessor.app" application is available on MacOS.
👉 Send questions/suggestions to the developers via the contact form or join the BP developers list on SourceForge.
Install the Apache server and Bol Processor package
Installing the Bol Processor BP3 does not require any programming skills. Just use the installers for MacOS and Windows, or the installation scripts for Linux.
Follow instructions on installation pages for MacOS, Windows and Linux.
Compile the console and check its operation
The Bol Processor's PHP interface recognises the system your computer is running. It checks key features and tells you what is missing or needs fixing.
👉 If you have installed the standalone "BolProcessor.app" application on MacOS, you can start it and go directly to Produce items.
- Start your Apache/PHP server and point your web browser at the file bolprocessor/php/index.php.
- The URL looks like http://localhost/bolprocessor/php/. Note that "http" is used, not "https". On Windows, the URL is displayed as localhost/bolprocessor/php/.
- MacOS and Linux users: if you get an error message or see nothing, check file permissions ("775" in the "bolprocessor" folder) in your installation. The installer or the installation script takes care of it: did you use it? This issue did not occur on Windows 10.
- MacOS and Windows users: the Bol Processor console ("bp" or "bp.exe") is distributed precompiled if you use the installer. You should see that the console is "responding" at the top right of the window. Otherwise, proceed as shown below for Linux.
- Linux users: If you have just done a new installation or an upgrade, you will get a warning that the console "bp3" is not "responding" along with a link to the compilation page. It will compile the console if the installation is correct. More information is found on the Quick install page. After the compilation, you will get a confirmation message if it was successful, or a list of errors if it was not — which should never happen, otherwise tell us!
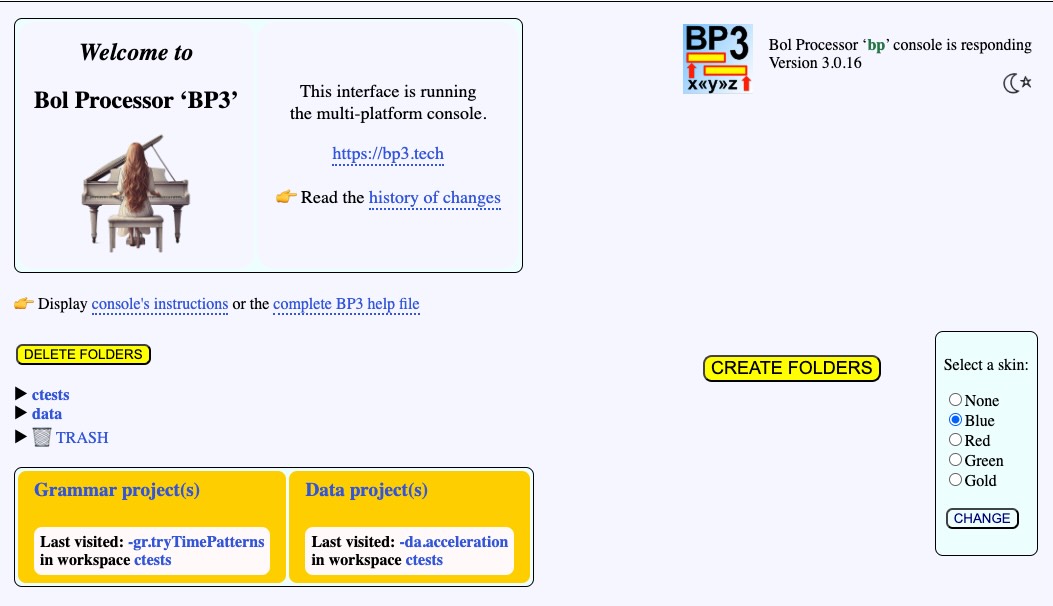
You can then reload the home page, now looking like the picture above, by default in dark mode.
😀 You've done the difficult part! 😀
The "bp" (or "bp.exe" or "bp3") console is now working.
If you wish to recompile the console, you can simply point your browser to localhost/bolprocessor/compile.php. This will automatically run the "Makefile". In MacOS and Linux, the console is automatically recompiled each time you run the installer to patch an update of the Bol Processor. In Windows, the precompiled (and certified) "bp.exe" is distributed, but you can recompile it after deleting "bp.exe".
- The home page displays the contents of the "bolprocessor" folder, in particular a link to the "ctests" folder.
- Follow the "ctests" link. You will find a list of available example files classified in distinctive frames. In general, the name of a grammar project starts with "-gr", but it can also end with the extension "bpgr". The name of a set of data project starts with "-da", but it can also end with the extension "bpda". Both type conventions are supported. This became necessary a long time ago, when upgrading BP2 from MacOS 9 to MacOS 10…
- Click on "-gr.koto3" to open a grammar. This will automatically create a folder called "my_output" at the top of the "bolprocessor" folder if it doesn't already exist. You can try to create an output folder with a different name and check its presence at the top of "bolprocessor". The current name of the output folder is saved in "_settings.php" which is recalled each time the interface is used.
- You can create subfolders of the current output folder. For example, if the current output is set to "my_output", create "my_output/todays_folder". The interface automatically replaces spaces with '_' as these may be unwanted on some systems.
On the page displaying the files in a workspace (e.g. "ctests") you will see the DOWNLOAD FILES, MOVE and IMPORT FILES buttons. These are used to move files between workspaces. Files can indeed be moved from the Finder or File Manager, but he interface takes care of the owner/group permissions required for its operation. Therefore, uploading a file using the IMPORT FILES button is a better idea than moving it using the Finder.
👉 The Bol Processor interface can be displayed in both dark and light modes. There is an icon in the top right corner to switch between these modes.
Produce items
👉 In June 2024, the prefixes and suffixes of some files have been changed to make them more meaningful:
- Prefix "-ho" and suffix "bpho" are replaced by "-al" and "bpal" (Alphabet files)
- Prefix "-mi" and suffix "bpmi" are replaced by "-so" and "bpso" (Sound-object files)
These changes are automatically managed by the interface and the console. No manual editing is required.
In the following sections, the output options are either MIDI file or CSOUND file. However, we recommend opting for real-time MIDI if your machine is set up for it: see details.
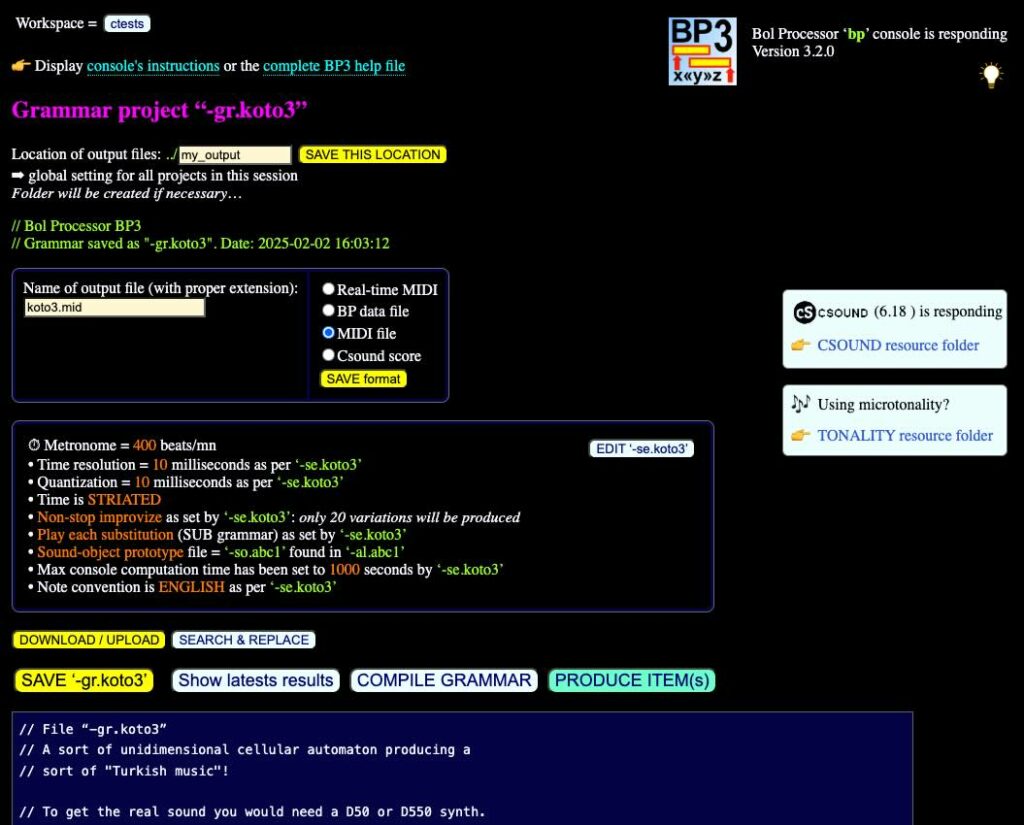

- Open the "-gr.koto3" grammar and click PRODUCE ITEM(s). This will open a "BP console" pop-up window and launch the console application.
- By default, the output is set to MIDI files. A link is provided to download this MIDI file, and a javascript MIDI player is displayed to listen to its contents.
👉 If your computer is not connected to the Internet, you won't hear anything on this player… - In the absence of "MIDI program" messages, piano-like sounds are produced which do not resemble the rendering of the -"gr.koto3" grammar on a proper MIDI device — here a Roland D-50 synthesiser, listen to the real thing.
- Don't waste time trying to understand how this grammar works, we're just doing a technical test!
- While the console application is running, a detailed list of actions is recorded, which you can display in the pop-up window.
- At the top of the window, the command line created to call the console is displayed in red. This is used by programmers to check the console's response.
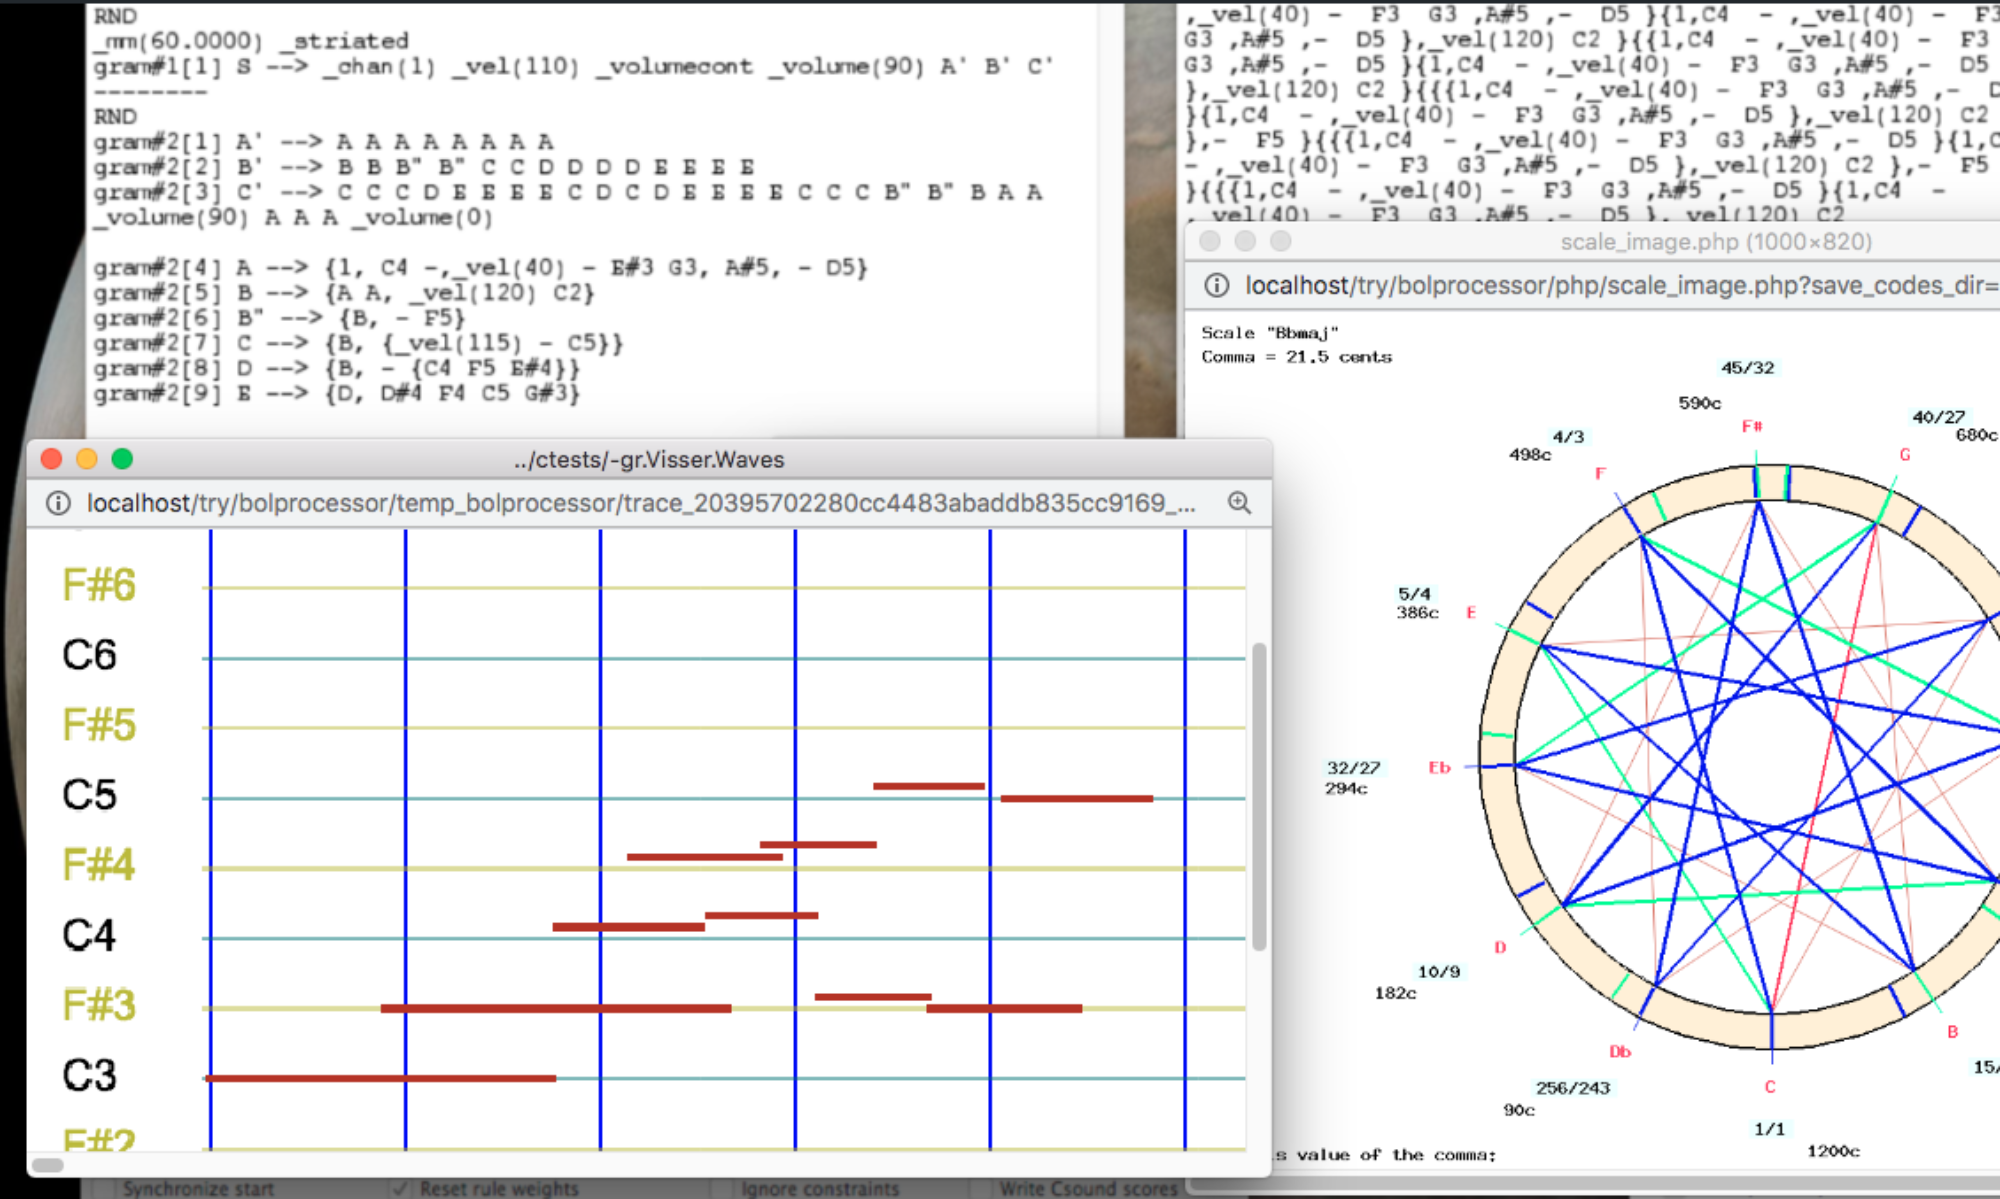
- "Image" links will appear at the top of the BP console window. Click them to display images in new windows. By default, this picture shows the sound-objects a, b, c, chik, etc. We will see a pianoroll later as another option.
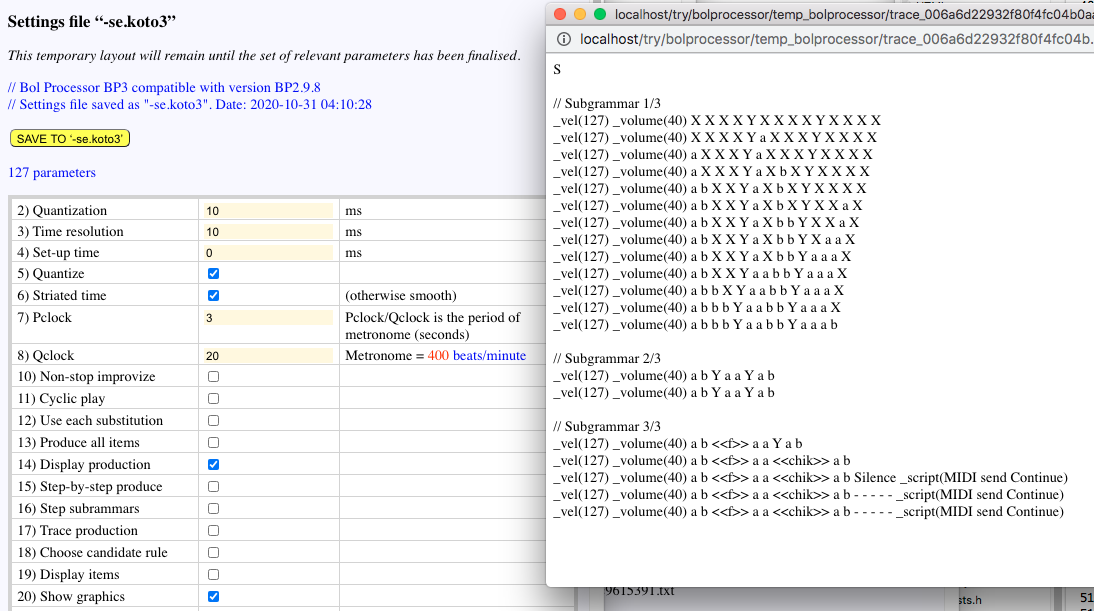
- At the top of the "BP console" there is a link to the "trace file" which shows the full process of derivations for creating items. It was created by adding the --trace-production option to the command line to check the details. The Trace mode can be enabled or disabled in the "-se.koto3" settings page.
- The "my_ouput" folder should contain "koto3.mid" — the name for this MIDI file.
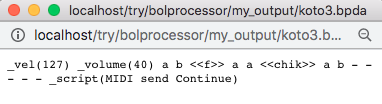
- Return to the grammar and select "BP data file" as the output option, then click the SAVE button. Now the name "koto3.bpda" will be created, but you can change it to anything you like, keeping the "bpda" extension, or using the "-da" prefix instead.
- Click the PRODUCE ITEM(s) button again. A link to the data file in Bol Processor score notation appears at the top (see image). The Trace file shows the same derivations. The file "koto3.bpda" should also be in the "my_ouput" folder.
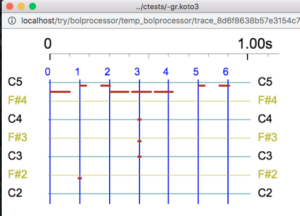
- In the settings for "-gr.koto3" it is possible to change the format of the graphics display. Currently it is "Show objects". Let us try "Piano roll". This format emphasises the melodic and harmonic structure of the composition whereas the "objects" format is explicit about the size and position of the sound-objects.
- Comparing the two images we can guess that "a" contains a stroke of the note A5 and "b" contains two strokes of the note B5. The <<f>> sound-object is an out-time object of zero duration, containing a single stroke of the note F2. The <<chik>> object is also out-time and contains a chord: {C3, F3, C4}.
The main mechanism for creating musical items in this grammar is called substitutions, indicated as SUB on top of the 2nd subgrammar. A substitution rule, when selected, is applied simultaneously to each fragment of the work string. This is made clear by displaying the derivations of the string. To do this, select the "Display production" option on the Settings page. The derivation steps will appear in the Trace window:
Clicking "Trace production" in the settings will give more details about the inference process.
In the "Non-stop improvize" mode, every step of the substitution is used for the sound output. To do this, variables are erased and only terminal symbols are played. The effect is that the work string "grows" until it collapses as a polyphonic phrase with out-time objects <<f>> and <<chik>> playing the bass. The theoretical model behind this process is a (one-dimensional) cellular automaton. For example, listen to this performance of "-gr.koto3" with the original sounds:
If you set up the output format to "Real-time MIDI", the improvisation will play forever on the MIDI device connected to your computer. Clicking the STOP or PANIC button will stop it. Read explanations on the page Real-time MIDI.
As this is only a technical review of how BP3 works, we won't discuss the arcanes or rule-based composition in the Bol Processor. You should have a look at the tutorials and experiment with your own creations to get familiar with it.
Create or import data
The demo items shown on this page are all located in the "ctests" folder, which is created when BP3 is installed and is refreshed during updates.
👉 If you are running the standalone "BolProcessor.app" application on MacOS, the "ctests" folder is visible after clicking "Show Package Contents" and moving down to "Contents/Resources/www".
It is not a good idea to move files in and out of data folders using the Finder or the File Manager, as this can lead to read-write permission errors. Use only the import features documented in this section.
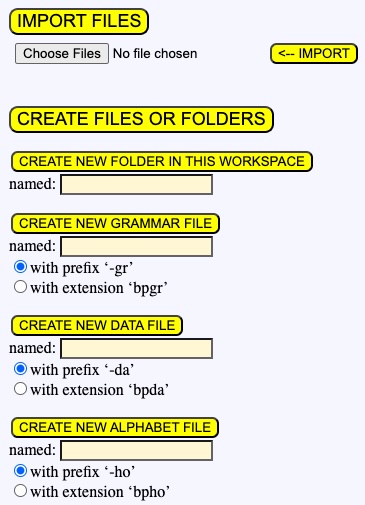
A button CREATE FILES AND FOLDERS on the right displays a form to this effect. Creating your own folders (workspaces) is recommended, as files in the "ctests" folder are restored to their initial status during updates.
When a file is created, the appropriate prefix or extension is added, depending on the type of file. For example, a grammar named "mygrammar" will be saved as "-gr.mygrammar" or "mygrammar.bpgr", depending on your choice.
Using the import feature has two advantages:
- Only files relevant to the Bol Processor will be imported;
- File permissions will be set to the same permissions as the "bolprocessor" (or "Contents/Resources/www") folder, i.e. "775".
A DOWNLOAD FILES button is also available to facilitate the export of data to other computers. However, if you need to change the location of data within the "bolprocessor" (or "Contents/Resources/www") folder, it is more practical to use the MOVE command.
Download/upload is also possible on project pages (Data or Grammar):
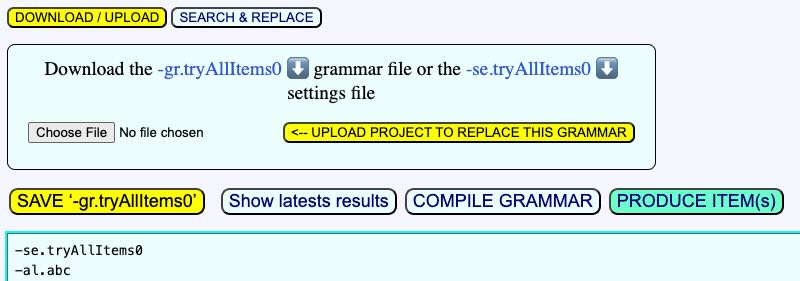
The procedure ensures that you upload the same type of file, i.e. do not replace a Data project with a Grammar project or vice versa. The operation can be undone with a single click until the modified page is saved.
Moving folders and projects outside the "bolprocessor" (or "Contents/Resources/www") folder is made possible by creating symbolic links so that they can be accessed via the interface. Read the Move data page to learn how to do this.
Import MusicXML scores
The previous section was an introduction to the main features of Bol Processor: creating music using a grammar, an alphabet and sound-object prototypes, which we will present in more detail below. This requires some knowledge of both music composition and the specific task environment of Bol Processor, as shown in the old BP2 reference manual, and more recent tutorials.
With BP3 it is possible to take a simpler (but arguably less creative) approach: import pre-composed music and reuse its fragments to create new musical works. This process is achieved by using standard sheet music converted into the MusicXML format. MusicXML files are downloaded from the web or exported by score editors such as MuseScore. A (very technical) description of this method can be found on the Importing MusicXML scores page, along with an introduction to the MusicXML format.
Another technique for importing music will be the real-time recording and interpretation of MIDI events, which is still in development. Follow the progress of this approach on the Capture MIDI input page.
Below is an example of Beethoven's Fugue in B flat major imported from MusicXML and converted as Bol Processor data — a set of polymetric expressions, see tutorial. It was played on the PianoTeq physical-model synthesiser receiving real-time MIDI messages produced by BP3. We interpreted it as a piano piece because we had no synthesiser that could do a good imitation of the string instruments.
This example illustrates both the accuracy of the conversion and the level of complexity handled by Bol Processor.
Using a very short quantization (typically less than 10 milliseconds) on a large item can increase memory usage to the point where the MAMP or XAMPP driver hangs without warning. For this reason, the quantization is set by default to 10 ms.
Help messages
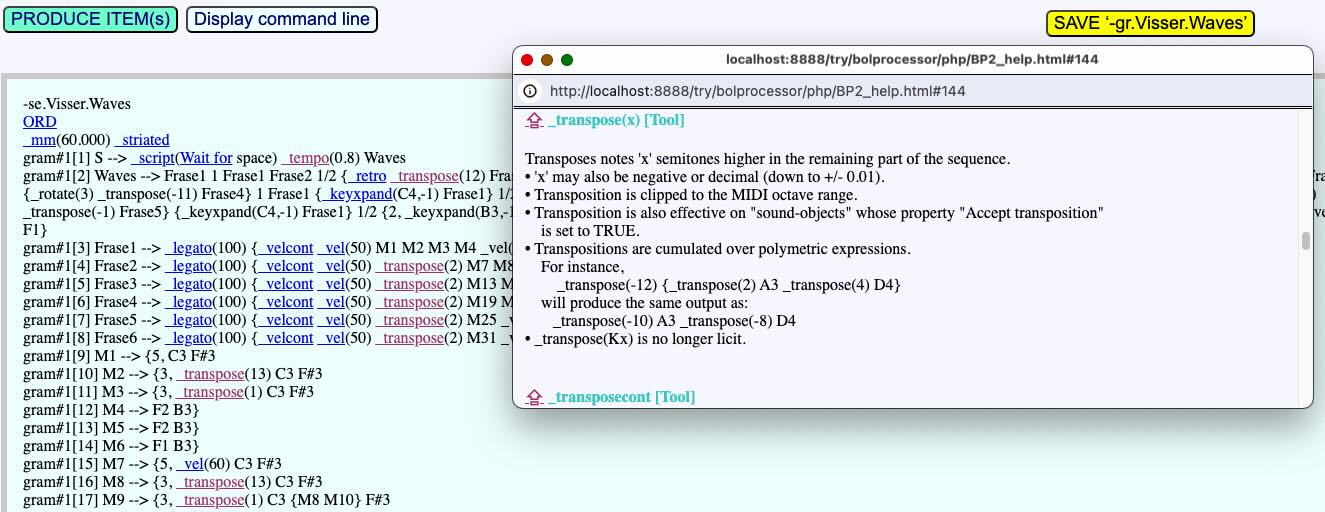
- Open the "-gr..Visser.Waves" grammar (designed by Harm Visser). At the bottom of the page, click the SHOW HELP ENTRIES button. This will display the grammar with links appearing on reserved words. For example, click on the link for "_transpose". A pop-up window will open, displaying the help at the exact location of the reserved word.
- At the bottom of the grammar file, there is one more more button: EDIT ‘-se.Visser.Waves’. It has been created automatically because the "-se.Visser.Waves" declaration was found at the top of the grammar. Click on it to edit or create the file.
- You can now produce the "Visser.Waves" item, listen to its sound rendering and view the graphic output as "pianoroll" or "objects". Below is a rendering of this grammar with physical model instruments (read explanations):
played on physical model synthesis saxophone and piano
Error messages
- Now, let us do something wrong to check for errors. In "-se.Visser.Waves" change the "Note convention" from ‘0’ (English) to another option such as ‘1’ (Italian/Spanish/French). Click on SAVE PARAMETERS, go back to the "-gr.Visser.Waves" grammar, click on SAVE and PRODUCE ITEM(s). Now, neither the "output file" nor the graphics will be visible, because the console cannot not create an item due to its misunderstanding of note names. For example, "B3" is interpreted as a variable and not as a simple note. This is not acceptable in the first argument of control "_transpose()".
- The note "B3" should have been replaced by its French equivalent "si2". The good news is that this can be done automatically in a grammar: select the convention you want to use at the bottom of the page.
- PRODUCE ITEM(s) sometimes reports that errors have been detected by the console. They appear in the "error" trace file and a link is provided to display it.
- Try the same procedure with "-gr.trial.mohanam". It is set for the Indian sargam note convention = 2. After changing the convention to "French", the output file will only contain notes "re6" which have the same name in both conventions. Confusing note conventions is a common source of error when designing music with the Bol Processor. For this reason, the current setting of this convention is displayed on the Grammar window.
- Note that the rendering of "-gr.trial.mohanam" is better with the output selection set to "CSOUND file". If Csound is installed and responding on your machine, just try it!
Compile a grammar
- So far, the grammars have been well formed, so clicking on the COMPILE GRAMMAR button would certify that there is no error. Now go to the grammar called "unknown-terminal.bpgr"and click on COMPILE GRAMMAR. It tells you that errors have been found, and the "trace" file explains that it has found (at least) one unknown terminal symbol. In fact, the symbols 'x' and 'a' have not been declared as sound-objects in a related "-al" alphabet file.
- The COMPILE GRAMMAR procedure renumbers subgrammars and rules. If you are still playing with "unknown-terminal.bpgr", replace "gram#1[1] S --> A B" with "S --> A B" and click on SAVE, then COMPILE GRAMMAR. The numbering "gram#1[1]" is restored. This takes account of inserting or deleting rules.
- The grammar named "symbols.bpgr" compiles successfully because its has an attached alphabet file containing all its terminal symbols. The alphabet file is called "symbols.bpal" and its declaration in the grammar is "-al.:symbols.bpal". This unexpected syntax is a trick to recognise file types whose names do not begin with the standard prefix. This is just to demonstrate how to manage files, as this alphabet does not produce any sound.
Change the start string
- Musical items are produced by a Bol Processor grammar which, by default, uses the symbol 'S' as the starting string for derivations. However, it is sometimes interesting to try to derive from another variable with the same grammar, or to listen to a polymetric expression. Both of these are easily achieved in the grammar window.
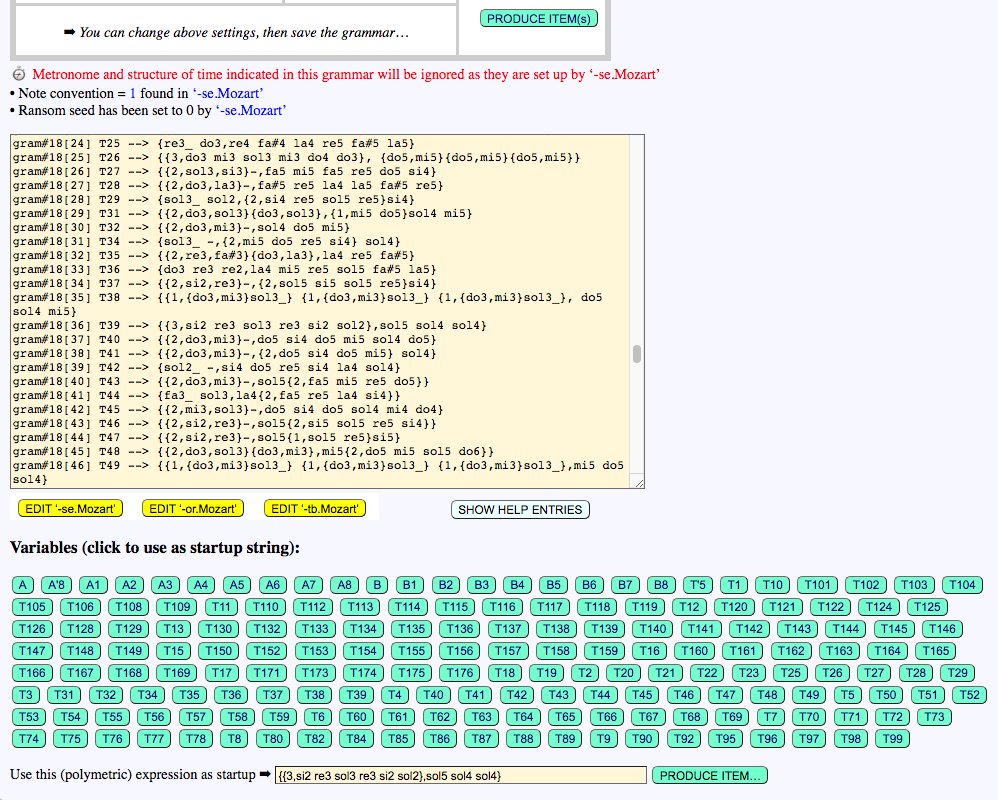
- An example of this is the use of "-gr.Mozart", where the variables represent musical fragments that are assembled in the final element (read explanation). All variables have been identified by the interface and displayed as buttons at the bottom of the page (see image on the right). Clicking on a button produces a derivation of the variable.
- Note however that in this grammar derivations from A1 to B8 won't be unique, because they are chosen randomly. Conversely, derivations from T1 to T176 are unique.
- At the bottom of the page is a field for entering a polymetric expression, for example {{2,sol3,si3}-,fa5 re5 si4}. This expression can contain variables. Click on PRODUCE ITEM to listen to the result or to obtain the output file (depending on the output format selected).
- For geeks: The "--start" and "-S" command line options used in these procedures are not yet implemented.
An example of using "-gr.Mozart" in Improvize mode is discussed on the Mozart’s musical dice game page. It will play forever if the real-time MIDI mode is active.
Play data
Open "-da.checkPoly":
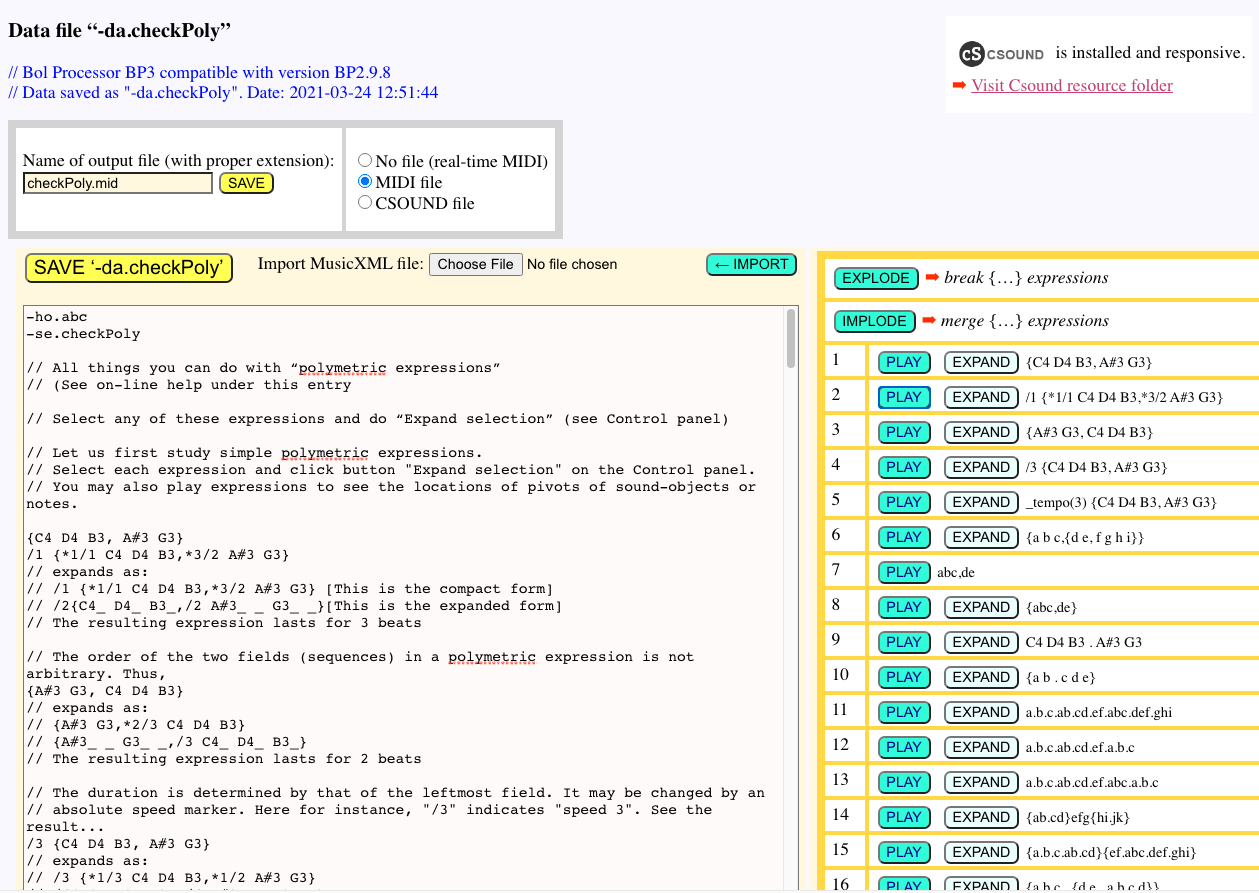
- The Data window (see picture) extracts lines that can be interpreted as musical items in BP notation.
- Each line is associated with two buttons:
- The PLAY button sends a "play" command to the console after saving the data line to a temporary file "…outdata.bpda" stored in the "temp_bolprocessor" folder. The console is asked to process this data as a MIDI file or a Csound score.
- The EXPAND button sends an "expand" command to the console after saving the data line to a temporary file "…outdata.bpda" stored in the "temp_bolprocessor" folder. The result will be displayed as text.
Sound-object prototypes
The grammar "-gr.koto3" uses an alphabet of sound-objects, namely "-al.abc1", which is related with a set of sound-object prototypes "-so.abc1". This file is located in the TONALITY resource folder, which has a link on the right hand side of each page.
The pianoroll display of an item (above in the "Produce items" chapter) already indicated that the sound-object "chik" contains a chord of 3 notes. We will now show you how to create or modify these sound-objects.
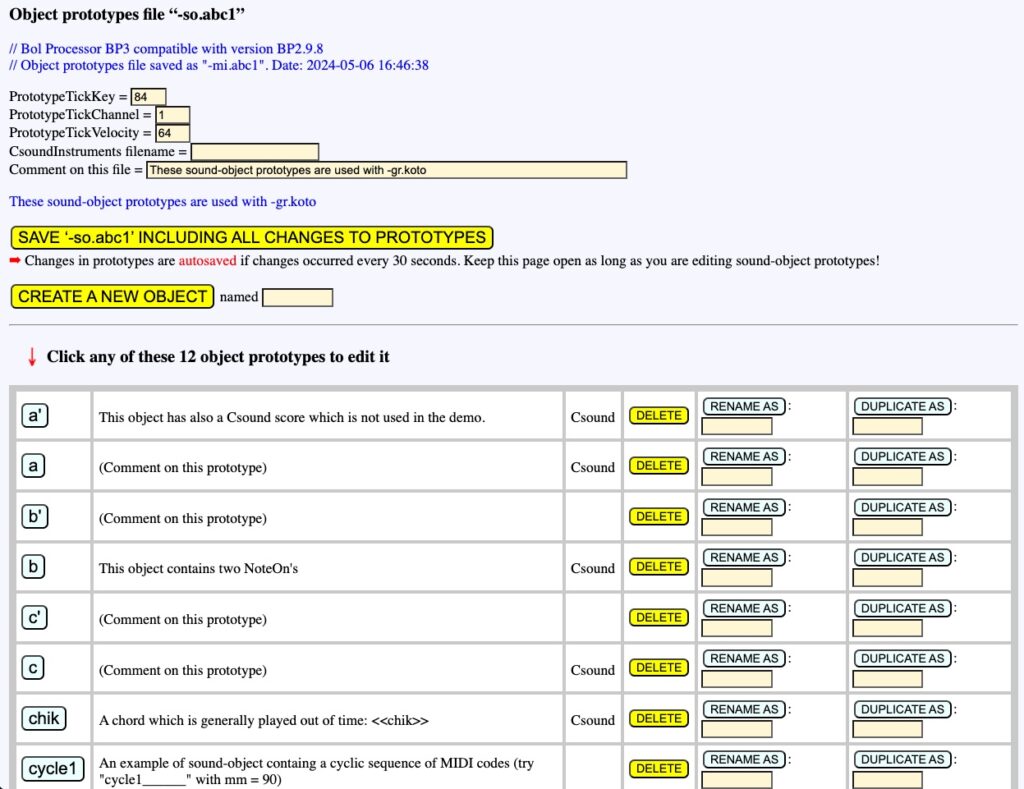
- Open "-so.abc1" (or a copy of it). Below the horizontal line you should see a table with the names of its sound-object prototypes: a, a', b, chik, cycle1 etc.
- For geeks: When you opened "-so.abc1", a temporary folder was created in the "temp_bolprocessor" folder. It has a complicated name, for example "‑so.abc1_ec02bffaaee23e051fa2afee52e57520_temp" which contains the session identifier. If you restart your computer (or your browser), the session number will be different. This folder will therefore become obsolete and a new one will be created with the current session identifier.
- The interface automatically deletes outdated folders that are more than 24 hours old. Keep pages and tags open while you work on a particular set of sound-object prototypes!
- Despite the dependency on session identifiers, no data is ever lost because "-so.abc1" is in autosave mode, automatically saving every 30 seconds while working on its sound-object prototypes. This feature is indicated by red messages at the top of the page.
- In the table you will be offered the option of deleting sound-objects. Try a couple of DELETE buttons. The good news is that a button called RESTORE ALL DELETED OBJECTS will appear… Click it to undelete sound-objects and return to the initial state.
- You can also create or duplicate sound objects. If you do so, don't forget to add their names to any "-al" (alphabet) file that declares a link with "-so.abc1". The interface ensures that you do not create multiple objects with names that are currently in use or have recently been deleted.
- Now let us edit an object, for example "chik". Click on the button with this name. (Old timers: the parameters are the same as those shown in BP2.9.8.) You can modify any parameter and click on SAVE THIS PROTOTYPE. In most cases the consistency of the values is not checked. You will need a sound output to check the effect.
- Editing an object involves setting the metric and topological parameters used by the time-setting algorithm. Read the description of this constraint-solving algorithm that takes these parameters into account.
- PLAY sends a command to the console, which will later be executed to play the sound-object or a combination of sound-objects (arranged in a polymetric structure) entered on the form.
Modify MIDI codes in a sound-object prototype
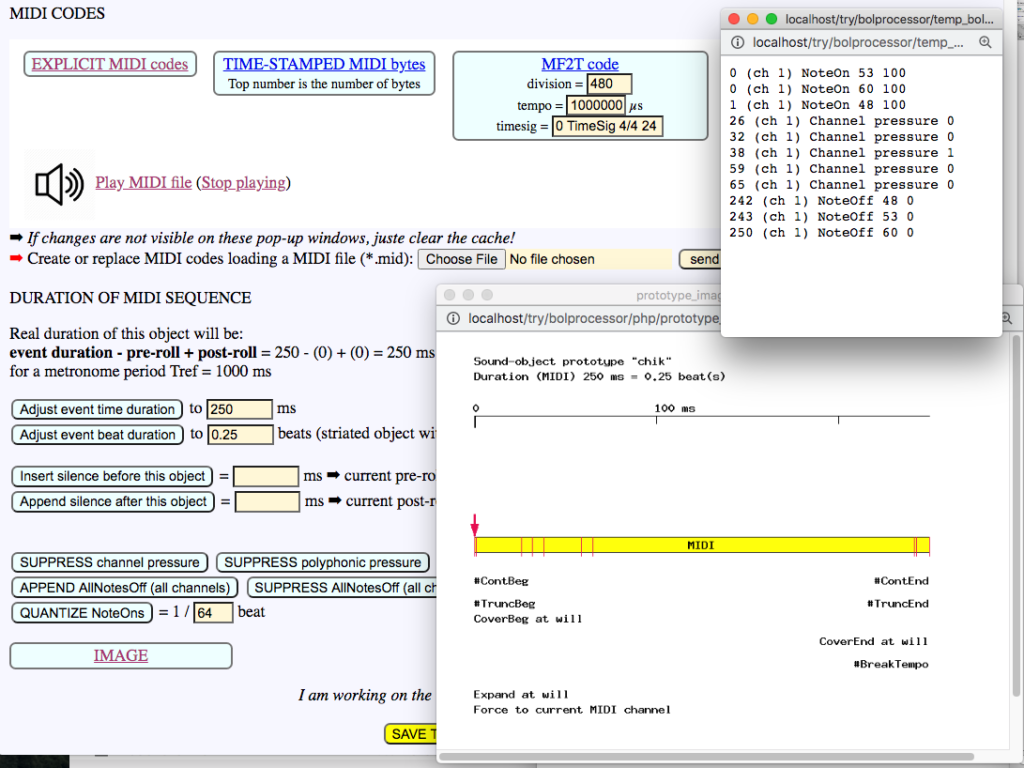
- At the bottom of each sound-object prototype page, the EXPLICIT MIDI codes and TIME-STAMPED MIDI bytes links display the lists of MIDI instructions and time-stamped bytes that will be sent to the MIDI driver. (The first number is actually the number of bytes.)
- 👉 Don't forget that the “-so” file is saved in the background every 30 seconds (autosave) while you are modifying sound-object prototypes… To return to the original version, close the “-so” tag and restore the “-so” file from its copy!
- The IMAGE link displays an image of the sound-object prototype along with indications of its topological and metrical properties, similar to the BP2.9.8 interface.
- The Play MIDI file link produces a sound output based on MIDI events contained in the sound-object prototype. Here, the "chik" sound-object prototype plays a 250 ms chord on a stringed instrument. The interface uses the MIDI player to do this.
- Note that there are five "Channel pressure" MIDI instructions in this sound-object. These may have been picked up by playing on a pressure-sensitive keyboard and their relevance is low since channel pressure can be controlled at a higher level by performance parameters. It is therefore advisable to click on SUPPRESS channel pressure and check the effect on EXPLICIT MIDI codes and TIME-STAMPED MIDI bytes. If the change is not immediately visible (this depends on the browser), simply reload the pop-up window. Other "continuous" parameters such as "volume control" can be suppressed in a similar way.
- APPEND AllNotesOff (all channels) can be a useful option to ensure that this object turns off all pending notes on the sound machine. It sends an instruction to each of the 16 channels.
- The MIDI content of this object can be changed by loading a MIDI file. Click Choose File to select a MIDI file — for example, "test.mid" in the "ctests" folder — and then send to upload it. It is not finalised immediately: you can examine the EXPLICIT MIDI codes and TIME-STAMPED MIDI bytes of this file before saving it to the sound-object prototype. The example "test.mid" contains no less than 432 bytes because of the "Channel pressure" and "Parameter ctrl 7" messages, which control pressure and volume. You can accept the import by clicking SAVE or cancel it by clicking CANCEL. There is currently no "undo" function in case the MIDI sequence has been replaced or deleted by mistake.
- An important feature is QUANTIZE NoteOns. We are dealing with "striated sound-objects", which means that they are designed to be played at a certain tempo. The tempo at which the MIDI content of this object was captured is generally not the same as the tempo at which it will be played, as the latter depends on performance parameters. The reference tempo is given by Tref which in this case is 1000 ms for a metronome with 60 beats/mn. The MIDI content uploaded by "test.mid" has a duration of 3500 ms, i.e. 3.5 beats. This duration can be set either in milliseconds or in beats. Regardless of the duration, it is often convenient to locate NoteOn and NoteOff events to a precise fraction of a beat. An Quantizing to 1/64th of a beat is often a good choice. For simplicity's sake, we will set it to 1/50th of a beat, or 20 ms.
Before clicking on QUANTIZE NoteOns, check the EXPLICIT MIDI codes. You will notice that there is a NoteOn of key 62 at 804 ms and a NoteOff of key 60 at 825 ms. Set the quantization to 1/50th of a beat and click QUANTIZE NoteOns. Now the timings of these events have been changed to 800 ms and 820 ms respectively, which are multiples of 20 closest to the original timings.
Csound
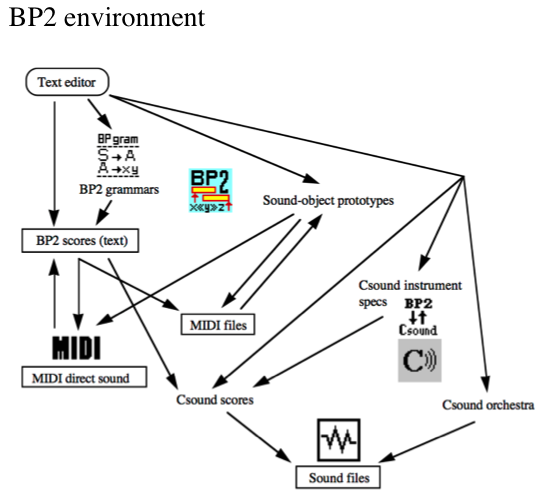
Csound is a program for the design and transformation of digitised sounds. Csound and Bol Processsor are similar and complementary in their text-oriented, programming approach, with respective emphasis on sound and musical structures. Their interaction is summarised in the BP2 environment image.
Note that Csound orchestra files containing sound production algorithms can be edited on this interface although it is not used by the ‘BP3’ console — nor was it used by BP2.9.8. Its name is stored in the Csound orchestra file. Arguments declared in the latter should match those in the former.
A simple orchestra file called "0-default.orc" is provided in the "csound_resources" folder. It can be used for Csound scores created by Bol Processor when no Csound orchestra file is specified.
Linux users: At the moment "0-default.orc" is not accepted by Csound in the Linux environment. We hope to solve this problem in the near future. For the time being you can use "BP2test.orc".
The use of Csound by the Bol Processor ‘BP3’ is the same as documented in chapter 17 of the BP2.9.8 instructions manual. Advanced features are documented in the articles Csound checkup and Csound objects.
MacOS and Windows users can download a pre-built installation of Csound from the download page. In Linux, simply type the following instructions:
sudo apt update
sudo apt install csound
If Csound is installed and responding, this status will be mentioned on the top of each page. Otherwise the machine will recommend installing Csound, or changing the path to Csound. This path is by default "/usr/local/bin" on MacOS, "usr/bin" on Linux. The BP3 interface will be able to figure this out under Windows. If a new path is entered, the machine will try to call "csound --version" and will stop trying if once it is correct.
- Open "-gr.Mozart"in the "ctests" folder.
- Select the CSOUND file output option, which (by default) will creates a file called "Mozart.sco" in the "my_output" folder. You can modify these parameters.
- If Csound is installed and responding, this status will be mentioned on the grammar. Otherwise the machine will recommend installing of Csound (from this site) or changing the path to Csound — by default "/usr/local/bin/" on a Mac. Each time a new path is entered, the machine will try to call "csound --version" and will stop trying if it succeeds.
- Click PRODUCE ITEM(s). A pop-up window will indicate that the process was successful. Click Read the output file to read the Csound score on another pop-up window.
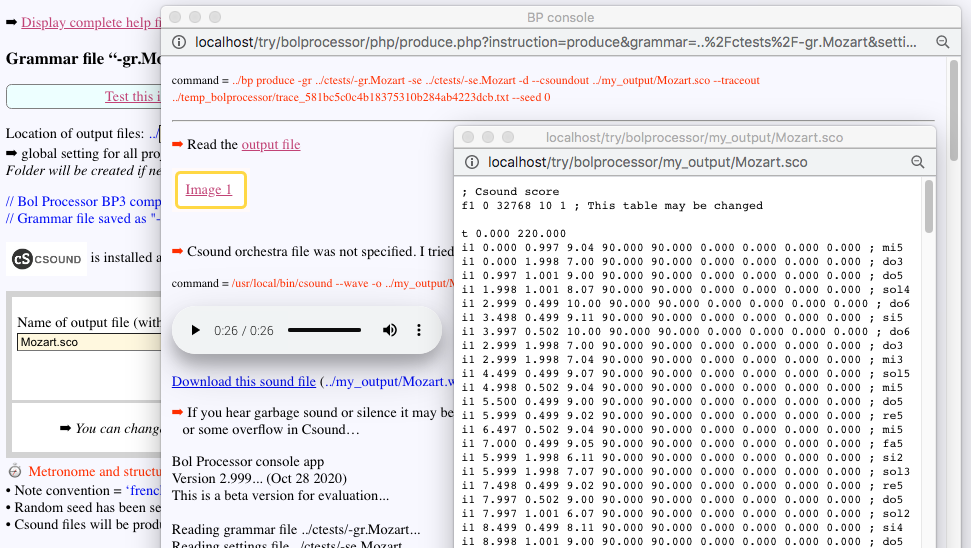
In this example, the Csound score has been generated by the Bol Processor as a sequence of "simple notes" that appear at the end of each score line: "mi5", "do3", "do5", etc. To do this, the Bol Processor uses conversion procedures to replace MIDI events with score lines.
If Csound is installed and responding, it will automatically be called to produce a sound file (in the WAV format) which will appear on a HTML player (see image). Checking the sound output — or rather the validity of the Csound score — is therefore the matter of a single click on PRODUCE ITEM(s).
On each score line, the "1" of "i1" is the value of argument "1", the leftmost one. The next two arguments are assigned to the start date and duration of the event, measured in beats. Then comes argument "4", which is assigned to the pitch in octave point pitch-class format. Arguments "5" and "6" are for continuous volume control (in the range 0…127). Argument "7" can contain the reference to a table for refining these variations. Arguments "8" and "9" are used for (continuous) pitchbend control, and argument "10" may contain the reference to a table for refining pitchbend variations.

A just-intonation version of Mozart's musical dice game can be heard on the Just intonation: a general framework page.
Csound instrument files
Bol Processor can generate a Csound output from scores stored in sound-objects or converted from the MIDI stream. It also has a direct control of the performance parameters that the Csound orchestra can independently manipulate on the standard MIDI controls ("pitchbend", "modulation", "volume", etc.). These parameters are further interpolated by the Csound orchestra, using the GEN07 (linear interpolation) or GEN08 (cubic spline) Csound generators. All this is documented in chapter 17 of the BP2.9.8 instructions manual and set up in a "-cs" Csound instrument file as the one shown below.
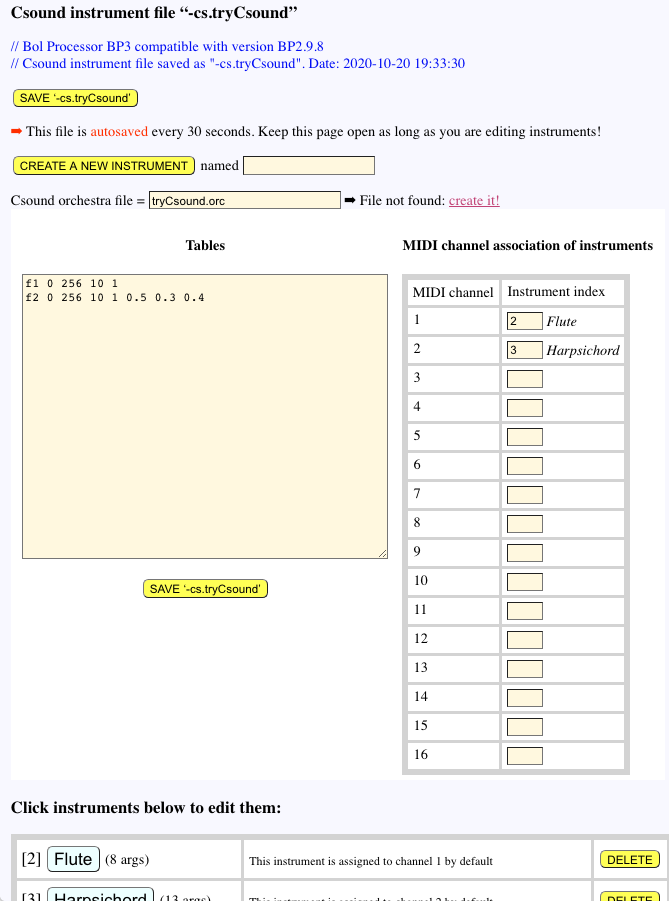
- Open "-cs.tryCsound" in the CSOUND resource folder. Note that this page is in autosave mode (see below): changes to Csound instruments are automatically saved at a rate of twice per minute.
- This Csound instrument file is declared to be linked to a Csound orchestra file called "tryCsound.orc". As this file is missing from the "csound_resources" folder, a link to create the file is displayed. Otherwise it would lead to editing the file.
- The text area for Tables needs no more explanation than given in the BP2.9.8 instructions manual. These tables are not used to create Csound scores. They are only inserted at the beginning of the score.
- Csound instruments can be associated to MIDI channels. For example, here, MIDI messages sent to channel 2 will be converted into instructions sent to instrument 3 "Harpsichord".
- At the bottom of the page is a list of the Csound instruments declared in this "-cs" file. These can be deleted, undeleted and duplicated much in the same way as sound-object prototypes (see above). Clicking on the blue button with the name of the instrument opens an editor for that instrument.
Editing a Csound instrument
The Csound instrument editor is very similar to that of the BP2.9.8's interface. A detailed description can be found in chapter 17 of the BP2.9.8 instructions manual.
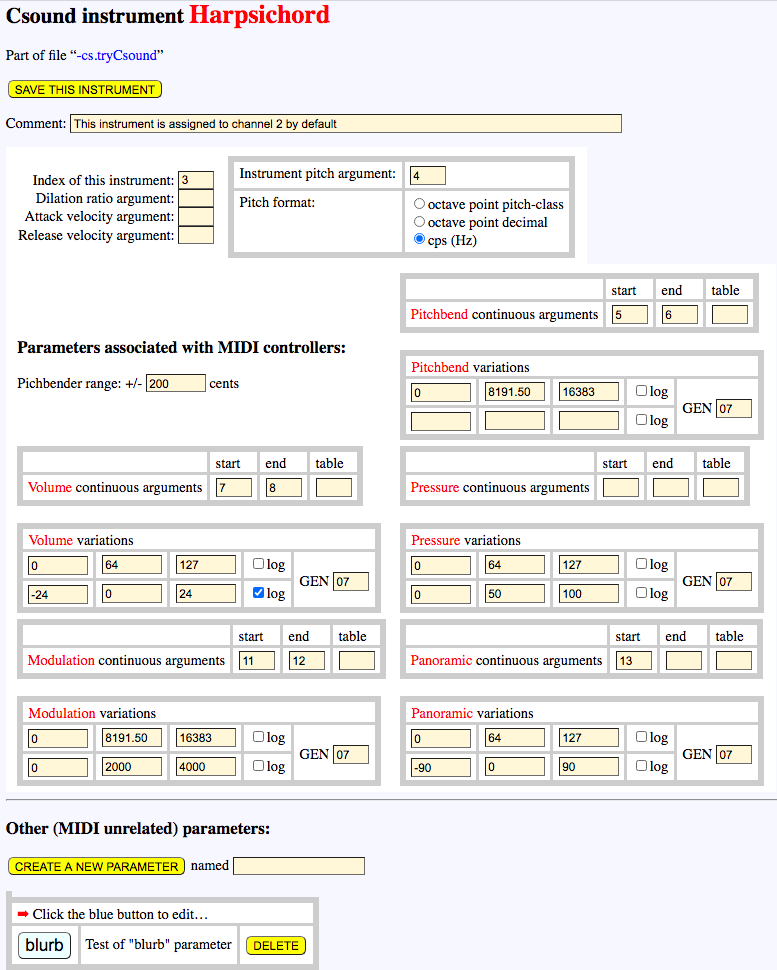
- For example, let us examine the instrument Harpsichord in "-cs.tryCsound". Its index is "3", which means that it can be called as _ins(3) or _ins(Harpsichord) on a Bol Processor score.
- The parameters displayed on the "Harpsichord" page are those associated with MIDI controllers. These can be controlled continuously if arguments are given to modify the start and end date values in a continuous change. The argument under "table" is the reference of an optional tabular function.
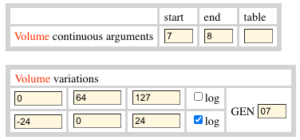
- For the volume parameter, "0", "64" and "127" (MIDI values) must to be converted to "-24", "0" and "+24" (Csound values) respectively. The conversion is from a linear to a logarithmic scale.
- The start and end values of the continuously changing volume are set by arguments "7" and "8" respectively. These are used by an algorithm that sets the volume in the associated Csound orchestra, based on the GEN07 (linear interpolation) or GEN08 (cubic spline) generators.
- Given three pairs of input/output values, BP2 tries to define a quadratic mapping between the input and the output. However, it may be difficult to fit the three values to a monotone quadratic function… See the Csound argument mapping page for a detailed explanation.
- At the bottom of the page you will find a list of Csound parameters that have nothing to do with MIDI controllers. This is where Bol Processor Csound production can differ radically from MIDI!
- This instrument has only one additional parameter called "blurb".
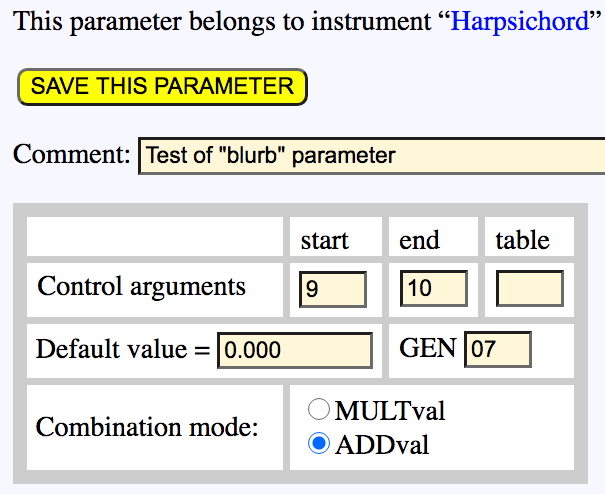
These additional parameters can be created, deleted and undeleted in the same way as instruments (see above). The interface ensures that a new parameter does not have the same name as an existing one or a (temporarily) deleted parameter.
Let us look at the "blurb" parameter (image on the left). Each parameter has a default value which is not necessarily zero. Values found on Csound scores can be combined additively (ADDval) or multiplicatively (MULTval). This "blurb" parameter sends its start value to argument "9" of the algorithm in the Csound score, and its end value (for continuous variations) to argument "10".
Using a Csound instrument in a grammar
This use is demonstrated in a hypothetical music production that is simple enough to grasp the basic features of Csound in its Bol processor implementation. A complete demo based on a real musical example can be found in the article Sarasvati vina. We have also documented all the features of the Csound implementation in the articles Csound checkup and Csound objects, showing examples that can be checked with the evaluation version of BP3.
The grammar "-gr.tryCsound" calls "-cs.tryCsound" and uses its instrument "3" (Harpsichord):
S --> _ins(3) _volumecont _volume(127) A4 G4 C5 A5 A4 G4 C5 A5 _volume(0)
The Csound score produced by this grammar is shown below:
; Csound score
f1 0 256 10 1
f2 0 256 10 1 0.5 0.3 0.4
t 0.000 60.000
i3 0.000 1.000 440.00 8191.500 8191.500 24.000 21.688 0.000 0.000 0.000 0.000 0.000 ; A4
i3 1.000 1.000 392.00 8191.500 8191.500 21.688 18.431 0.000 0.000 0.000 0.000 0.000 ; G4
i3 2.000 1.000 523.25 8191.500 8191.500 18.431 12.899 0.000 0.000 0.000 0.000 0.000 ; C5
i3 3.000 1.000 880.00 8191.500 8191.500 12.899 -0.031 0.000 0.000 0.000 0.000 0.000 ; A5
i3 4.000 1.000 440.00 8191.500 8191.500 -0.031 -1.179 0.000 0.000 0.000 0.000 0.000 ; A4
i3 5.000 1.000 392.00 8191.500 8191.500 -1.179 -2.794 0.000 0.000 0.000 0.000 0.000 ; G4
i3 6.000 1.000 523.25 8191.500 8191.500 -2.794 -5.547 0.000 0.000 0.000 0.000 0.000 ; C5
i3 7.000 1.000 880.00 8191.500 8191.500 -5.547 -24.000 0.000 0.000 0.000 0.000 0.000 ; A5
s
e
- Arguments "5" and "6" show the pitchbend start and end values as specified by the instrument. These remain at the default value of "8191.5" in the absence of pitchbend instructions.
- Arguments "7" and "8" display the start and end values of the volume parameter as expected. The continuous range is from "+24" to "-24". This is the result of a mapping between MIDI values in the range [0…127] and the volume parameter of this instrument in the range [-24…+24] (see image). This mapping is based on a logarithmic interpolation using a quadratic regression.
- Csound will be able to achieve a continuous variation of this volume parameter. To do this, it will invoke its own interpolation scheme specified as GEN07.
- The _volumecont instruction at the beginning of the sequence actually means "continuity". This resolves a discrepancy between the MIDI and Csound representation of "musical events": in the MIDI environment, each event is associated with a time point whereas Csound scores deal with time segments of specific durations. It is up to the Csound orchestra to decide how to modify a parameter from the on-set to the off-set of a segment.
- Arguments "9" and "10" remain at the default value "0.000" as the "blurb" parameter is not used.
- Arguments "11" and "12" remain at the default value "0" of the unused modulation parameter.
- Argument "13" remains at the default value "0" of the unused panoramic parameter.
Csound scores created with "-gr.tryCsound" cannot be played with "BP2test.orc" because their arguments do not match. They require a different orchestra file called "tryCsound.orc" which we haven't been able to design yet…
A real musical example using many features of the Csound integration in the Bol Processor is a phrase of Carnatic music composed/designed by Srikumar K. Subramanian in 1996. Read the description of this example and listen to its musical rendering (in “just intonation”) below:
Microtonality
In conjunction with Csound, the Bol Processor BP3 is open to microtonality and the programming of custom scales. Read the pages Microtonality and Csound tuning in BP3. Applications to western harmony and to the intonation of ragas in Indian music are presented in the "Musicology" section.
Editing the Timebase
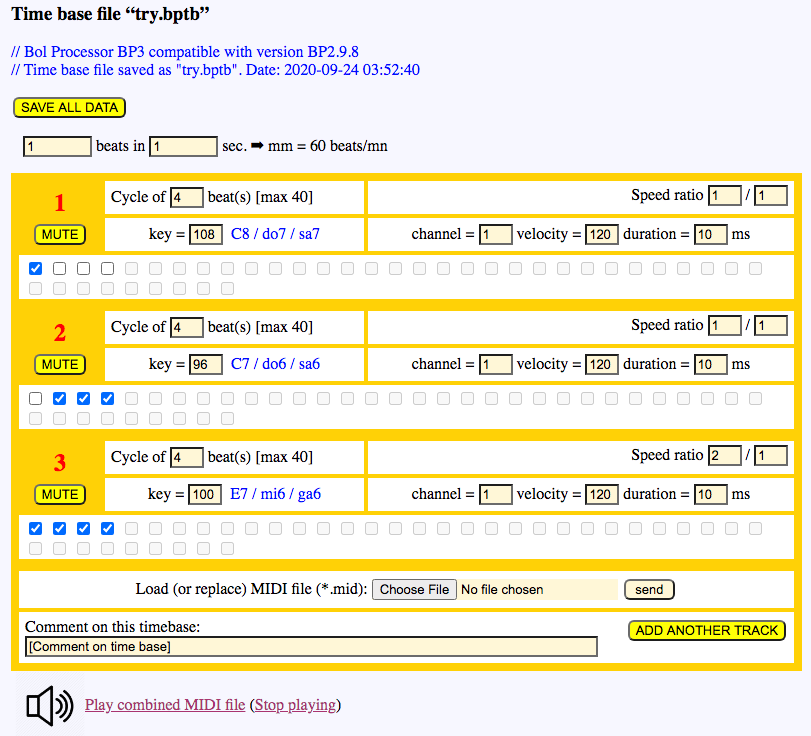
The Timebase is a device for creating a rhythmic pattern to be superimposed on a piece of music produced by the Bol Processor in real time via MIDI. Superimposition did not work well with BP2.9.8, but did work with older versions connected to MIDI via the OMS package. It has not yet been implemented in the 'BP3' console. Here we show a timebase editor which is a little more advanced than on BP2. We also try the overlay by importing the Bold Processor production as a MIDI file.
- Create a new time base called "try.bptb" in the "ctests" folder and open it.
- By default, the time base contains 3 tracks, 2 of which are set to a simple 4-beat tempo of mm = 60 beats/mn. The third track is empty. Fill it with 4 strokes on key = 100 at a speed ratio of 2/1.
- Now listen to the combined 4 tracks (repeated 3 times):
- To understand the structure you can mute some tracks.
- Now click on "Choose File" to select a MIDI file, for example "acceleration.mid", and click on the "send" button to import it.
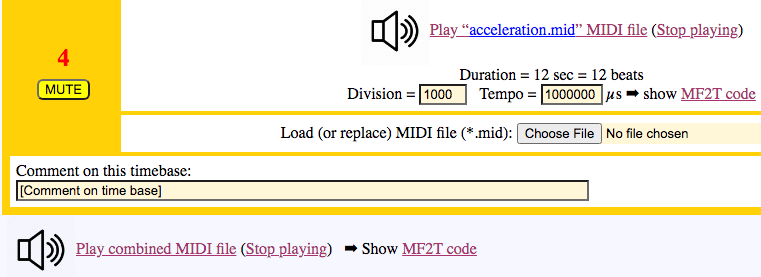
- You can listen to the imported file and to the combination of this piece of music piece with the ticking pattern:
- The overlay sounds good because the piece was created at mm = 60 and it fits a rhythmic pattern of 4 beats. You can try changing the metronome value in the table above. You will receive a warning if the metronome setting does not match the tempo declared in the imported MIDI file.
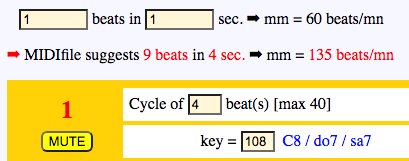
- For example, check this rhythmic cycle above "this_song.mid" in the "ctests" folder. You will be asked to set the metronome to 9 beats in 4 seconds, as declared in the MIDI file (picture on the right). The timing is perfect:
- This interface allows an unlimited number of cycle tracks to be added. (The limit in BP2 was 3 tracks).
- Playing with speed ratios creates complex cycles that can be used to control a drum machine if the appropriate channels, key numbers and velocities are set up. Traditional rhythmic structures can also be easily programmed. See examples below:
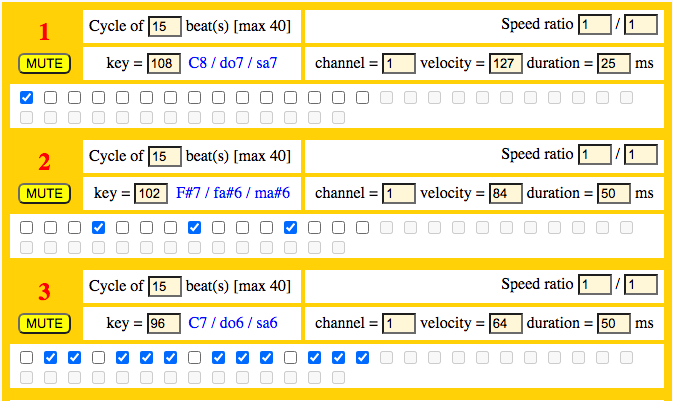 A 15-beat rhythmic structure called panchamasvari tala in Hindustani music | 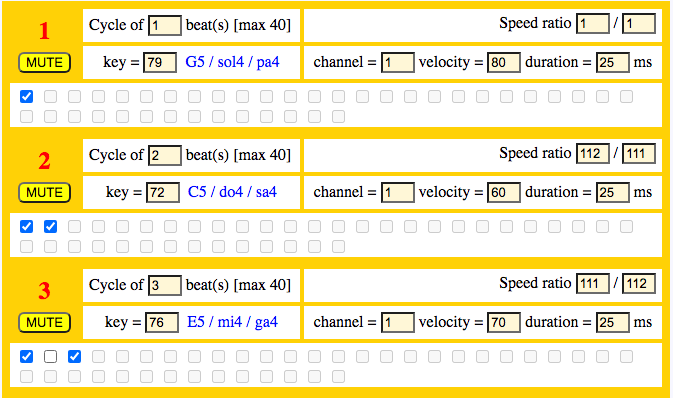 Slowly drifting rhythmic patterns |
Tick patterns as polymetric expressions
➡ For experts!
The Timebase page on the PHP interface provides a convenient way of superimposing a programmed tick pattern with a production of Bol Processor previously saved as a MIDI file. Another usage of time bases is the control of a MIDI drum machine taking part in the performance. It would be beneficial to design the drum machine track as part of the performance, as polymetric expressions are able to handle superpositions. We will see that although it is often possible, it remains a tedious task.
A polymetric equivalent of the tick pattern shown above would be:
{_chan(1) _vel(120) _staccato(99) C8 - - -, _chan(1) _vel(120) _staccato(99) - C7 C7 C7,
_chan(1) _vel(120) _staccato(98) E7 E7 E7 E7 E7 E7 E7 E7}
{_chan(1) _vel(120) _staccato(99) C8 - - -, _chan(1) _vel(120) _staccato(99) - C7 C7 C7,
_chan(1) _vel(120) _staccato(98) E7 E7 E7 E7 E7 E7 E7 E7}
This expression is displayed at the foot of the Timebase page.
Let us try to add this polymetric expression as variable "Drum" to the grammar "-gr.acceleration":
S --> {Piano, Drum}
Piano --> _vel(60) A B _vel(65) C D _vel(70) E F _vel(75) G _vel(77) H _vel(80) I _vel(85) J _vel(87) K _vel(90) L
A --> E2 •
B --> D2 A
C --> B2 B
D --> G2 C
E --> F#2 D
F --> A#2 E
G --> C2 F
H --> G#2 G
I --> A2 H
J --> D#2 I
K --> C#2 J
L --> F2 K
Drum --> {_chan(1) _vel(120) _staccato(99) C8 - - -, _chan(1) _vel(120) _staccato(99) - C7 C7 C7,
_chan(1) _vel(120) _staccato(98) E7 E7 E7 E7 E7 E7 E7 E7}
Unfortunately, this will not work because the "Piano" pattern needs to be repeated at the correct tempo instead of being extended in duration… The solution will be to replace it with a cyclic sound object. Let us do it…
- Create the following "-gr.drum" grammar and use it to create a MIDI file called "drum.mid":
S --> {_chan(1) _vel(120) _staccato(99) C8 - - -, _chan(1) _vel(120) _staccato(99) - C7 C7 C7,
_chan(1) _vel(120) _staccato(98) E7 E7 E7 E7 E7 E7 E7 E7} - Create a sound-object prototypes file called "-so.drum" and define a sound-object called "cycle2".
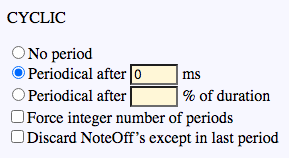
- Set it to "cyclic" (see picture on the left).
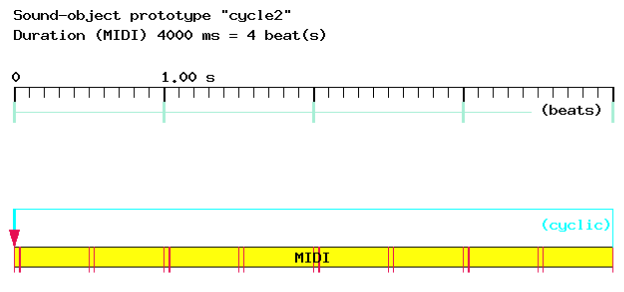
- Import "drum.mid" into sound-object protype "cycle".
- Bad news: its duration is 6000 ms instead of the expected 4000 ms…
- A look at EXPLICIT MIDI codes reveals that the last 2 seconds are a fade-out added by the Bol Processor to avoid an abrupt end.
- Good news: the sound-object prototype editor allows you to crop the sound-object by truncating its end. So let us crop it to 4000 ms.
- Listen to the cropped "cycle2" sound-object and look at its image. Everything is perfect. This object sounds identical to the sequence previously programmed on the Timebase page:
Cropping sound-objects is done carefully. If necessary, the algorithm rewrites "NoteOff" messages that have been deleted by the cropping. - Now the sound-object will be added to the grammar as follows:
-al.drum
S --> {Piano, cycle2}
Piano --> _vel(60) A B _vel(65) C D _vel(70) E F _vel(75) G _vel(77) H _vel(80) I _vel(85) J _vel(87) K _vel(90) L
A --> E2 •
B --> D2 A
C --> B2 B
etc…
J --> D#2 I
K --> C#2 J
L --> F2 K
- The "cycle2" sound-object and its associated "-so.drum" prototype file must be declared in the following "-al.drum" alphabet file:
-so.drum
The ‘*’ on the second line of the alphabet is an arbitrary symbol declaring a homomorphism — not used here.
*
cycle2
- This method is tedious, although it conforms to the Bol Processor model. Worse still, the equivalent polymetric expression can become extremely complex if the speed ratios and/or beat cycles of all the tracks are not the same. In this case, it will not be displayed at the bottom of the Timebase page.
Scripts
- Bol Processor BP2.9.8 was fully scriptable in the sense that all commands launched from its menu could be captured as sequences of script instructions and reproduced at will. This included opening folders and files, modifying text or doing something with the selection.
- A script was run every evening for about half an hour checking all procedures and tracking changes in the output data, in addition to the sound check.
- This level of automation will not be achieved in the current release of BP3 because of the decoupling between the console and its PHP interface. As a result, many BP2 script instructions won't be valid in BP3. They will be ignored during script execution.
- Consider for instance "-sc.tryMe":
Show messages OFF
Note convention = English
Show graphics ON
Play - - {2,G4,E4,C4,- C5 - C5 {C5_-,A#4_ _}}
Show messages ON
Activate window Scrap
Type Welcome to Bol Processor BP3...
Type Hope you enjoyed the music!
Type BP3 is now waiting for you to play ‘C4’ on the MIDI keyboard
Type <return>
Wait for C4 channel 1
Run script -sc.trySubscript
Type That's all folks!
- In this script, instructions "Show messages OFF", "Show graphics ON", "Show messages ON", "Activate window Scrap" and "Wait for C4 channel 1" are ignored. The "Play" instruction will expand the polymetric expression - - {2,G4,E4,C4,- C5 - C5 {C5_-,A#4_ _}} and send it to MIDI in real time. The note convention has been set to "English" to recognise "G4", "E4" etc. as simple notes. The tempo is set to standard metronome = 60 beats per minute.
- The "Type" instruction displays a line of text (which may contain HTML elements).
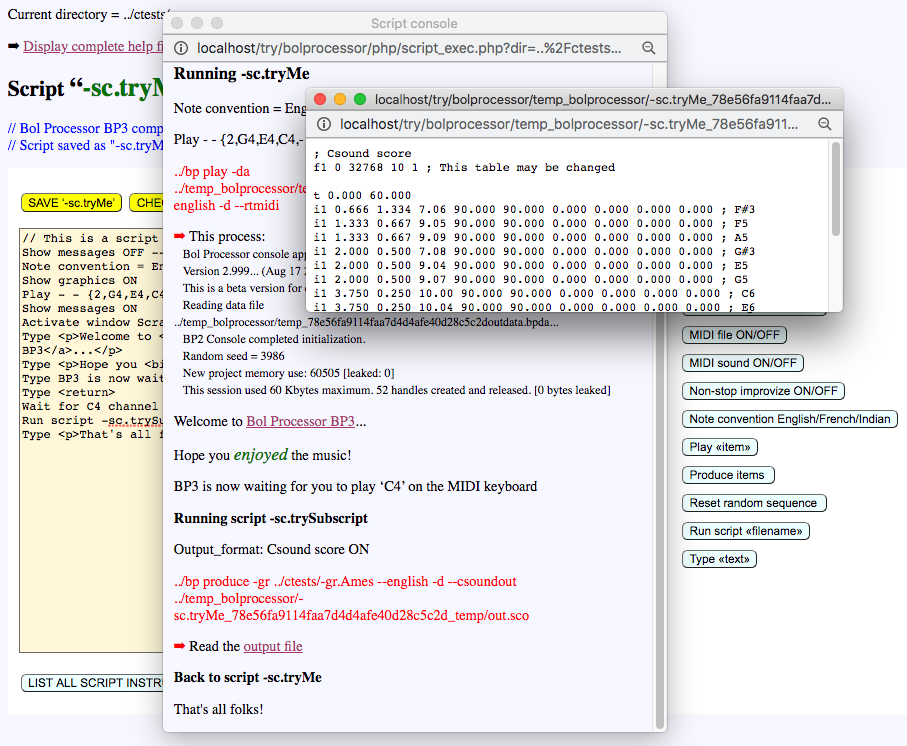
- This script calls a subscript called "-sc.trySubscript" in the same folder. Its content is:
Load project -gr.Ames
Csound score ON
Produce items - Here the machine will call the grammar "-gr.Ames" and set the output format to "Csound score".
- The execution of the script is displayed in a pop-up window (see image above), which lists (in red) the commands sent to the console. The second command produces a Csound score, as expected.
- The image also shows (light blue) buttons for entering script instructions. No typing is required. There's a button called CHECK THIS SCRIPT which shows any errors, such as a file not found.
- Below the script, the LIST ALL SCRIPT INSTRUCTIONS button lists all the instructions handled by BP2.9.8, indicating which are obsolete for BP3 and which are under development.
Setting max computation time
👉 This feature is currently disabled.
There are many ways to ensure that a grammar does not repeat the same process over and over again. These are part of the syntax in the Bol processor. For example, a flag can be decremented each time a rule is applied, and can invalidate all rules when it reaches zero.
However, mistakes can — and will — happen. For example, consider the following grammar, where one rule rewrites the same string over and over:
RND
gram#1[1] S --> X Y
gram#1[2] X --> C4 D4 E4 [Let us at least produce this!]
gram#1[3] Y --> Y [This rule makes the grammar loop forever]
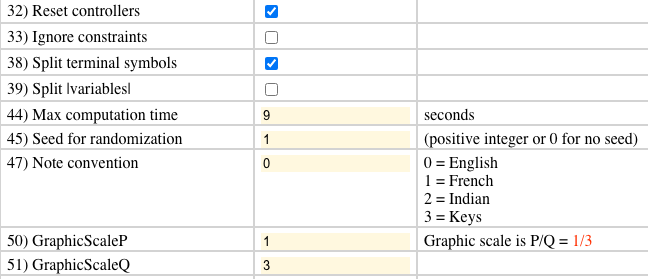
Running this grammar without any precautions would use rule [3] forever. The result would be an empty page until a break is called. Fortunately, a limit can be set in the preferences. For example 9 seconds.
Note that this grammar will stop, but it will still have created an item "C4 D4 E4" that can be displayed and heard in MIDI or Csound.
Programming tricks (for developers)
This PHP interface has been designed in a conventional manner, prioritising functionality over aesthetics. However, a few special features have been implemented which require explanations because of the painstaking search for documentation that was involved.
Pop-up windows
It is important to note that pop-up windows should be visible regardless of the security settings on the web browser. This is because they are created by a standard window.open() call attached to the button.
A typical link that activates a pop-up window is this one in "prototype.php":
echo "<a onclick=\"window.open('".$text_link."','MIDItext','width=300,height=300'); return false;\"
href=\"".$text_link."\">EXPLICIT MIDI codes</a>";
The same window.open() code may be incorporated into a "submit" button.
Autosave
The autosave feature is designed to emulate the automated updating process of Google Docs pages or WordPress posts/pages. This functionality has been integrated into the editing of sound-object prototypes and Csound instruments.
Please be aware that if you are editing prototypes belonging to "-so.abc1", all data is contained in this file. When working on a particular prototype and clicking the SAVE THIS PROTOTYPE button, only the temporary file will be updated — the path of which is shown at the top of the page. Once you have completed your work, you are expected to return to the "-so.abc1" file and click the SAVE ‘-so.abc1’ INCLUDING ALL CHANGES TO PROTOTYPES button. Fortunately, the autosave, which is indicated by a red line at the top of the page, does it for you in the backgraound.
The same feature has been implemented on the page dealing with Csound instrument files. For instance, the file "-cs.tryCsound" is automatically saved every 30 seconds while the user is working on the edition of instruments or additional parameters stored in this file.
In practice, the autosave feature is activated by a simple call of JavaScript code in files "autosaveObjects.js" or "autosaveInstruments.js". The command itself is myVar = setInterval(savePost, 30000), where "30000" represents 30 seconds. A savePost() function sends POSTs to file "autosaveObjects.php" or "autosaveInstruments.php".
GD graphics and Canvas
The GD graphics library is already included in current distributions of PHP. No installation is necessary if PHP has been compiled with the "gd" option. If you have any doubts, please display the "http://localhost/try/bolprocessor/php/phpinfo.php" page on your local server.
As an illustration of the use of GD instructions, please refer to page "prototype_image.php". It should be noted that all variables used to build the image have been stored in a temporary file "image.php". This eliminates the need to send hundreds of POST messages to "prototype_image.php".
The console has been enhanced with graphic procedures implemented in HTML Canvas, which is compliant with standard HTML5 and does not require PHP. Each image is saved as a set of JavaScript instructions, allowing its vectorised construction. This differs from GD graphics, used in the PHP/Javascript interface, which produces a PNG image. The Canvas script contains width and height values used for clipping the image. These are read by the PHP script on "produce.php" for setting up dimensions of the pop-up window that will contain the image.
👉 Don't hesitate to ask questions or send comments on the contact page!