Notes can be entered from a connected MIDI device to the Grammar or Data projects of BolProcessor BP3. This is a monophonic input with no timing parameters. For time-tagged MIDI capture, refer to this page.
If you are having problems connecting to MIDI devices, check out the instructions on the Real-time MIDI page. We will remind you of the minimum procedure here. The same applies to Grammar and Data projects.
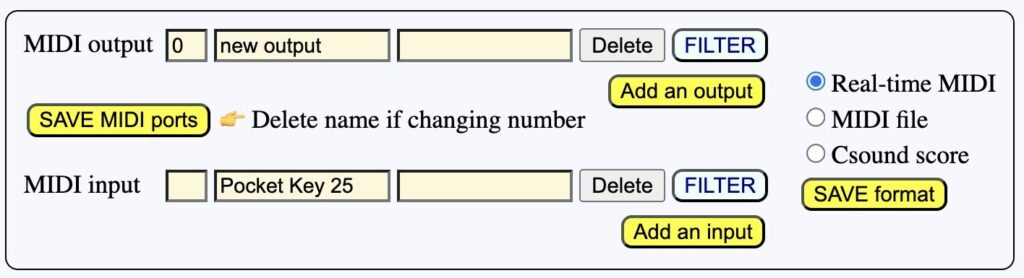
Let us assume that you connected a MIDI piano keyboard to a USB port of the machine running BP3. My keyboard's name is "Pocket Key 25". The only step required is to declare the keyboard as an input device.
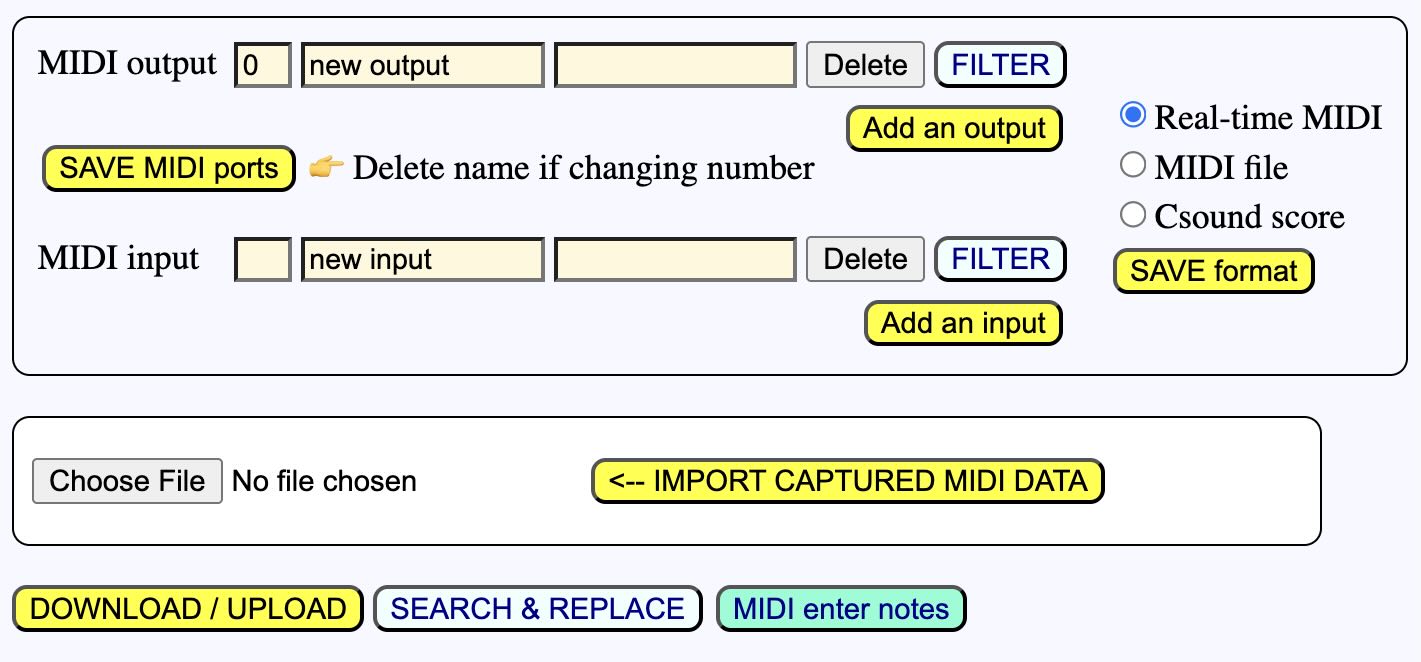
Select Real-time MIDI and click SAVE format. Then click Add an input and SAVE MIDI ports. You will then see the following:
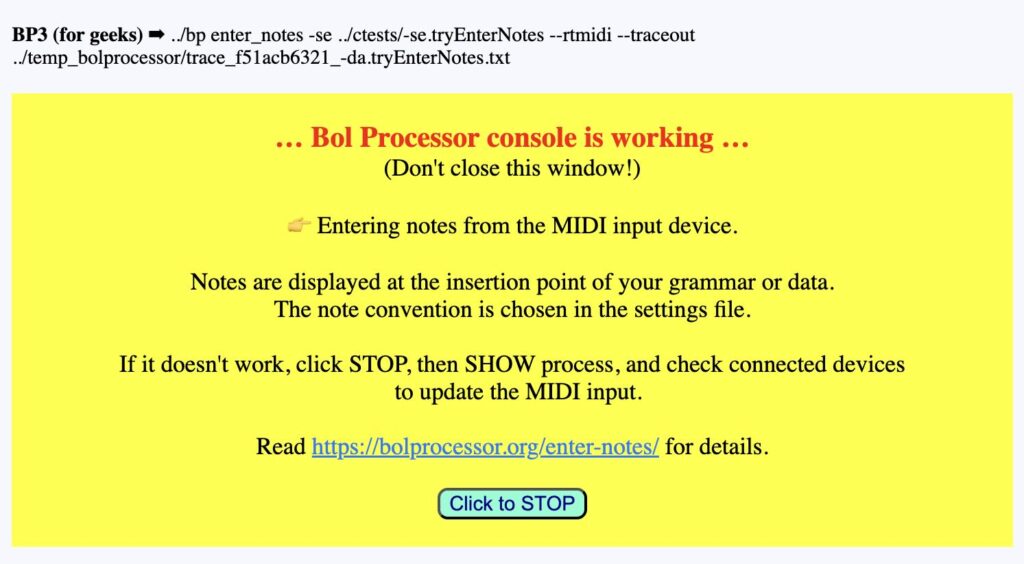
This means that BP3 will attempt to connect to the next available MIDI input and output. Every system has its own built-in MIDI devices, including those that you are currently running on the same machine. Therefore, it is unlikely that your external keyboard will be selected immediately. Never mind; click on the location in your data or grammar where you want to write notes, then click the MIDI enter notes button, which should now be visible since you declared a MIDI input. A process window will appear:
If the notes you play on the MIDI keyboard are immediately displayed on your Data or Grammar page, it means that BP3 has found your external keyboard. This is generally not the case. Clicking STOP will take you here:
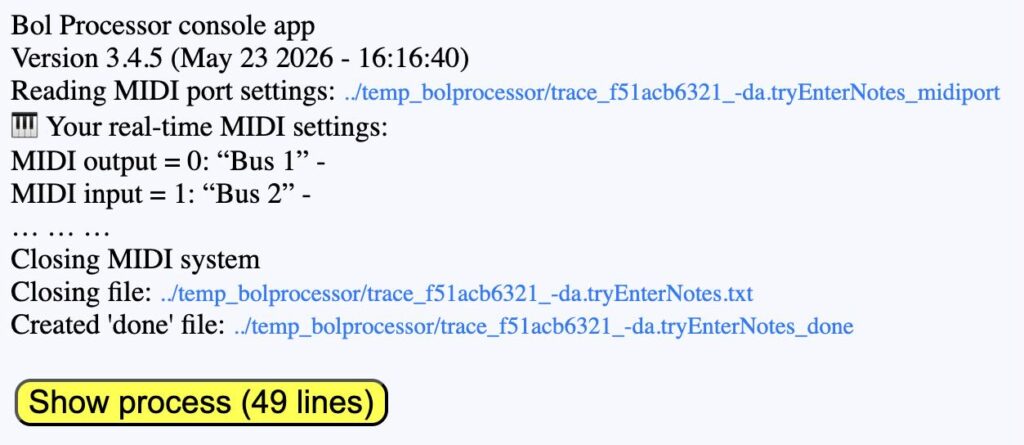
On this example you can see that the selected input was "Bus 2", which is not the external keyboard. Click Show process to read details.
This the MacOS version; the others are very similar:
Bol Processor console app Version 3.4.5 (May 23 2026 - 16:16:40) Reading MIDI port settings: ../temp_bolprocessor/trace_f51acb6321_-da.tryEnterNotes_midiport 🎹 Your real-time MIDI settings: MIDI output = 0: “new output” - MIDI input = -1: “new input” - 🎹 Setting up MacOS MIDI system Trying to assign ports to 1 output(s) without names but possibly with numbers MIDI output = 0: “Bus 1” 👉 the number of your choice Trying to assign ports to 1 input(s) without names but possibly with numbers MIDI input = 1: “Bus 2” 👉 choice by default MIDI input 1 makes BP3 interactive 🎶 More MIDI output options are available: MIDI output = 1: “Bus 2” MIDI output = 2: “Pocket Key 25” 🎶 More MIDI input options are available: MIDI input = 0: “Bus 1” MIDI input = 2: “Pocket Key 25” MIDI settings saved to ../temp_bolprocessor/trace_f51acb6321_-da.tryEnterNotes_midiport 🎹 Name(s) of MIDI input or/and output changed and will be updated when saving the page of your project
BP3 selected "Bus 2" as the input, but it also says that "Pocket Key 25” is another option. This is the one we need. Let us copy and paste the name, then SAVE MIDI ports:
Now, clicking again the MIDI enter notes button will effectively type the names of notes played (in sequence) on the keyboard.
👉For now, chords will be interpreted as note sequences rather than polymetric constructions. This could be addressed later.
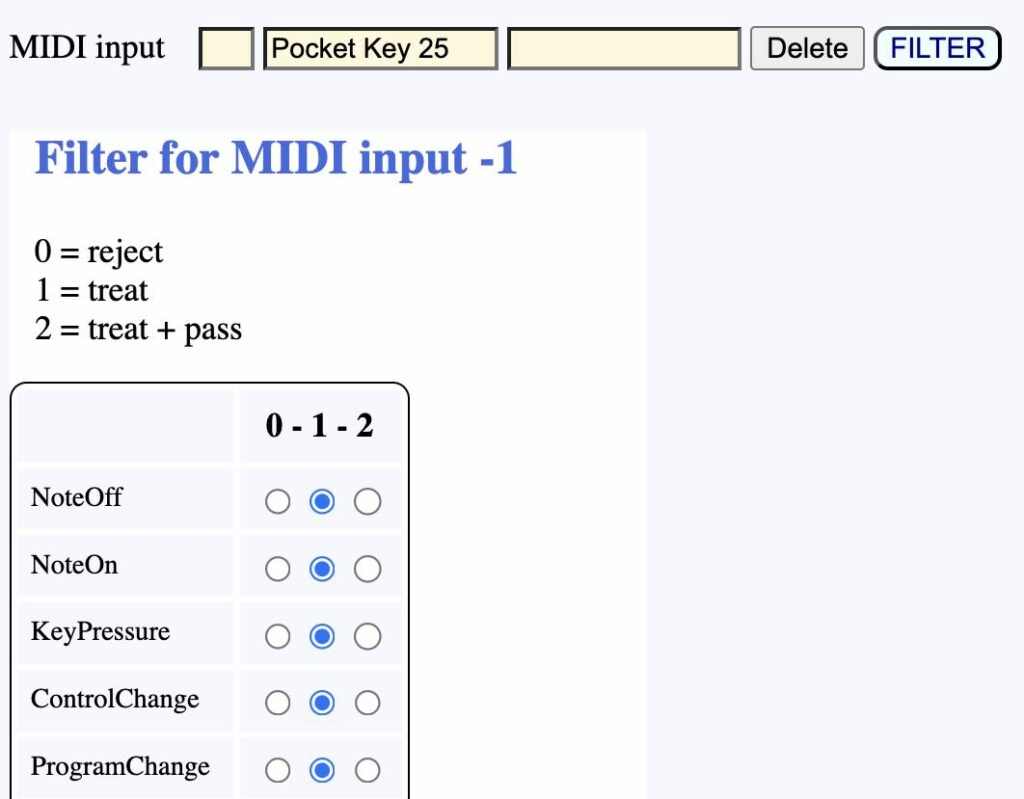
If it still does not work, check the input filter:
NoteOn should be at least in column 1 (treat). If NoteOn and NoteOff are in column 2 (transmit), the notes will also be heard on the MIDI output device.
You can change the note convention from English to Italian/French or to Indian. Open your project settings and select the desired convention.
Note that you can use the computer keyboard mapping and MIDI keyboard capture of notes at the same time.
The first version of the Bol Processor (BP1) was an advanced word processor designed to store text representations of musical variations created by Indian drum players. This work required a mapping system that could associate a word with a single key on the computer keyboard.
Keyboard mapping on Bol Processor BP1
Although the keyboard mapping was relatively easy to program in the Apple II's 6502 assembly language, its implementation in BP2 and then BP3 was delayed until version 3.4.4 (May 2026). Thus, after many years, the entire technical environment for the study of drum improvisation has been revived, alongside the restored procedures of item parsing and learning rule weights from examples.
Checking keyboard mapping on BP3
Open "-gr.dhadhatite" (in the latest distribution of the "ctests" folder). On top of the grammar you can read:
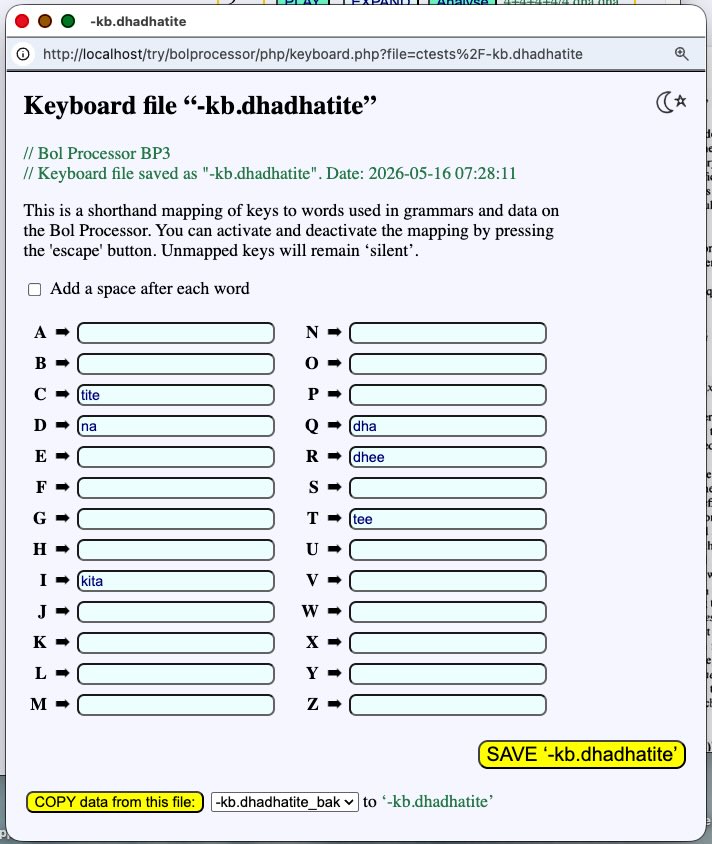
The "-kb.dhadhatite" declaration points to a file containing the keyboard mapping. If this file is present in the "ctests" folder, a button appears below the grammar to open it. If no file with this name is found, you will be offered the option of creating a new one.
The display is self-explanatory:
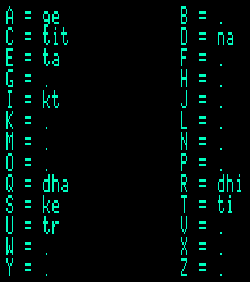
The mapping involves the association of alphabetic keys with any word (or sequence of words). Here we use only the terminal alphabet of the grammar — 'bols' in the language of drum players. But we could map other keys to frequently used variables or expressions in this work environment.
When working with the tabla, Jim Kippen managed to position the words at keyboard locations that facilitated typing at the same speed at which he would play them on the tabla. For this reason, "dha" is located at the far left.
To activate the mapping, click on the desired position in the grammar and then press the 'Escape' key. Now, if you type "qcqqcrd" — or "QcQQCrd", etc. — you will get:
dhatitedhadhatitedheena
This works in MacOS, Windows and Linux environments.
Alphabetic keys that are not mapped, such as 'A' and 'N', will be inactive. Non-alphabetic keys, such as digits and typographic symbols, will function as normal.
If the "Add space after each word" option is checked, and the mapping is saved, typing "qcqqcrd" will produce:
dha tite dha dha tite dhee na
The Bol Processor can segment strings without spaces if they are made of words from the terminal alphabet, here defined in "-al.dhadhatite". However, adding spaces makes it easier to read for untrained humans.
The same keyboard mapping feature can be used on a Data page such as "-da.dhadhatite".
At the bottom of the keyboard form, there is a button labelled "COPY data from this file". This allows you to select a different keyboard file to use for the settings.
Grammaires de génération et de reconnaissance de phrases rythmiques Grammars for the production and recognition of rhythmic sentences
Bernard Bel
Actes du 6e congrès AFCET/INRIA, Antibes, 1987b: 353-366.
This paper details a cognitive anthropology project that uses formal generative grammars to model and analyze the rhythmic structures of North Indian tabla music.
Résumé : Un projet d'anthropologie cognitive sur les langages de percussion du nord de l'Inde met en interaction des musiciens experts, un analyste et un automate simulant la génération et la reconnaissance de compositions rythmiques. Les connaissances et les hypothèses sur chaque type de composition sont formulées à l'aide de règles de production. Les grammaires sont ensuite modifiées jusqu'à ce que l'adéquation entre l'ensemble des phrases générées et la pratique musicale soit jugée satisfaisante. Cet exposé décrit le formalisme de représentation et les algorithmes utilisés pour la synthèse et l'analyse des phrases, en s'appuyant sur des exemples tirés du répertoire musical.
Abstract: In a cognitive anthropological project dealing with drumming languages in North India, an interaction has been created between expert musicians, an analyst and an automaton simulating the generation and recognition of rhythmic compositions. Production rules are used to represent knowledge and hypotheses on each compositional type. Grammars are then modified in order to match the set of generated sentences with musical practice. This paper describes data representation and algorithms utilized for the synthesis and parsing of sentences, with the support of examples drawn from the musical repertoire.
More details are found in chapter 4 of Bel's (1990) thesis: French and English versions.
The "learning rule weights" feature was implemented in the first version of the Bol Processor (BP1) a long time ago. It was designed in response to a problem that arose during fieldwork sessions while Jim Kippen was developing grammars capable of identifying the "language" conveyed by qa‘ida compositions of tabla. Citing Jim (Kippen & Bel, 1992):
[…] sometimes a grammar would reach a point of stagnation where computer-generated variations were judged to be neither very good nor incorrect. Consequently there was no simple way of refining or improving the model. We felt that a solution lay in attributing to each production rule a coefficient of likelihood (or weight) where the probability that certain generative paths would be chosen in preference to others could be examined.
The probabilistic model that has been implemented on the BP is derived from probabilistic grammars/automata as defined by Booth & Thompson (1973), the difference being that a weight rather than a probability is attached to every rule. The rule probability is computed as follows: if the weight is zero then the probability is zero; if the weight is positive then the inference engine calculates the sum of weights of all candidate rules, and the rule probability is the ratio of its own weight to the sum.
Rule weights can be inferred from a set of sentences (Maryanski & Booth 1977:525). The algorithm implemented in the BP is more powerful than the one devised by Maryanski and Booth, since the latter required the choice of a sample set in which all rules had been used. Given a grammar and a subset of the language that this grammar generates (for instance a sample sequence taken from a performance of an expert musician), rule weights may be inferred as follows: first, reset all weights to zero. Then, analyse every sentence and increment the weights of all rules used in the derivation by one unit.
We will demonstrate the inference of rule weights using grammars and data distributed in the ‘ctests’ folder. These grammars are real examples from field work.
Infer weights in the "-gr.dhadhatite" grammar
The ‘ctests’ folder contains both "-gr.dhahatite" and "-dha.dhahatite". The latter is a set of 15 examples designed for the demonstration. They are not of great interest because they were all produced by the grammar and will therefore be parsed successfully. However, you can try modifying details to observe failed parsing.
In addition, the first eight ones are identical, except for their notation. Items can be typed without spaces, given that the terminal alphabet "-al.dhahatite" will create a correct segmentation. They can be set out on several lines separated by single line feeds. Beats can be marked with periods (the period notation) which the polymetric algorithm interprets as identical symbolic durations (see this page).
Let us have a look at the "-gr.dhahatite" grammar which we already used for parsing variations. First create its templates as explained earlier.
Settings of the "-gr.dhahatite" grammar
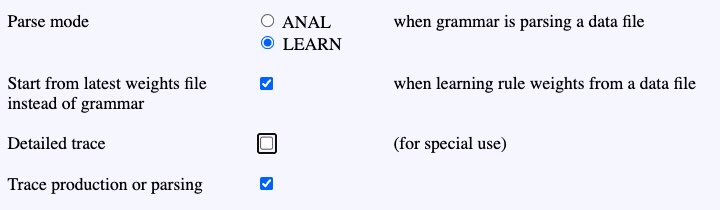
Open the settings and check the LEARN option for parsing data files (see image). The option "Start from latest weights file instead of grammar" is selected by default and will be explained further.
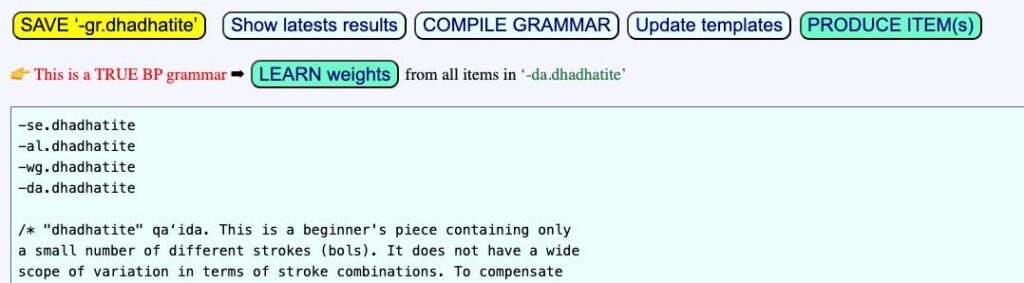
Then add "-dha.dhahatite" and "-wg.dhahatite" in declarations on top of the grammar, and save the page.
This modifies the display of the top of the grammar:
Clicking the LEARN weights button will launch the inference of weights from the sample set in "-dha.dhahatite":
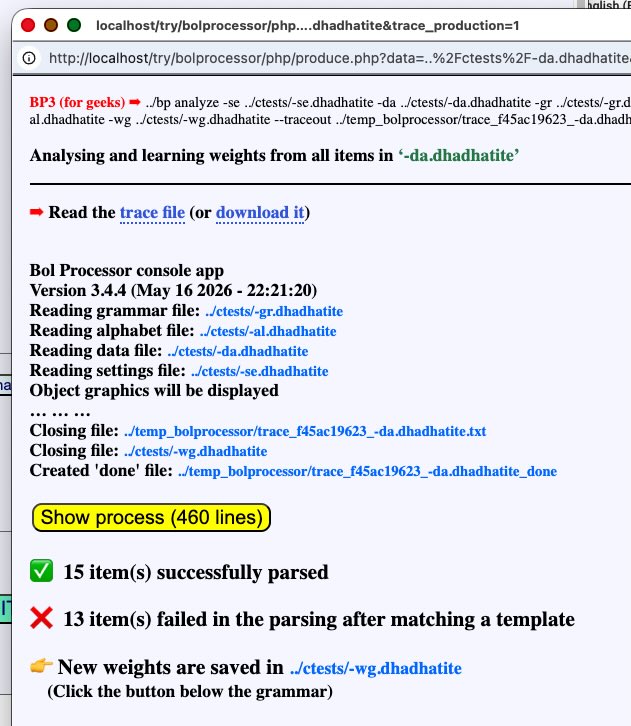
The production window shows that all 15 items were successfully parsed although "13 item(s) failed in the parsing after matching a template"… We knew that this grammar would accept all items, so we need an explanation for the failed parsing.
Click the Show process button to get more details:
This report shows that the first item failed to match two templates but was later correctly parsed after matching template [3]. Other items displayed similar behaviour. At the top of the page, there is a link to a trace of the parsing because the "Trace production or parsing" option is selected in the settings. There is also a "Detailed trace" option available for automated analysis, which is not discussed here.
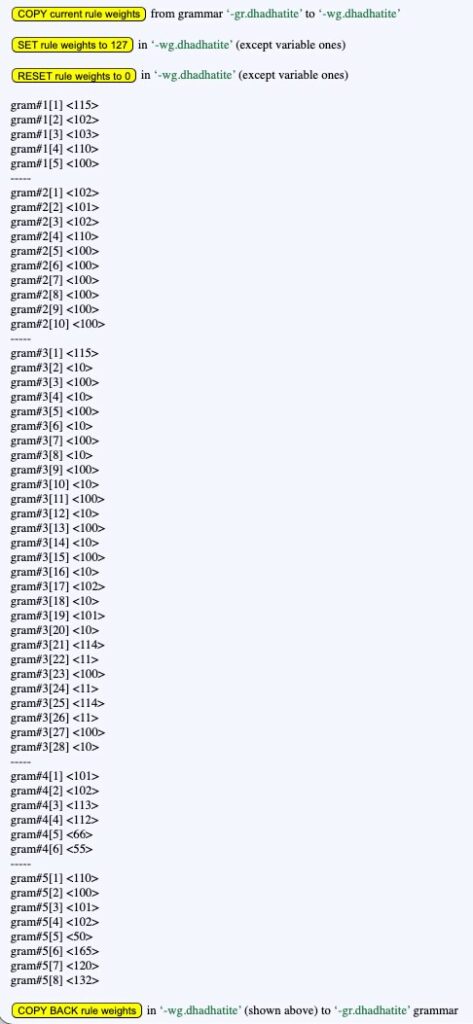
Now, move down to the bottom of the grammar and click the "-wg.dhadhatite" button. This file was created by the BP3 console upon completion of its analysis. It contains the new weights of the grammar, i.e. for each rule, the original weight (usually 100) plus the number of times the rule has been used in the parsing process.
For example, the weight of rule [1] of gram#1 would be raised from 100 to 115, since it was used for all 15 items. However, the weight of rule [5] of gram#1 would stay at 100, since it was not used in this analysis. Changes are easy to check comparing the content of "-wg.dhadhatite" with weights in the grammar.
The "-wg.dhadhatite" display includes several buttons that are easy to understand:
The COPY current weights button will copy all the weights in the grammar to the file "-wg.dhadhatite";
The SET rule weights and RESET rule weights buttons will set or reset all weights in the file "-wg.dhadhatite", yet not in the grammar.
The COPY BACK rule weights button will copy weights from "-wg.dhadhatite" to the "-gr.dhadhatite" grammar. Then you are offered the option to save the grammar if these weights are correct, or to reload the grammar otherwise:
The "-wg.dhadhatite" page also has buttons that allow you to save a copy of its weights to a new '-wg' file, or copy weights from another file.
In real life…
This "-wg.dhadhatite" layout shows how to proceed in real-life situations. You have a working Bol Processor grammar, as well as large sets of examples produced by the grammar and validated (or provided) by the expert you are working with. Proceed as follows:
Open the "-wg" file and RESET all weights to 0 (in that file);
Click the LEARN weights button;
Keep an eye on items that are rejected. These may indicate an incomplete grammar. They may also be incorrect. If so, make changes and go back to step 1;
If the option "Start from latest weights file instead of grammar" is selected, you can repeat this process with more sets of examples, as rule weights will add up.
Although rule weights can be very large integers, we find it more practical to keep them within a small range, such as 0 to 127. The 127 limit is just a convention that can be changed in the PHP interface. Currently, if the weight of a rule is not displayed, its value is 127, and vice versa.
The Bol Processor can analyse musical variations (strings of terminal symbols) using a grammar. A successful parse (membership test) indicates that the variation was produced by, or could be produced by, the grammar. This process was used extensively for modelling improvisation and composition in north Indian tabla drumming — read Jim Kippen's interview.
On this page we will introduce the real data sets "-da.dhahatite" versus "-gr.dhahatite", and "-da.dhin--" versus "-gr.dhin--". However, let us first deal with a very simple example.
A simple true Bol Processor grammar
Grammar "-gr.tryAllItems0" in the "ctests" folder:
RND gram#1[1] S <-> (= X) X (: X) gram#1[2] S <-> X X ----- RND gram#2[1] X <-> a gram#2[2] X <-> b
This grammar is a "true Bol Processor grammar":
It does not contain erase rules such as X --> lambda;
Rules can be used for producing and parsing items, as indicated by the "<->" derivation sign;
Rules do not contain any /flag/;
Rules do not have decreasing weights such as "<K3-20>", "<100-50>", etc.;
Rules do not contain any procedure such as "_goto", "_repeat", "_destru", etc.;
Note, however, that rules can contain left/right contexts, including remote ones.
This can be summarised by the following, less technical yet highly relevant statement: a true Bol Processor grammar will deterministically parse every item it can produce. The "deterministic" property means that the algorithm will not backtrack if there are no available candidate rules. This is a fundamental feature of recognising formal languages that represent sets of musical variations.
When a grammar is read, the interface checks whether it is "true BP". If so, a "Create templates" button is displayed.
(For geeks)The interface uses the is_true_bp() function to check the grammar.
This grammar uses the terminal alphabet "-al.abc" which is linked to a set of sound-objects, but we won't use this feature here. Set the output mode to "BP data file".
Let us first produce all items, i.e. the language of this grammar. In the settings, check "Produce all items" in the PRODUCTION section. You can set "Max items produced" to a large number, for instance 500, as we assume that the actual size of the language is much smaller.
Click "PRODUCE". The result is:
a a a a b a b a b b b b a a a b b a b b
The first four items have been created by gram#1[1], the first rule of the first subgrammar. The rule contains a pattern (=X)…(:X) meaning that the first and last parts must be identical.
The gram#1[2] rule produces two instances of variable X that are rewritten as 'a' or 'b' in gram#2. All possibilities are displayed in the last four items.
These 8 items have been copied to "-da.tryAnalyse", with additional empty lines to separate them.
Parse "-da.tryAnalyse"
In order to parse items in "-da.tryAnalyse", we need to write the name of the grammar on top of the Data page, along with links to the alphabet and settings:
-se.tryAnalyse -al.abc -gr.tryAllItems0
Now, "Analyse" buttons are shown for each item. However, if you click on any of these, the parsing will fail for the first four. The reason is that these should be recognised by gram#1[1], which is a pattern rule. In other words, we need to tell the engine that the pattern has been recognised.
👉 This is why we need to create templates in true BP grammars that contain pattern rules.
Create templates for "-gr.tryAllItems0"
Click the "Create templates" button, then click the "output file" link. We get:
In this simple grammar, the two templates represent the pattern types of each rule in gram#1. Although no theoretical knowledge of templates is required to use them, let us have a little explanation:
Template [2] contains two occurrences of '_', which means it will match any item containing two terminal symbols.
Template [1] contains the structural markers "@0" indicating a master parenthesis, and "@1" its slave copy. Note that "@0" is followed by a single "_", indicating a single terminal symbol, but "@1" is alone in its parenthesis, as it is meant to be the exact copy of its master.
Copy the templates, paste them at the bottom of grammar "-gr.tryAllItems0", then save the grammar. Note that the template button now appears as "Update templates".
Parse "-da.tryAnalyse" using the templates in "-gr.tryAllItems0"
Return to the "-da.tryAnalyse" and click the "Analyse" buttons. Now, all items are parsed successfully. The trace of the analysis of the first item "a a a" make it clear:
Analysing this item Compiling grammar… Compiling subgrammar #1… Compiling subgrammar #2… Compiling subgrammar #3… Parsing completed Errors: 0 Template(s) found, position 333 👉 We will try all templates, as per your settings Analyzing selection… Item matched template [1] • Subgrammar 3/3 • Subgrammar 2/3 • Subgrammar 1/3 👉 Item matching template [1] accepted by grammar… ✅
Evidently, the four first items will match the "template [1]", and the four last items will match the "template [2]". The trace is self-explanatory:
Selected: gram#2[1] X <-> a (= a) X(: a) Selected: gram#2[1] X <-> a (= X) X(: X) Selected: gram#1[1] S <-> (= X) X(: X) S
A few words about the creation of templates. Firstly, this procedure is restricted to finite languages. A grammar containing recursive rules would produce items of unrestricted length, resulting in an infinite number of templates. The Bol Processor has grammar procedures, such as "_repeat()", that tell the number of times a rule can be applied, thereby limiting the length or duration of any production. However, these procedures are currently not applicable to the parsing of items.
Secondly, at first glance, creating templates for the simple grammar amounts to producing the entire language, replacing terminals with '_', and eliminating duplicate instances. This would be impractical for most real-world grammars because, although the language is finite, it can be very large. To avoid this, the machine first determines up to which subgrammar structural rules are found. Then it explores all derivations of these subgrammars, and for each derivation it produces only one item which is converted to its template.
Structural rules are the ones that contain syntactic structures (master-slave parentheses) or/and structural markers if they are not in the contexts of the rule.
Structural markers are the glyphs '+', ':', ';', '=' and '\'. We'll see their usage in grammars for tabla compositions.
Analysis of "-da.acceleration" (without templates)
The "-gr.acceleration" grammar has no template, but you can check that it is able to parse "-da.acceleration" which it had created. Note that all rules have '<->' derivation signs instead of '-->' as in the old version.
A particular feature of this grammar is that a rule contains a period (beat marker) :
gram#1[2] A <-> E2 •
The item produced by this grammar contains periods that create the accelerating tempo:
These periods are taken into account for the analysis because they have been produced by the grammar. For example, if you erase the last one, the parsing will fail.
Performance controls such as "_transpose()" and "_vel()" are ignored. The trace of the (successful) parsing ends as follows:
… Selected: gram#1[3] B <-> D2 A E2 . B C D E F G H I J K L Selected: gram#1[2] A <-> E2 . A B C D E F G H I J K L Selected: gram#1[1] S <-> A B C D E F G H I J K L S
Remember that "." and "•" are identical glyphs on BP3.
Rule selection criteria
To ensure the deterministic analysis is successful, several rules and selection criteria must be observed.
When multiple rules are candidates for rewriting a string Wi, the system selects based on:
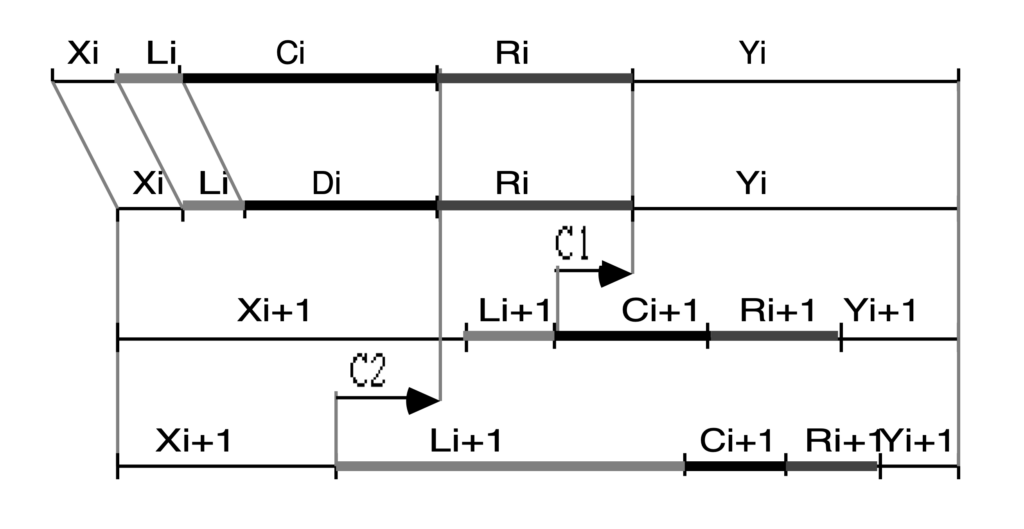
(D1) Position: Preference for the rightmost possible derivation.
(D2) Context Length: Preference for the rule that maximizes the fulfillment of context conditions.
(D3) Pattern Length: "Priority to the largest aggregates of symbols." Longest patterns are recognized first.
(D4) Order: The reverse order of appearance in the grammar.
To prevent ambiguity and "checkmate" scenarios in analysis, the following rules are applied:
The Chunk Rule: The right-hand side of a rule fi cannot be a substring of the right-hand side of a rule fj where j < i.
The Context Rule: In a LIN subgrammar, a right-hand context can only contain symbols from the subgrammar's external alphabet. Every symbol in the external alphabet of a subgrammar Gi is a terminal of a subgrammar Gj with j < i.
Explanations and proofs are found in chapter 4 of Bel's (1990) thesis: French and (bad English) versions.
Analysis of tabla compositions
Grammars "-gr.dhahatite" and "-gr.dhin--" are authentic examples of qa‘ida, the basic composition/improvisation form in the Lucknow school of tabla, as taught to Jim Kippen by Ustad Afaq Husain Khan in the early 1980s. (Read our joint paper in Anthropological Quarterly, 1989.)
The methods described here were first implemented in 1981 on an Apple IIc computer with just 64 kilobytes of memory… The Bol Processor BP1 was programmed in 6502 assembly language. Still, it was efficient enough to be used as an expert system for field research with leading exponents of the tabla.
The Bol Processor grammar concept emerged from formulating hypotheses about the structures of a qa‘idas within a teaching context. The aim was to generate as many variations as possible that would be deemed correct by an expert. However, proper identification of the language implied that the machine would be able to recognise good and bad variations submitted by experts and students alike. For this reason, each grammar should work "in reverse": given a musical variation (a string of terminals typed on the keyboard), the rules are applied from bottom to top until no rule remains applicable. If the final symbol is "S", the starting symbol, then the musical variation is assessed as "correct".
The "-gr.dhadhatite" grammar
The "dhadhatite" qa‘ida is taught to tabla beginners. This is because it is technically easy while also following complex syntactic structures, which traditional musicians refer to as "qavaid" — a term meaning "grammar" in Urdu (and Arabic). Therefore, the idea of using formal grammars to describe this compositional type was very promising.
A keyboard mapping in the old BP1
The Bol Processor enables users to program the computer's keyboard to map words to keys instead of characters. For example, typing "q" on an English keyboard would type "dha" into the text.
This is possible in "-gr.dhahatite" and "-da.dhadhatite" because "-kb.dhadhatite" is declared at the top of the grammar or data. The mapping is effective after pressing the "escape" key — read details.
When you open the "-gr.dhahatite" grammar, you will see that it is recognised as a "true BP grammar". Click the "Create templates" button, click the "output file" link, and copy the templates at the bottom of the grammar:
These six templates contain markers of master-slave parentheses created by subgramar #2, including markers of a homomorphism, notated "*", that modifies the content of the following parenthesis, applying a mapping defined in the "-al.dhadhatite" alphabet:
* dha --> ta ti te na dhee --> tee tr
The terminal alphabet of this grammar is made of sound-objects named "dha", "ta", etc. These are quasi-onomatopoeic mnemonics, in an oral notation system, that represent drum-strokes. The "*" homomorphism reflects the musical concept of replacing "open" (resonating) strokes, such as "dha" and "dhee", with their "closed" counterparts, here "ta" and "tee". So, for instance "*(dhadhatite)" should be played "tatatite". You can use any word you like instead of "*" to label the mapping.
The templates also contain structural markers "+" also produced by subgrammar #2, for example:
In rule [5], the string "++" is a left context, but in rule [6] the string "#+" is a negative context, meaning anything but '+'.
The last rule of subrammar #5 deserves our attention:
gram#5[8] ++ S2F <-- ++ dhadhatitedhadhadheena
It is using the derivation sign "<--" instead of "<->". This means that this rule can only be used in the analysis. It is easy to guess that when the sequence of strokes "dhadhatitedhadhadheena" is found preceded by a "++" (picked up from the template), it is immediately identified as "S2F". Sequences S1F and S2F appear in typical rhythmic contexts shown in subgrammar #1, for example:
gram#1[3] S64 <-> S1V S2F S1F S2F E32
In subgrammar #2, some of these fixed units are replaced with variations:
To make things easier, the analyst labelled the variables with numbers indicating their durations: 1 for A1, for example, and 7 for V7. This is not compulsory, however.
In subgrammar #3, variations are broken down into smaller units. For example:
gram#3[18] V7 <-> T1 V6 gram#3[19] V7 <-> T2 V5
Then in the following subgrammars, small units are rewritten as sequences of strokes, for instance:
Experts familiar with this musical genre will be convinced by an in-depth analysis of this grammar and experiments of production that its construction is based on musical concepts that are embodied perfectly in the formal grammars of the Bol Processor.
There is little to say about the derivation modes of these subgrammars. Most of them could be set to "RND", but "LIN" produces equivalent output in less computation time. This was critical in the Apple II era… Subgrammar #5 is "ORD", the fastest option, but "LIN" or "RND" would also be acceptable.
Now, let us produce a few variations of the "-gr.dhahatite" grammar. In the settings, check the "Non-stop improvize" option and set "Maxitems produced" to a small number, e.g. "4"., which is safe in terms of computation time and disk usage. Set the output file to "BP data file", since no sounds are expected.
If the "Seed for randomization" is set to 0 in the settings, you will get a different sequence each time you click the "PRODUCE ITEM(s)" button, for example:
4+4+4+4/4 dha dha ti te • dha dha dhee na • dha dha dhee na • ti te tee na • dha dha ti te • dha dha dhee na • dha dha ti te • dha dha tee na • ta ta ti te • ta ta tee na • ta ta tee na • ti te tee na • dha dha ti te • dha dha dhee na • dha dha ti te • dha dha dhee na
4+4+4+4/4 dha dha tee na • dha dha dhee na • dha dha ti te • dha dha tee na • dha dha ti te • dha dha dhee na • dha dha ti te • dha dha tee na • ta ta tee na • ta ta tee na • ta ta ti te • ta ta tee na • dha dha ti te • dha dha dhee na • dha dha ti te • dha dha dhee na
4+4+4+4/4 dha dha ti te • dha dha dhee na • dhee na ti te • dhee na tee na • dha dha ti te • dha dha dhee na • dha dha ti te • dha dha tee na • ta ta ti te • ta ta tee na • tee na ti te • tee na tee na • dha dha ti te • dha dha dhee na • dha dha ti te • dha dha dhee na
4+4+4+4/4 dha dha ti te • dha dha dhee na • dha dha ti te • dha dha tee na • tee na dhee na • dha dha ti te • dha dha ti te • dha dha tee na • ta ta ti te • ta ta tee na • ta ta ti te • ta ta tee na • tee na dhee na • dha dha ti te • dha dha ti te • dha dha dhee na
The "4+4+4+4/4" sections marking at the start of each variation indicates a layout most suitable for musicians: the beats are separated by periods ("." or "•"), with each beat containing four strokes — hence the "/4". These periods will be ignored in the parsing because they are not created by any rule in the grammar.
The expression "4+4+4+4" indicates that there are four lines, each containing four beats. As expected, the total duration is 16 beats.
👉 An old, still-valid format for "4+4+4+4/4" is "4+4+4+4*1/4".
Note that if "Split terminal symbols" is unchecked, you get a more compact representation, for instance:
There is no guarantee that all variations will be different. Another method that ensures this (at the cost of computation time) is to select "Produce all items" instead of "Non-stop improvize" in the settings. Now, the machine only keeps productions that have not been found in the list before.
Items produced by this grammar can be copied to a Data project, here "-da.dhadhatite". The file in "ctests" contains eight variations. Beware that items should be separated by empty lines, which is automatically the case if you checked "Add lines between items" in the settings of "-gr.dhadhatite". In the settings of "-da.dhadhatite", check "Trace production or parsing", then save the settings and data and click "Analyze" near the first item. The "trace file" displays the detailed process which we won't comment. The "Show process" button displays a summary:
Template(s) found 👉 We will try all templates, as per your settings Analyzing selection… Interpreting structure… Expanding polymetric expression… Using quantization = 10 ms with compression rate = 1 Phase diagram contains 2 lines 👉 Item matched template [1] Subgrammar 6/6 Subgrammar 5/6 Subgrammar 4/6 Subgrammar 3/6 Subgrammar 2/6 Subgrammar 1/6 Item matching template [1] rejected by grammar… ❌ Result of failed analysis: S1F +V8(= S1F) +S2F *(= S1F ++V8)(: S1F) S1F 👉 Item matched template [2] Subgrammar 6/6 Subgrammar 5/6 Subgrammar 4/6 Subgrammar 3/6 Subgrammar 2/6 Subgrammar 1/6 Item matching template [2] rejected by grammar… ❌ Result of failed analysis: (= ++S2F) +V8 S1F +S2F *(: ++S2F) *(= ++V8) S1F S1F 👉 Item matched template [3] Subgrammar 6/6 Subgrammar 5/6 Subgrammar 4/6 Subgrammar 3/6 Subgrammar 2/6 Subgrammar 1/6 Item matching template [3] accepted by grammar… ✅ 👉 Item matched template [4] Subgrammar 6/6 Subgrammar 5/6 Subgrammar 4/6 Subgrammar 3/6 Subgrammar 2/6 Subgrammar 1/6 Item matching template [4] rejected by grammar… ❌ Result of failed analysis: (= ++S2F V4 +B4) S1F +S2F *(: ++S2F V4 +B4) S1F S1F 👉 Item matched template [5] Subgrammar 6/6 Subgrammar 5/6 Subgrammar 4/6 Subgrammar 3/6 Subgrammar 2/6 Subgrammar 1/6 Item matching template [5] rejected by grammar… ❌ Result of failed analysis: (= ++S2F V6 +B2) S1F +S2F *(: ++S2F V6 +B2) S1F S1F 👉 Item matched template [6] Subgrammar 6/6 Subgrammar 5/6 Subgrammar 4/6 Subgrammar 3/6 Subgrammar 2/6 Subgrammar 1/6 Item matching template [6] rejected by grammar… ❌ Result of failed analysis: (= ++S2F V8) S1F +S2F *(: ++S2F V8) S1F S1F
This summary shows that this variation matches all six templates. However, only one leads to successful parsing, ending with the start string "S". This helps determine the syntactic structure of the musical example, in addition to telling that it is "correct".
The initial beat and tempo expression "4+4+4+4/4" can be ignored. The following versions will also be parsed successfully:
This grammar describes two sets of variations associated with the qa'ida. The first set covers 16 beats, i.e. 96 strokes at a speed of 6 per beat. The second set covers 32 beats, i.e. 192 strokes.
The 16-beat version was taught to Jim Kippen by Ustad Afaq Husain Khan in the 1980s. Within weeks, Jim had learned to identify the "language" of this qa‘ida, meaning that the machine successfully parsed all examples provided by the expert musician. However, at the end of the training, when Afaq Husain Khan played the same qa‘ida in a concert, he deliberately expanded variations to 32 beats. None of these were recognised by the grammar. Therefore, the grammar was adapted to produce 32-beat variations, and its validity was verified by analysing the variations performed at the concert.
Each set is represented by a variable named "S96" or "S192", created by subgrammar #1:
RND gram#1 [1] <0> S <-> 4+4/6 S96 gram#1 [2] <5> S <-> 4+4+4+4/6 S192
The weights of rules 0 and 5 indicate that the weights of the rules have been inferred from a set of examples, five of which belonged to the 'S192' variant and none of which belonged to the 'S96' variant. Weight inference is explained on this page.
The weights of rules 0 and 5 indicate that the weights of the rules have been inferred from a set of examples, five of which belonged to the 'S192' variant and none of which belonged to the 'S96' variant. We will explain weight inference later.
'S192' and 'S96' are broken down further into fixed or variable blocks in subgrammar #2, which also introduces master-slave parentheses and the open-closed homomorphism notated "*":
The variations differ slightly. These subtle differences are intended to create a "poetic" effect for listeners familiar with the "language" of the tabla.
Create 16 templates in the "-gr.dhin--" grammar. You will notice that the first eight cover 16 beats and the next eight cover 32 beats. This indicates that the creation of templates disregards rule weights and takes all rules in order. The same is true when creating variations with the "Produce all items" option.
A set of three 32-beat variations is provided in the "-da.dhin--" Data project. You can check that all these variations are successfully parsed. The parsing of the third item deserves our attention:
In the settings of "-da.dhin--", the option "When parsing, check all templates" is selected. This means that even after a successful analysis, the machine will try all the other templates. In this example, templates [12] and [13] match the composition and both lead to successful parsing. Therefore, there is a syntactic ambiguity in this piece, which we may see as part of its "poetic" dimension.
These demos highlight an important feature of the Bol Processor which is summarised by the following:
Every language produced by a true Bol Processor grammar is finite;
The grammar produces a finite (hopefully small) number of templates;
The parsing of an item matched against a template is done in a deterministic way;
Consequently, a true Bol Processor grammar is an identification of its finite language.
These qa‘idas are discussed in detail in our paper Modelling music with grammars (Kippen & Bel, 1992). The paper demonstrates the ability of the model to handle complex structures by taking real examples from the repertoire. It also questions the relevance of attempting to model irregularities encountered in actual performance.
(For geeks) An appendix of our Kippen & Bel (1992) paper explains the process of context-sensitive canonic rightmost derivation which is used for the parsing. More details are found in Bel (1987) and in chapter 4 of Bel's (1990) thesis: French and (bad English) versions.
Let us compare productions by the same grammar “-gr.tryDerivationModes” in all derivation modes.
The grammar comprises two subgrammars. The second one (gram#2) uses the ORD derivation mode in all examples. We show the trace of a derivation and the resulting production.
'A' and 'B' are variables. 'a', 'b', 'e' and 'f' are terminal symbols that are used to label sound objects.
[Derivation mode] gram#1[1] S --> A B B A B B A gram#1[2] A B --> a B gram#1[3] B A --> B b gram#1[4] B B A --> e B A gram#1[5] B B --> f B
ORD gram#2[1] f B --> f f gram#2[2] e B --> e e gram#2[3] A e --> c e
ORD
[Step #1] Selected: [1] LEFT S --> A B B A B B A A B B A B B A [Step #2] Selected: [2] LEFT A B --> a B a B B A B B A [Step #3] Selected: [2] LEFT A B --> a B a B B a B B A [Step #4] Selected: [3] LEFT B A --> B b a B B a B B b [Step #5] Selected: [5] LEFT B B --> f B a f B a B B b [Step #6] Selected: [5] LEFT B B --> f B a f B a f B b [Step #7] Selected: gram#2[1] LEFT f B --> f f a f f a f B b [Step #8] Selected: gram#2[1] LEFT f B --> f f a f f a f f b
Result: a f f a f f b
In this mode, the rules are applied in order and the rewriting positions are searched from left to right. This process is the fastest way to find a unique solution.
RND (default derivation mode)
[Step #1] Selected: [1] RND S --> A B B A B B A A B B A B B A [Step #2] Selected: [4] RND B B A --> e B A A e B A B B A [Step #3] Selected: [3] RND B A --> B b A e B A B B b [Step #4] Selected: [2] RND A B --> a B A e B a B B b [Step #5] Selected: [5] RND B B --> f B A e B a f B b [Step #6] Selected: gram#2[1] LEFT f B --> f f A e B a f f b [Step #7] Selected: gram#2[2] LEFT e B --> e e A e e a f f b [Step #8] Selected: gram#2[3] LEFT A e --> c e c e e a f f b
Result: c e e a f f b More results: a f f a f f b a f f a e e b a f f b f f b a f f b e e b a e e a f f b a e e b f f b a e e a e e b a e e b e e b a e e c e e b a f f c e e b c e e b f f b c e e a e e b c e e b e e b c e e c e e b
Rules are selected at random, with probabilities depending on their weights. The rewriting position is also selected at random unless it is specified as "LEFT" or "RIGHT."
LIN
[Step #1] Selected: [1] LEFT S --> A B B A B B A A B B A B B A [Step #2] Selected: [2] LEFT A B --> a B a B B A B B A [Step #3] Selected: [4] LEFT B B A --> e B A a e B A B B A [Step #4] Selected: [3] LEFT B A --> B b a e B b B B A [Step #5] Selected: [4] LEFT B B A --> e B A a e B b e B A [Step #6] Selected: [3] LEFT B A --> B b a e B b e B b [Step #7] Selected: gram#2[2] LEFT e B --> e e a e e b e B b [Step #8] Selected: gram#2[2] LEFT e B --> e e a e e b e e b
Result: a e e b e e b More results: a e e a f f b a e e b e e b a e e b f f b a f f a e e b a f f a f f b a f f b e e b a f f b f f b
Here, rules are selected at random but the rewriting position is searched from left to right, unless it is specified as "RIGHT" or "RND".
SUB
[Step #1] Selected: [1] RND S --> A B B A B B A A B B A B B A [Step #2] Selected: [2] RND A B --> a B [Step #3] Selected: [4] RND B B A --> e B A [Step #4] Selected: [2] RND A B --> a B [Step #5] Selected: [4] RND B B A --> e B A [Step #6] Selected: [3] RND B A --> B b [Step #7] Selected: gram#2[2] LEFT e B --> e e [Step #8] Selected: gram#2[2] LEFT e B --> e e
Result: a e e a e e b
Here, all eligible rules are applied at once. The process is repeated until no rule is eligible.
SUB1
[Step #1] Selected: [1] LEFT S --> A B B A B B A [Step #2] Selected: [2] LEFT A B --> a B [Step #3] Selected: [2] LEFT A B --> a B [Step #4] Selected: [3] LEFT B A --> B b [Step #5] Selected: [5] LEFT B B --> f B [Step #6] Selected: [5] LEFT B B --> f B [Step #7] Selected: gram#2[1] LEFT f B --> f f [Step #8] Selected: gram#2[1] LEFT f B --> f f
Result: a f f a f f b
This is similar to "SUB," except that rewriting positions are searched from left to right, and the set of eligible rules is applied only once.
POSLONG
[Step #1] Selected: [1] LEFT S --> A B B A B B A A B B A B B A [Step #2] Selected: [2] LEFT A B --> a B a B B A B B A [Step #3] Selected: [4] LEFT B B A --> e B A a e B A B B A [Step #4] Selected: [2] LEFT A B --> a B a e B a B B A [Step #5] Selected: [4] LEFT B B A --> e B A a e B a e B A [Step #6] Selected: [3] LEFT B A --> B b a e B a e B b [Step #7] Selected: gram#2[2] LEFT e B --> e e a e e a e B b [Step #8] Selected: gram#2[2] LEFT e B --> e e
Result: a e e a e e b
This is similar to SUB1, except that rewritings only occur in the positions of the longest substrings matched by a rule.
In the current version of the Bol Processor, sound-objects contain either a stream of MIDI codes or a few lines of Csound score, or both. Each terminal is either interpreted as either a simple note (a NoteOn/NoteOff sequence) or linked to a sound-object, provided that one with the same name exists in a sound object description file (e.g. "-so.MySounds").
When an item is played in real time using MIDI, a MIDI file or Csound, any terminal not listed in the associated sound object description file is ignored. The same applies to variables that were not rewritten or erased at the end of the production process.
In earlier versions of BP3 (before 3.15), these unused symbols were erased before constructing the phase table containing the list of sound events. At present, they are treated as silent sound objects. While these objects carry neither MIDI nor Csound instructions, they have the same metric characteristics as a simple note: a duration of one unit, a pivot at the beginning for its location, and relocatability.
Silent sound-objects are of little or no utility in the MacOS, Windows and Linux implementations of BP3. They are intended for environments using the WebAssembly (WASM) architecture. The idea is to use the Bol Processor's sophisticated time-setting features to send the structure to external devices and create sounds of great design. Read this page for more information.
Examples of data creating silent sound-objects can be found in "-da.trySilentSoundObjects". The resulting graphs are shown below.
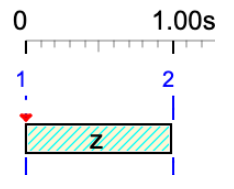
The terminal alphabet of this data project includes 'a', 'y', 'z', but only 'a' is found in "-so.trySilentSoundObjects". The note convention is English.
z
'z' is treated as a silent sound-object. It is displayed as a hatched rectangle. Its duration is 1 unit.
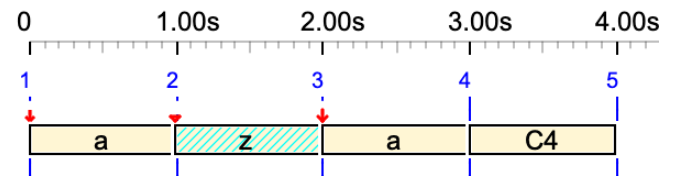
a z a C4
In this sequence, the silent sound-object 'z' occupies 1 unit but it does not produce any sound.
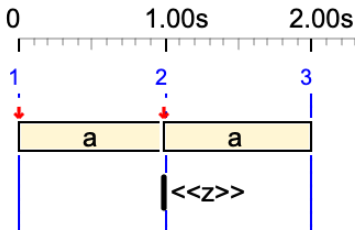
a <<z>> a
Here, 'z' is an out-time silent sound-object (no duration). No sound and no duration.
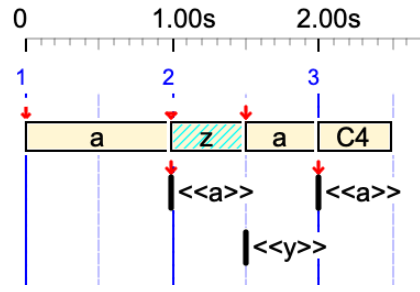
a <<a>> _tempo(2) z <<y>> a <<a>> C4
'z' has 1/2 beat duration, due to the tempo. 'y' is an out-time silent sound-object.
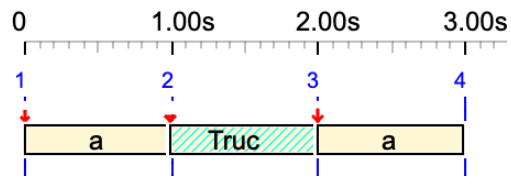
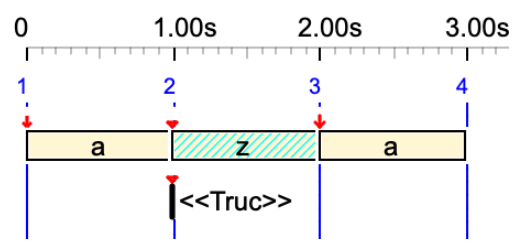
a Truc a
Variable 'Truc' is converted to a silent sound-object. Its duration is 1 unit.
{a Truc a, z C4}
In this polymetric expression, 'z' is resized to have the same symbolic duration as C4.
a <<Truc>> z a
Variable 'Truc' is converted to an out-time silent sound-object.
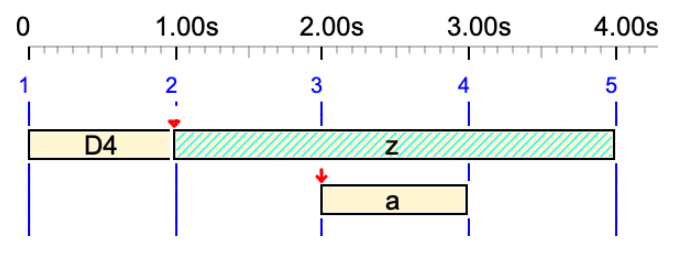
D4 z& a &z
Silent sound-object 'z' is tied to itself. 👉 Read the Tied notes page.
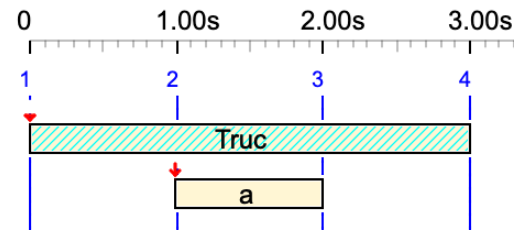
Truc& a &Truc
Variable 'Truc' is converted to a silent sound-object and tied to itself.
The conversion of variables to silent sound-objects may have an impact on grammars using substitution rules in which an erase rule cannot be used at each substitution. Check for instance "-gr.koto3":
Variable 'Y' hasn't been erased and it occupies a one-unit time segment without producing any sound.
This page is about the polymetric notation used in the Bol Processor project and, most likely, other software environments. This advanced tool is used to represent the time structure of events, which can be simple notes, sound-objects, or more generally time-objects that can be instantiated as video fragments, sequences of robotic actions, and so on.
In a polymetric structure, rests (or 'silences') are represented by integer ratios (their symbolic duration), for example ‘6’ for "six beats" or '4 2/3' for "four and two third beats". Small integers can be replaced with hyphens, for example '---' for '3'.
In some (but not all) polymetric structures, rests with explicit durations can be replaced with undetermined rests (notated '…' or '_rest'), the value of which is calculated by a (deterministic) algorithm in the console (file 'polymetric.c'). This is an important feature because it enables the notation to be simplified without compromising the accuracy of the time. Take a look at Charles Ames' example, for instance.
A polymetric structure containing at least an undetermined rest is called 'minimised" for this reason. Examples of minimised structures are found on the Polymetric structures page.
The topic of this page is about 'reverting' the algorithm that assigns explicit durations to undetermined rests in the Bol Processor console. Geeks will find this algorithm in the 'polymetric.c' file, and they can set the 'trace_und' variable to '1' to trace its operation.
Examples of minimisation
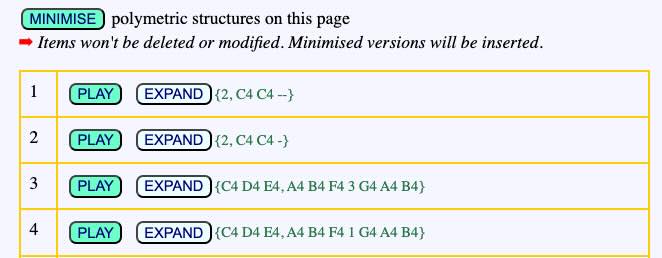
All examples are found in the "-da.tryMinimise" data file (distributed from the 3.3.6 version). Click the MINIMISE button to minimise all (eligible) polymetric expressions on the page.
Only polymetric expressions between curled braces { } are processed.
The first example {2, C4 C4 --} will be minimised as {2, C4 C4 …} whereas the second example {2, C4 C4 -} is not eligible. The reason is that {2, C4 C4 …} is always instantiated as {2, C4 C4 --} (or {2, C4 C4 2}) and there is no minimised version of {2, C4 C4 -}.
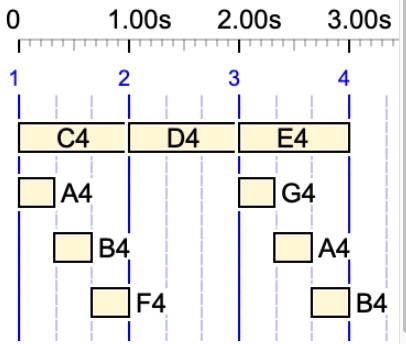
The third example {C4 D4 E4, A4 B4 F4 3 G4 A4 B4} is minimised as {C4 D4 E4, A4 B4 F4 …G4 A4 B4}. Both versions yield the following time structure:
For this demo, we use simple notes with arbitrary pitches in English notation, as we are only focusing on the time structures.
The following examples are not eligible for a minimisation:
It is not easy to guess which duration of the rest — 1, 2, 3, 4 beats? — makes it eligible for being undetermined. The correct value can be found by clicking the EXPAND button to the right of {C4 D4 E4, A4 B4 F4 … G4 A4 B4}. The first line of the result is the expanded polymetric expression:
/1 {*1/1 C4 D4 E4,*1/3 A4 B4 F4 - _ _ G4 A4 B4}
The '- _ _ ' sequence is a rest of duration 3 beats. The symbol '-' represents a rest of one beat. This is followed by two prolongations, '_'.
Note that the "expanded polymetric expression" displays absolute tempo markers, such as '*1/3', to represent the structure, rather than relative markers, such as '__tempo(1/3)'. This representation can be used for data, as was the case in early versions of the Bol Processor.
Indeed, in this simple example, the duration was visible on the graph. However, it becomes increasingly difficult to measure when rhythmic structures become more complicated. For example, {A4 F4 G4, … C4 D4 … E4} is expanded as:
It is not easy to figure out that '*3/8 -' is a silence at twice the speed of '*3/4 C4', therefore its (relative) duration is 1/2 and the structure is equivalent to {A4 F4 G4, 1/2 C4 D4 1/2 E4}.
The process is more complex for fields of the polymetric structure that contain at least two rests with different durations. For example:
{C3 D3 E3, A5 5/4 B5 5/2 C5 5/4 D5}
The algorithm generates a table of equivalent rests in chains, such as two 5/4 rests and one 5/2 rest. The table is sorted down on the number of rests in each chain, which yields:
5/4 5/4 5/2
Then, each chain is considered as a potential solution to the undetermined rest(s). The first one that meets the conditions provides the solution. Here, it is "5/4 5/4", which yields:
{C3 D3 E3, A5 … B5 5/2 C5 … D5}
In this example, {C3 D3 E3, A5 5/4 B5 … C5 5/4 D5} is another solution.
If several chains contain the same number of units, the first acceptable one is given as the solution and the (deterministic) algorithm ends. However, other chains of maximum length might also meet the conditions. This means that the minimisation algorithm does not provide all solutions, but at least it does provide one which has the maximum number of undetermined rests.
Tracing the minimisation
The algorithm for minimising polymetric structures is more complicated to design than the one for assigning explicit durations to undetermined rests. As per this writing, it does not cover all cases. Updated versions will be implemented in the interface file 'data.php'.
If you need to follow the process while looking at the code, open the settings file and enter the item number at the bottom of the form. In this example, we have chosen to trace the minimisation of item #30.
Don't forget to save the settings and save again the Data page. Now, click the MINIMISE button. You will get a trace that looks like this:
Journées d'Informatique Musicale 1996, Caen (France)
Abstract
Most computer music environments privilege music representations derived from western common music notation, which make it difficult to explore musical ideas based on different concepts. This is notably the case with Indian composers eager to handle sophisticated note treatment and complex polyrhythmic structures. This paper presents recent developments of a compositional environment, Bol Processor BP2, addressing the issue of abstract and comprehensive, altogether flexible and accurate, music representations.
Sound examples
Broken links point to sound examples, which can be found in this folder. Just replace 'mov' extensions with 'mp3'.
Seven radical ideas from an old music software that are still revolutionary today
This blog post was created with the help of NotebookLM (November 2025)
👉 In the following text, "BP2" is the old acronym for "Bol Processor". It can be replaced with "BP3".
Introduction: The Unseen Blueprint of Digital Music
Open any modern music production app, and you’re greeted by a familiar landscape: a piano roll, a timeline divided into bars and beats, and tools designed to place discrete notes on a grid. This environment is so universal that we rarely question its foundations. We treat it as a neutral canvas for creativity.
But what if it isn’t? What if the very architecture of our digital tools—the twelve-tone scale, the rigid timing, the concept of a single "note"—is a cultural box, subtly shaping our music to fit a Western model? For musicians from traditions with different melodic and rhythmic philosophies, this isn't just a hypothetical question. It's a daily creative hurdle. A fascinating piece of 1990s software called Bol Processor BP2 offered a radically different path, and its core concepts are more relevant today than ever. This is a look at the most mind-bending ideas from a program that dared to think outside the grid.
1. Our Digital Tools Have a Western Accent
The central problem that Bol Processor BP2 set out to solve is that most music software is built on a foundation of Western common music notation. It privileges the twelve-tone system and the binary division of time (whole notes, half notes, quarter notes, etc.). This isn't just about the on-screen interface; as the source text notes, the MIDI standard itself helps "reinforce this conventional approach," making it a systemic bias built into the very plumbing of digital music. This design choice creates an immediate and profound challenge for composers from other musical worlds, such as India, who want to express the "melodic subtleties and rhythmic intricacies of their musical heritage."
When the tools don't match the tradition, the music itself is compromised. In a commercial setting, this can lead to a problematic formula where traditional instruments are reduced to a mere "masala ingredient" sprinkled on top of a generic electronic track. The expressive depth of the original music is lost because the underlying digital skeleton can't support it. This isn't a failure of the musician, but a limitation of the tool. A new approach wasn't just a technical challenge; it was a cultural necessity.
2. The Big Idea: Treating Music Like Vector Graphics, Not Pixels
To break free from the Western framework, BP2’s creators re-imagined the very nature of musical data. They drew a distinction between "descriptive" and "prescriptive" notation, using a powerful analogy from graphic design.
Descriptive notation is like a "pixel" image. To create a curve, you must explicitly define the color and position of every single pixel along its path. In music, this is like using a standard sequencer to create a delicate Indian melodic pattern (gamaka), where the composer must manually program every single microtonal "PitchBend" message. It’s clumsy, computationally inefficient, and fails to capture the holistic gesture of the musical idea.
BP2's approach is like "vector" graphics. Instead of defining pixels, a vector-based program uses mathematical descriptions—a starting point, an ending point, and the shape of the curve in between. BP2 applies this logic to music. It uses abstract, efficient representations to generate complex and accurate musical shapes without needing to define every single point.
This shift is more than just an efficiency hack; it's a philosophical one. A vector encodes the composer's intent—the idea of a gesture—while pixels merely describe a static, unchangeable result. This conceptual leap is the key to BP2's power, offering immense creative freedom and efficiency.
3. Beyond the "Note": Learning from Indian Drum Syllables
In Western music, the "note" is the fundamental building block. But BP2 proposed a more flexible and musically intuitive unit: the "sound-object." This concept was derived directly from the study of North Indian tabla drumming, where onomatopoeic syllables called bols are used to represent complex rhythmic gestures.
The creators of BP2 observed that tabla players don't think in individual sounds. A complex phrase like ‘tirakita’ (four strokes) isn't four separate events; it's one conceptual unit, a single word in a rhythmic language. The same is true for a simpler phrase like ‘tira’ (two strokes). BP2 was built to honor this, treating such gestures as a single, indivisible "sound-object." This allows a composer to work with musically meaningful phrases as the primary material, rather than being forced to construct everything from a series of isolated, atomized events. It's the difference between writing with words instead of individual letters.
Definition: A time-object is a basic sequence of messages (e.g., MIDI NoteOn/NoteOff). When this sequence is assigned metrical and topological properties, it becomes a sound-object, which can represent an elementary musical gesture or its resulting sound.
Key Properties of Sound-Objects
Metrical: Defines how a sound-object's internal timing adjusts to tempo. For example, the four strokes in 'tirakita' may be forced to maintain equal spacing, which changes with the overall tempo.
Topological: Governs how sound-objects can be truncated or overlapped to create realistic phrasing.
Pivot: A specific time point within the sound-object that is anchored to a musical pulse or "time streak."
Relocatable: An object that can be shifted freely in time.
Special Types
Out-time Sound-Objects: Have a null duration, with all constituent messages dispatched simultaneously.
Input Objects: Time-objects with null duration that wait for an external input (MIDI note, mouse click) to facilitate basic real-time synchronization.
4. Time Management
BP2 provides sophisticated tools for structuring both pulsed and non-pulsed musical time.
Striated vs. Smooth Time: The system handles both striated time (built on regular or irregular pulses) and smooth time (where no pulse is necessary, e.g., the alap of Indian music).
Time-Patterns: In smooth time, users can define arbitrary physical time ratios using special time-objects (t1, t2, etc.) to create a specific temporal structure.
Time-Base: An internal clock calculates physical durations. It can be set via a metronome value or with absolute accuracy (e.g., a number of ticks in a given number of seconds). It can also produce audible tick patterns with superimposed cycles (e.g., cycles of 4, 5, and 7).
5. Taming Complex Rhythms with a Single Dot
Creating complex rhythmic cycles and subdivisions in standard software can be a tedious process of clicking, dragging, and setting grid values. BP2’s solution evolved into an astonishingly simple text-based system. The older syntax was functional but rigid, using explicit markers like /2 or /3 to force absolute tempo assignments: /1 a b c /2 a b c d e f. This was inflexible because these sequences couldn't be easily reused as building blocks in new contexts without manual recalculation.
The revolutionary solution was "period notation." By connecting symbols with a period (.), a composer can create beats of equal symbolic duration, and the software automatically calculates the subdivisions. Consider this simple line of text:
a.b.c.ab.cd.abc.def
Without any complex commands, this notation intuitively represents a rhythmic acceleration. It starts with one note per beat (a.b.c.), progresses to two notes per beat (ab.cd.), and finishes with three notes per beat (abc.def). In the language of North Indian music, this elegantly describes a progression from hargun (speed 1), to dogun (speed 2), and finally to tigun (speed 3). This plain-text syntax provides a fluid and powerful way to build intricate rhythmic structures that would be incredibly cumbersome to create in a conventional point-and-click interface.
Period notation can of course be combined with polymetric structures for simultaneity (see 6).
How to Compose Backwards in Time
Perhaps the most surprising and powerful feature of BP2 is its ability to solve a compositional problem that feels like working in reverse. In polymetric music, different performers play in different time signatures or rhythmic cycles simultaneously. A common challenge is making sure everyone, despite their different paths, resolves together at the very end.
This was exactly the problem faced in Andréine Bel's 1994 dance production "Cronos" (read 765432). The piece featured six dancers—Suresh, Smriti, Olivier, and others—performing parts based on different rhythmic cycles. Suresh counted in 7s, Smriti in 6s, Olivier in 5s, and so on. The choreography demanded that they all finish at the exact same moment. Calculating the precise starting points and rests to achieve this would be a mathematical nightmare.
BP2’s solution was a feature called "undetermined rests," notated simply as "...". A composer could place this symbol at the beginning of each part, and the software itself would calculate the precise duration of silence needed for all the different rhythmic cycles to align perfectly at their conclusion. The system had one logical constraint: each part of the structure could contain at most one undetermined rest. This feature allowed the composer to define the end point and let the machine figure out the beginning.
A musician rightly identified this technique as "working on reversed time", a problem that is crucial in Indian rhythm.
6. Polymetric Structures for Simultaneity
The Comma Operator: The , (comma) operator indicates simultaneity. An expression like {A, B, C} means that the musical expressions A, B, and C (called fields) are performed together.
Duration Matching: The interpreter uses the same algorithm to match symbolic durations in polymetric structures as it does for sequential ones, ensuring alignment.
Duration Precedence: By convention, the duration of a polymetric expression is determined by its leftmost field. For example, {abc,de} has a duration of three beats, while {de,abc} has a duration of two.
BP2 includes a macro language of approximately 200 instructions for automating processes and controlling performance parameters with a "vectorized" approach.
Stepwise Control: Parameter values change from one sound-object to the next.
Example (Articulation): The _staccato(x) and _legato(x) instructions modify the duration of subsequent sound-objects by a percentage. These values can be interpolated across a musical phrase.
Continuous Control: Parameter values are changed via linear interpolation between specified points. This is highly efficient, as it avoids storing massive streams of MIDI data.
Example (Microtonal Pitch): The _pitchbend(x) instruction, when combined with _pitchcont, creates smooth portamenti. The pitch values can be specified in cents if a pitch bender range is defined (_pitchrange(r)), making microtonal work intuitive.
Independent Control in Polymetric Structures: Different fields within a polymetric structure can have independent, simultaneous parameter changes. For example, two melodic lines can execute different microtonal pitch bends at the same time, provided they are assigned to separate MIDI channels.
Conclusion: Looking Beyond Our Creative Code
The true innovation of Bol Processor BP2 wasn't just its clever features, but its fundamental philosophy. Instead of simply digitizing the conventions of an existing musical tradition, it built a creative environment from abstract, culturally-aware principles. It acknowledged that the tools we use are not neutral; they carry inherent biases that shape what we can easily create.
BP2 is a powerful reminder to look at the assumptions embedded in our own creative software. In a world increasingly shaped by AI and algorithms that learn from existing data, what other cultural blueprints are being baked into our tools? What new forms of art, music, and expression are we failing to imagine simply because our digital canvas wasn't designed to support them?
The aim of the current project is to transcribe a musical input (given by a stream or a table of MIDI events) to the most comprehensible polymetric notation. An extension of this would indeed be to accept a sound signal as input.
Polymetric expressions are a convenient product of rule-based music composition. They are represented as strings of symbols that embody a semi-lattice structure, here meaning a tree of sound objects with ties. Polymetric notation, generally speaking, is a sequence of polymetric expressions that is processed as a single polymetric expression.
(just for decoration)
To achieve this, we plan to train a transformer (a type of neural network), using sets of polymetric expressions alongside their associated MIDI file renderings, both as standard MIDI files and in tables of events. As we require large datasets that cover a wide range of musical styles, the plan is to create these sets using existing musical scores.
The process described on the Importing MusicXML scores page demonstrates the ability to "translate" any Western musical score (in its digital format) to a polymetric expression. This process is irreversible because polymetric expressions cannot be fully converted into human-readable musical scores, despite them carrying time structures that sound "musical". A typical example of this is the use of undetermined rests, as these imply further processing of the structure in order to set exact durations.
Datasets that associate polymetric expressions with their MIDI file renderings contain identical pitch and timing information on both sides. Since both descriptions are complete and not redundant, the matching is a game of full information.
At a later stage, the transformer should also be able to handle streams of MIDI events created by humans or random effects, where the timings are not based on a simple framework. Therefore, a quantization of timings is needed to adjust the stream before it is analysed. This quantization is already operational on the Bol Processor — see the Capture MIDI input page.
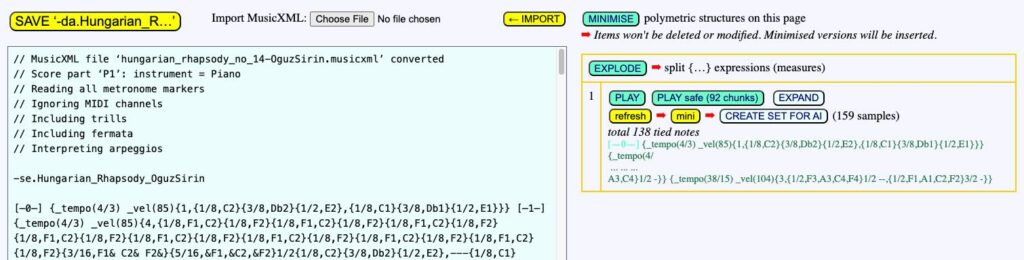
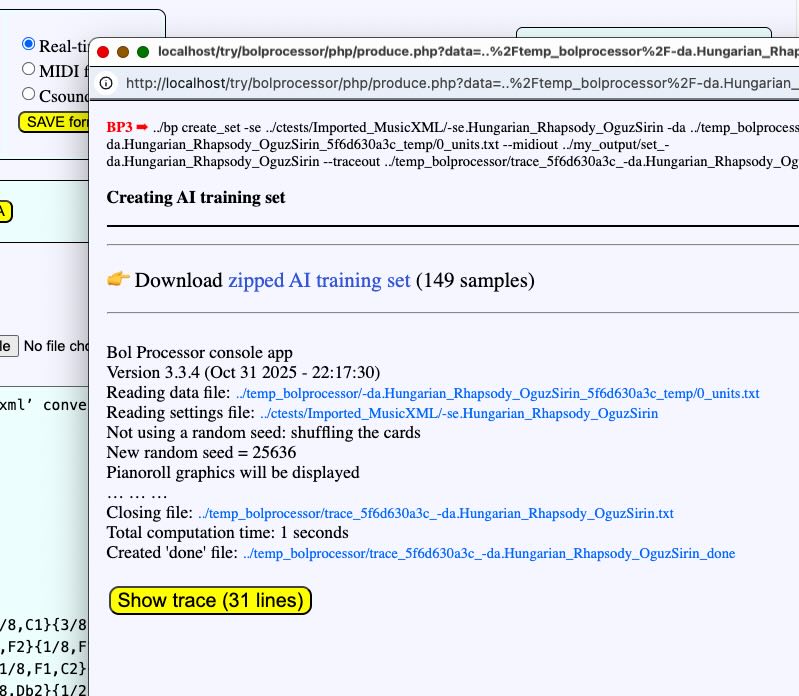
A dataset is created and can be downloaded in a zip file: set_-da.Hungarian_Rhapsody_OguzSirin.zip.
More sets can be created using the same musical work. Clicking the CREATE DATASET FOR AI button again would produce the same set, as it is built from a sequence of random numbers that is not reinitialised. To ensure the new set is different, click the refresh button. When downloading it, the system will automatically assign it a different name, e.g.: set_-da.Hungarian_Rhapsody_OguzSirin (1).zip.
Datasets of minimised polymetric structures
The mini button close to the refresh button modifies the dataset so that all (eligible) polymetric structures are minimised. In a minimised structure, some rests with explicit durations are replaced with undetermined rests (notated '…') without any loss of timing accuracy. Read the Minimising a polymetric structure page for more details. These sets are smaller in size than the ones they are derived from because only eligible structures have been retained.
Once samples in the training set have been minimised, the CREATE DATASET FOR AI button is changed to CREATE minimised DATASET FOR AI.
The sets of minimised structures are downloaded with specific names that mention the 'mini' feature, such as: set_-da.Hungarian_Rhapsody_OguzSirin_mini.zip
When training an AI, these sets should be used separately from standard sets because they are expected to train the transformer to guess the proper locations of undetermined rests. Nevertheless, it could be interesting to compare related (standard versus minimised) samples in order to model changes between standard and minimised polymetric structures.
The content of a dataset
The first dataset created in this demo contains 160 samples. These samples are text files named 1.txt, 2.txt, etc., associated with MIDI files 1.mid, 2.mid, etc., and tables of events (see below) 1.tab, 2.tab, etc., 1.tsv, 2.tsv, etc. A text file whose name ends in "_units.txt" contains all the sample text files, enabling these samples to be copied in a single piece to a data project. Clicking on the word "samples" displays it in a pop-up window.
This polymetric expression covers 2 measures of the musical score. Clicking the Refresh button (or reloading the page) slices the score randomly into chunks containing between 1 and 5 measures. The upper limit of 5 has been set arbitrarily and may be revised at a later date. Every time the Refresh button is clicked, a new slice is created, resulting in a different dataset.
The idea is twofold: (1) the transformer should be trained to recognise sequences of polymetric expressions, and (2) tied notes may span more than one measure. A tied note in the above example is the pair "D6& &D6" (read more). Each sample contains only complete pairs of tied notes. This means that any notes whose ties are not present in the sample are untied for the sake of consistency.
Note that the timings of the polymetric expression and the MIDI file are identical, as the metronome is automatically set to a default tempo of 60 beats per minute when the MIDI file samples are created. In the above phrase, the tempo is set to 4/3, which is equivalent to a metronome set at 80 bpm.
Tables of events
The tables of events provide an easy-to-read representation of the contents of MIDI files.
Two kinds of text files are created.
1) The file with extension "tab" lists MIDI events in four columns. The leftmost column contains the timing of each event in milliseconds. For instance, the following text (from Couperin's Les Ombres errantes):
The "tab" table contains only NoteOn/NoteOff events. However, the MIDI file may contain controls, such as volume, panoramic, pressure, pitchbend, modulation, pedal on/off, and more in the range 65 to 95, which are performance parameters in the Bol Processor score. Therefore, a more detailed format of tables of events is needed to list them.
2) The text file with extension "tsv" contains a detailed list of (all) MIDI events carried by the MIDI file.
The following example is the opening of Listz's La Campanella.
Note that at time 1866ms, the pedal is released and pushed again immediately, as indicated in the score below. The source is '0' by default and can be modified by _part() control parameters.
Note that the pedal remains pressed at the end of this fragment, as indicated in the "tsv" table.
Since the Bol Processor can capture a MIDI stream and create a "tsv" table of events with quantized timings (see Capture MIDI input), training a transformer to convert these tables into polymetric structures could eliminate the need to decrypt MIDI files and quantize their timings.
These can be used for training a transformer of your choice. We recommend creating more sets from more musical works to achieve a better training. Run the Bol Processor and browse imported MusicXML scores in the ctests/Imported_MusicXML workspace, or import more works from a dedicated MusicXML server.
A test of the transformer's ability to "translate" MIDI files (or tables of events) to polymetric notation will first be to retro-convert (to polymetric expressions) all samples. Then, if successful, retro-convert the MIDI files of complete musical works used for the training.
What follows…
Once the correct transformer type and optimum dataset size have been identified, we will work on the following extensions:
Translate MIDI streams produced by human interpreters for which precise timing is not guaranteed.
(Optional) Extend the AI recognition to the use of undetermined rests as it provides a more simple polymetric structure.
Use a sound to MIDI converter to convert a sound input to polymetric notation.
Let us assume that the musical input consists of fragments separated by silences. Convert these fragments into polymetric structures and then search for regularities in the rhythmic and tonal structures to create variations in the same style. Formal grammars will be employed for this purpose.