In May 2024, the Bol Processor BP3 acquired the ability to manage the input and output of MIDI events. This allows it to "communicate" in real time with external MIDI devices (keyboards, synthesizers) and even with other instances of BP3 running on the same machine.
For geeks and programmers: This feature had already been implemented in the earlier (MacOS only) version called 'BP2'. However, the implementation in a C language 'console' to work in MacOS, Linux and Windows environments was more technical. In addition, the concept of "real time" in the current MIDI setup is different from the previous one using Opcode Music System.
The following examples will work the same in MacOS, Windows and Linux. They have been tested on a recent PowerBook running MacOS (Sonoma) with 16 Gb RAM, and an HP Intel Core computer with 8 Gb RAM running Windows 10 (64-bit) and LinuxLite 7.0 (in Ubuntu). Memory size can become critical if many MIDI devices or virtual ports are connected.
Using microtonal scales is now possible in real-time MIDI. Read the Check MIDI microtonality page for details.
Setting up the MIDI environment
Let us assume that you have successfully downloaded, installed and compiled the Bol processor BP3, as described on the page Bol Processor ‘BP3’ and its PHP interface.
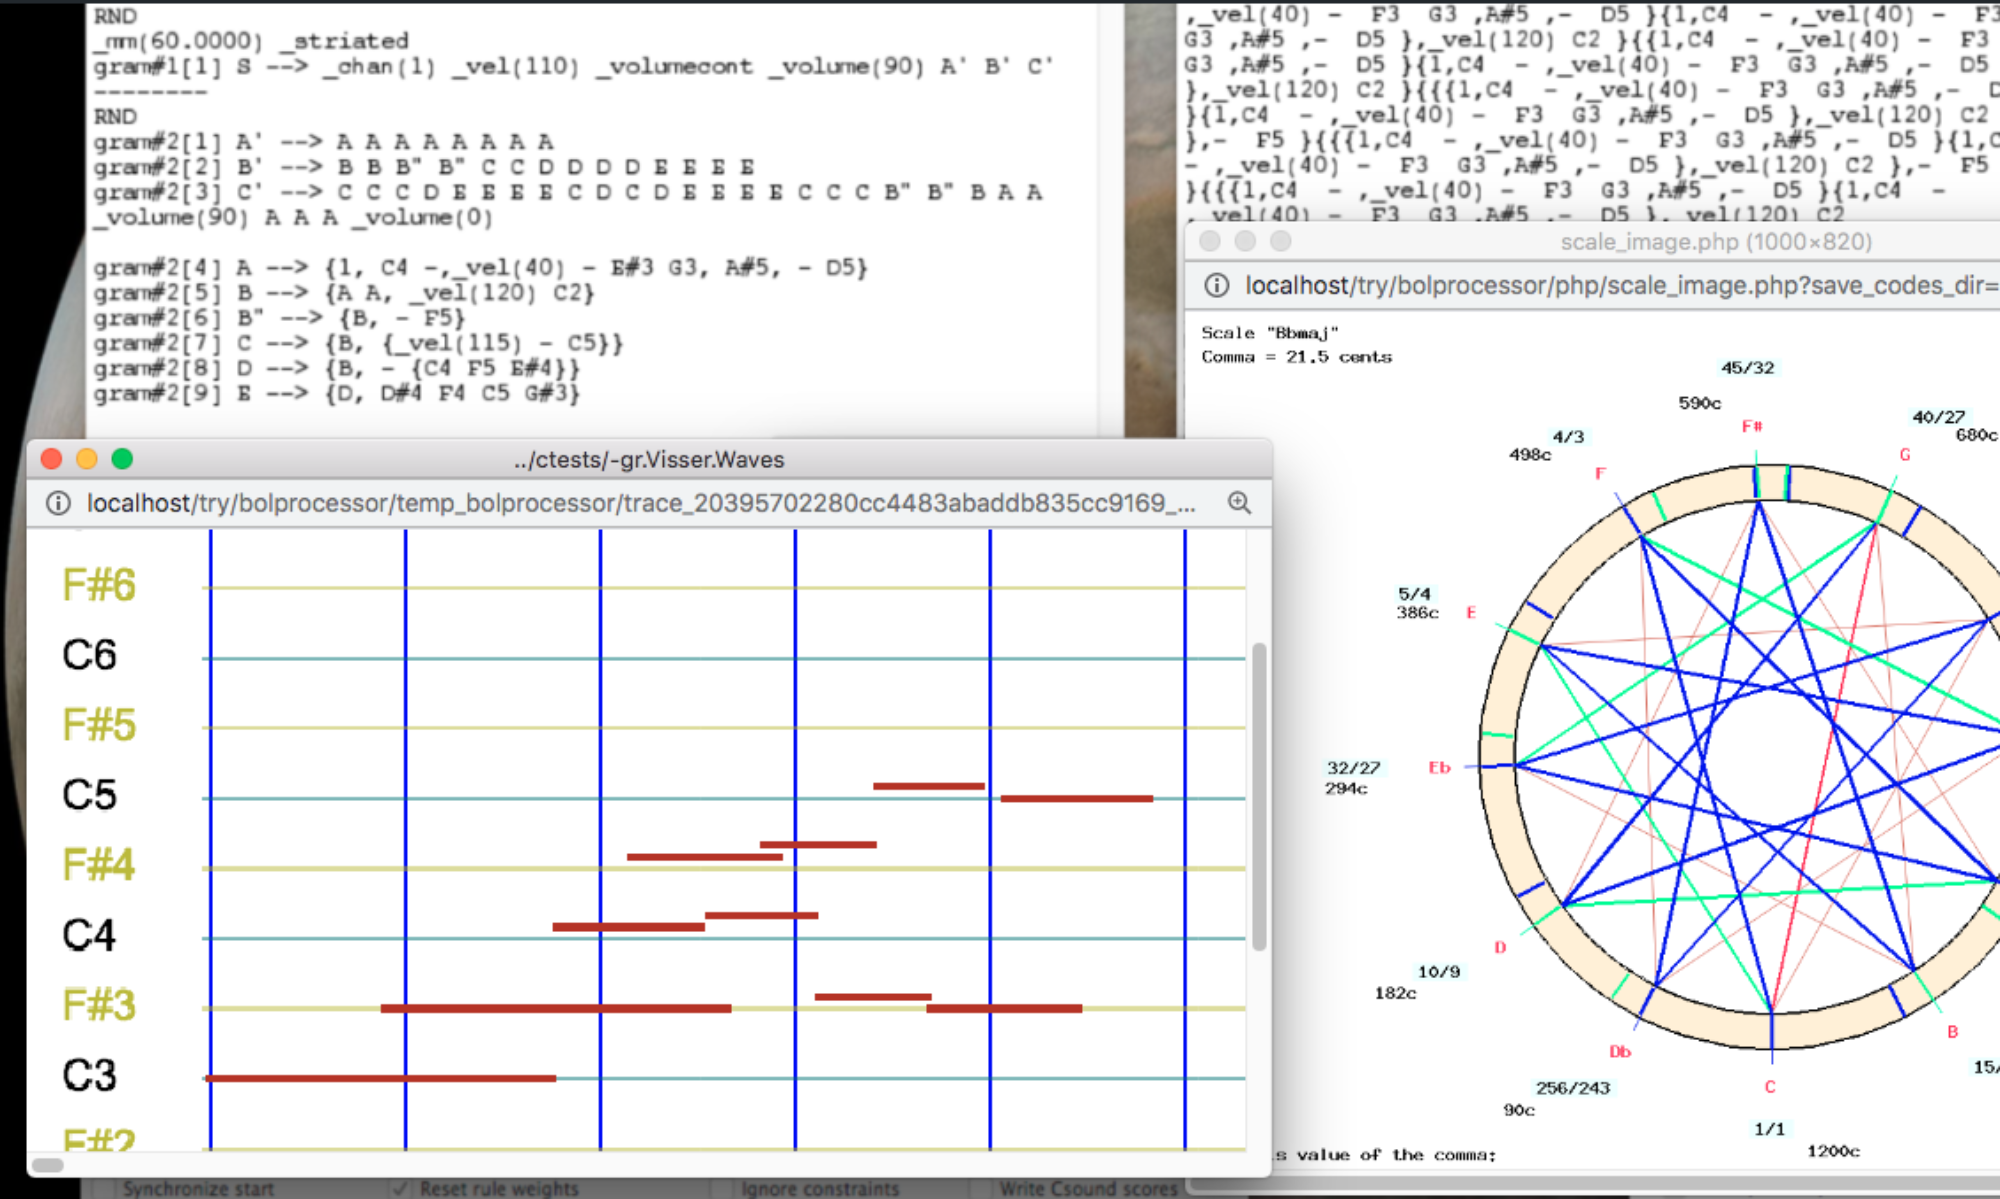
In Bol Processor jargon, a 'project' is either a grammar (with a '-gr' prefix) or a set of data (with a '-da' prefix). So, create or load a simple project, e.g. "-da.acceleration" which can be found in the "ctests" folder (download it here).
An output
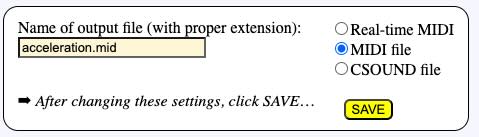
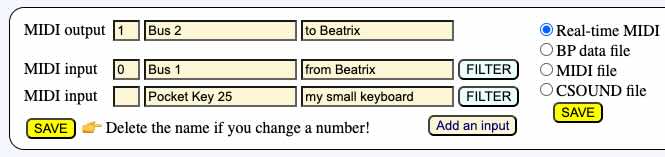
By default, a project is set up to create MIDI files, as shown on the selector (see picture). Make sure your project is working! Then select Real-time MIDI and click SAVE format.
The selector will now display a different image, as shown below:
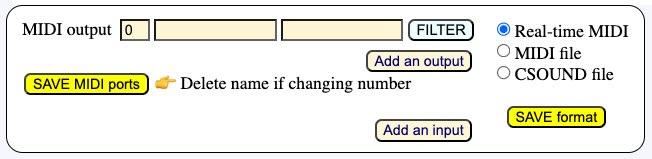
By default, the MIDI output used for sending events is numbered '0' — and the MIDI input used for receiving events will be numbered '1'. This is a common situation. In MacOS and Windows, these numbers are taken as 'ports'. In Linux they are considered as 'clients', each 'client' having its own 'ports', so certainly numbers '0' and '1' won't work… Never mind this issue, BP3 will take care of it when scanning real or virtual devices and trying to connect. Read more below.
We cannot rely on "port numbers" alone because they change when we turn on and off MIDI devices connected to the computer. In Linux, the client number is more specific to a MIDI device. In fact, the only reliable identification is its name, which is empty by default: the next field at the right of the input/output number.
Let us check the MIDI output. Windows does this automatically. The good news is that Windows 10 (and presumably later versions) comes with a built-in MIDI device called Microsoft GS Wavetable Synth. The Bol Processor will automatically detect it and connect to it if no other device is connected to the system.
Linux also connects, by default, the output to a virtual device whose client number is '0', but it won't produce any sound in the basic installation of Ubuntu. So, to try real-time MIDI on Linux, you need to connect an external MIDI device via its USB/MIDI interface, or to install a software synthesizer. Read more below.
Clicking Add an input will create fields for you to select an input device. We'll use this later.
To connect external MIDI input/output devices to Windows, you may need to install an environment similar to IAC on MacOS. Read details below. However, most tests shown on this page can be performed on Windows without any additional installation.
The following paragraphs are for MacOS users. Windows and Linux users can happily jump to the next section.
Turn on a MIDI device (synthesizer, piano, etc.) connected to the computer. On my personal Mac, I usually use the Pianoteq synthesiser, which produces a physical model synthesis of various keyboard instruments. It communicates with BP3 via a device called the Inter-Application Communication (IAC) architecture — read this if you need details.
The IAC driver is installed by default on recent MacOS systems. (It is a part of the CoreMIDI framework provided by Apple.) It allows you to create virtual MIDI ports that enable MIDI applications to communicate internally within the same machine. Equivalent devices exist in the Linux and Windows environments, see below.
The IAC also communicates with external MIDI devices via the USB ports, BlueTooth and possibly more network protocols. We'll try it later.
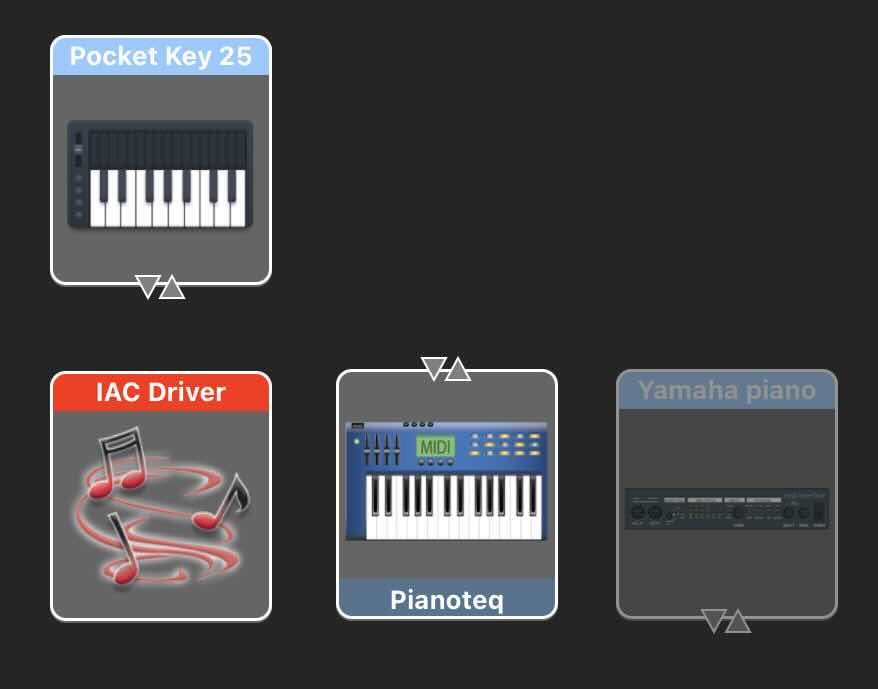
To set up the IAC, run the Audio MIDI Setup application (in the Utilities folder). Ask it to show "MIDI Studio". On my personal computer, it looks like this: the IAC driver, the Pianoteq synthesiser, a Pocket Key 15 keyboard connected to a USB port, and a Yamaha piano connected by standard MIDI cables and a USB MIDI interface. The Yamaha piano appears grey because it is switched off.
On active MIDI devices you will see triangles indicating input/output ports. These are used to connect devices directly by drawing a 'cable' to connect them. We don't need to use these 'connectors' as BP3 communicates via the IAC MIDI ports.
Check output options
(MacOS, Linux and Windows)
The easiest way to proceed now is to run any project in the Real-time MIDI mode, and see if sounds are produced… Whatever the result, at the end of the (potentially silent) performance, you will see a Show all … messages button along with a blinking red signal "=> 1 warning". Click on the button to read detailed explanations of the failure (or success):
🎹 Setting up MIDI system
MIDI output = 0: “Bus 1” 👉 the number of your choice
MIDI settings saved to ../temp_bolprocessor/trace_974dd9ab22_-gr.tryTimePatterns_midiport
🎹 Name(s) of MIDI input or/and output changed and will be updated when saving the page of your project
(For MacOS users)
This all makes sense given the Audio MIDI Setup shown above. The Bol Processor scanned all output (and input) MIDI ports. Given port '0' as an output by default, it assigned it to "Bus 1" which the 'port' set up in IAC.

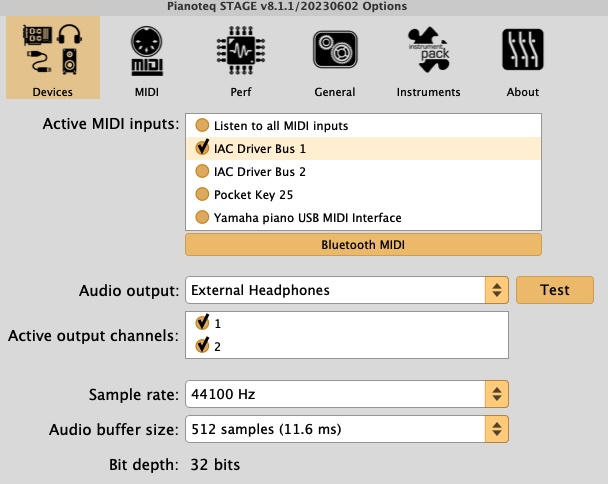
If your synthesiser happens to be connected to "Bus 1", you will hear sounds and the problem is solved. Let us suppose that you are running Pianoteq and hear nothing. Open the settings of Pianoteq and select "Devices". All you have to do is check "IAC Driver Bus 1". You might also check other inputs, including Pocket Key 25 if you want to connect your small keyboard directly to Pianoteq, but these are extra procedures.
Opening Pianoteq settings informed us that it is communicating with IAC, and it suggested to use a IAC 'Bus' for this communication. The 'Bus 1' port is technically called a virtual port.
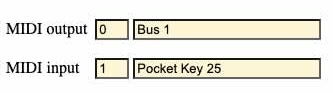
All you need to do to ensure that the connection remains correct when more devices are switched on/off and MIDI port numbers change. The only reliable way is to write the name "Bus 1" as the MIDI output. You can also write "Pocket Key 25" (or whatever is detected as your input MIDI device) to the MIDI input, as we will use it later. Note that MIDI port numbers are now irrelevant, as names take precedence. BP3 will correct them automatically.
Click the SAVE MIDI ports button to store this setting. Clicking on the SAVE format does the same thing, so don't worry about confusing buttons!
To the right of the MIDI port name is an empty field where you can enter a comment. For example, write "Pianoteq synth" to the right of "Bus 1".
Let us now switch on a Yamaha piano which is connected via a USB MIDI interface. The interface I use has a green light that indicates it has power. If the piano is actually communicating with it, we should see a flashing red light. In MacOS, sometimes it is necessary to restart the computer after switching on the piano… But in Windows and Linux the red light flashes immediately.
As soon as the red light flashes, open the Pianoteq settings. Great! We can now see that the Yamaha piano is recognised and connected to the IAC.
The easiest way to connect the Yamaha piano to BP3 is to click PLAY. Whatever happens, we'll get a warning and see the following diagnosis:
🎹 Your real-time MIDI settings:
MIDI output = 0: “Bus 1” -
MIDI input = 1: “new input” -
🎹 Setting up MacOS MIDI system
MIDI output = 0: “Bus 1” 👉 the name of your choice
Trying to assign ports to 1 input(s) without names but possibly with numbers
MIDI input = 1: “Bus 2” 👉 the number of your choice
MIDI input 1 makes BP3 interactive
🎶 More MIDI output options are available:
MIDI output = 1: “Bus 2”
MIDI output = 2: “Pocket Key 25”
MIDI output = 3: “USB MIDI Interface”
🎶 More MIDI input options are available:
MIDI input = 0: “Bus 1”
MIDI input = 2: “Pocket Key 25”
MIDI input = 3: “USB MIDI Interface”
MIDI settings saved to ../temp_bolprocessor/trace_974dd9ab22_-gr.tryTimePatterns_midiport
🎹 Name(s) of MIDI input or/and output changed and will be updated when saving the page of your project
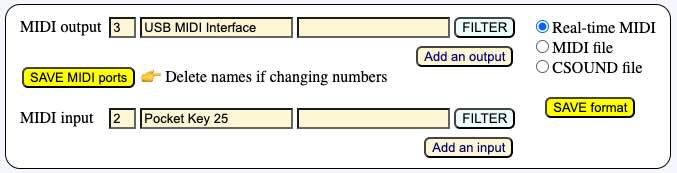
The MIDI input identified as "Pocket Key 25" is correctly connecting to port '2'. But the Yamaha piano is identified as "USB MIDI Interface". This is the name we need to copy to the MIDI output, then SAVE MIDI ports and PLAY. Another option is to leave the name empty and enter the MIDI output number '3'.
We hear the output on the Yamaha piano, although port numbers were incorrect on the interface. The inconsistency is resolved by the MIDI driver selecting ports by name in order of priority. Port numbers (and names) are updated as soon as you save or reload the project (data or grammar). Then you get:
Why does the name "Yamaha piano" appear in Pianoteq settings, but not in the MIDI ports scanned by BP3? This is a mystery that expert users of a MIDI studio could probably solve… For the time being, just write "Yamaha piano" in the comment field at the right of "USB MIDI interface".
The Pause and Continue buttons
During real-time playback, Pause and Continue buttons are displayed. These are self-explanatory. Clicking the Continue button will resume the performance with the exact timing.
These buttons affect all instances of BP3 that are playing together, if any (see below).
The _part() command
It is possible to send parts of a Bol Processor score to separate outputs. Parts are identified by the "_part(x)" command in which 'x' is an integer in range 1..30. We will be able to handle more than 30 parts if it turns out to be necessary.
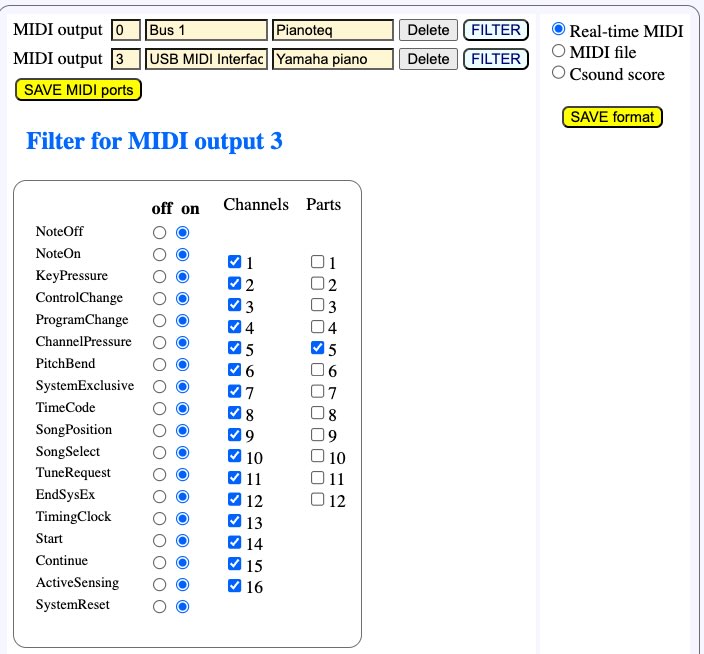
The "_part(x)" command directs MIDI messages to a specific MIDI output, which in most cases will be an instrument. The image on the side shows the mapping of port #3 (USB MIDI interface) to part #2, as set up in its filter.
By default, MIDI outputs "hear" all 30 parts, but here we've restricted this one to part #2.
For MIDI port #0 (Bus 1) we've restricted the output to part #5.
Let us play the following score:
C3 D3
This sequence of notes is heard on both instruments. As there is no "_part()" command in the score, all outputs send the MIDI messages.
Now let us try:
G2 _part(5) C3 _part(2) D3
Note G2 is heard on both instruments. But, as expected, the note C3 is heard on Bus 1 and D3 is heard on the USB MIDI interface.
The "_part()" command has exactly the same syntactic behaviour as "_chan()" and "_ins()". For example, it "follows" the score along the fields of polymetric structures:
G2 _part(5) C3 {D3 E3, _part(2) B2 _part(5) A2} F3 _part(2) G3
In this example, G2 is heard on both instruments. Then C3 is sent to Bus 1, as well as D3 and E3, since they are the first field of the polymetric structure. In the same time, B2 is sent to the USB MIDI interface, then A2 to Bus1. At the output of the polymetric structure, F3 is sent to Bus 1 which was the mapping before the structure. At last, G3 is sent to the USB MIDI interface.
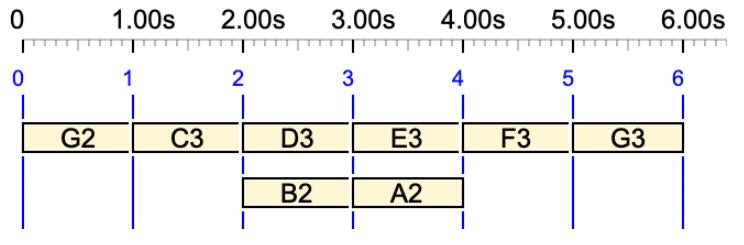
The sound-object graph shows that D3 and B2 are played together, although on different instruments, and E3 and A2 are played together on the instrument connected to Bus 1.
Parts are mostly relevant when importing digitised scores. They are used to declare instruments in MusicXML files. When importing a score, the Bol Processor will optionally place "_part()" or "_chan()" commands in the imported score, so that it can be played on the same set of digital instruments.
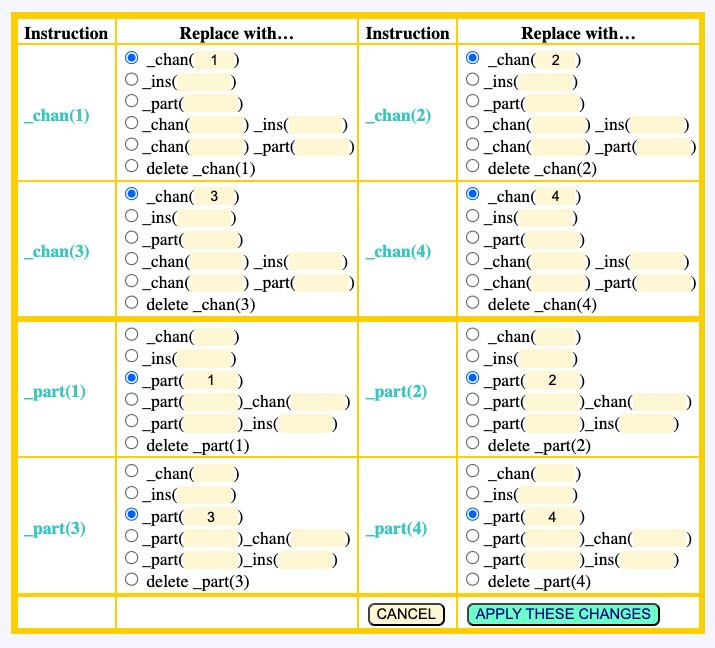
Using "_part()" is a better option than "_chan()" to name an instrument, because MIDI channels can be modified to handle microtonal adjustments. On the Data page, there is a MANAGE _chan(), _ins(), _part() button that opens a dialog for converting parts to/from channels, parts to/from instruments, etc.
An input
Setting up an input follows exactly the same protocol as setting up the output. For example, we can set up the input on "Pocket Key 25” as shown above. “USB MIDI Interface” (the Yamaha piano) is another possible choice. Let us continue with Pocket Key 25.
Windows users can simply plug their external MIDI keyboard (e.g. "Pocket Key 25”) to a USB port of their computer, as it will be automatically recognised and set up by the system.
Connecting an input to BP3 is of little interest if BP3 does nothing with input events. The instructions it can handle are listed in the section List of scripts for dealing with real-time MIDI below. "Wait for note…" means that BP3 will stop playing until it receives a NoteOn of the note in question — even with velocity zero.
Let us program this on a Data page for example:
_script(Iwait for C3 channel 1) _transpose(12) _vel(60) E2 • D2 E2 • _vel(65) B2 D2 E2 • G2 B2 D2 E2 • _vel(70) F#2 G2 B2 D2 E2 • Bb2 F#2 G2 B2 D2 E2 • _vel(75) C2 Bb2 F#2 G2 B2 D2 E2 • _vel(77) G#2 C2 Bb2 F#2 G2 B2 D2 E2 • _vel(80) A2 G#2 C2 Bb2 F#2 G2 B2 D2 E2 • _vel(85) Eb2 A2 G#2 C2 Bb2 F#2 G2 B2 D2 E2 • _vel(87) C#2 Eb2 A2 G#2 C2 Bb2 F#2 G2 B2 D2 E2 • _vel(90) F2 C#2 Eb2 A2 G#2 C2 Bb2 F#2 G2 B2 D2 E2
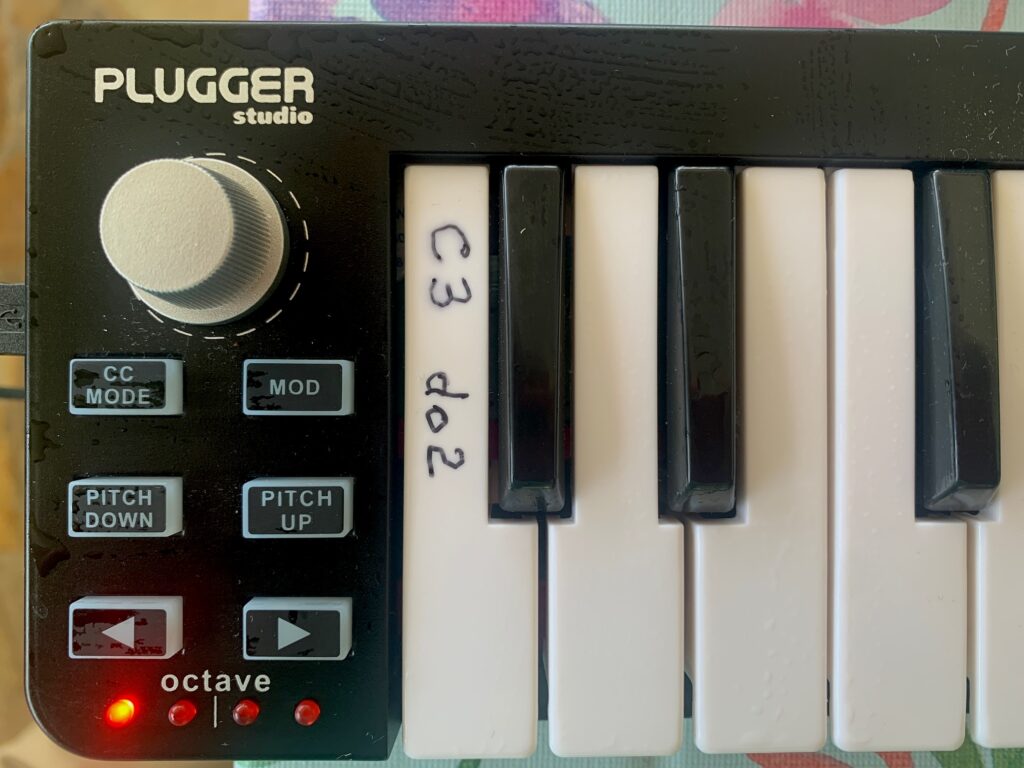
The script command tells that the performance should start when note C3 is received on MIDI channel 1. To avoid any confusion about octave numbers, I have written the name on the lowest key of my Pocket Key 25 (see photo). This confusion is made worse by the fact that the Italian/Spanish/French convention uses lower octave numbers!
So, the labelled key is the one we need to press to start this show. Let's try it…
When the PLAY button is clicked on the Data page, a flashing STOP button is displayed. The machine would wait forever unless the correct MIDI event has been received. The STOP button — or the PANIC button at the top right — can be used to abort the process cleanly. If all goes well, pressing the C3 key should produce this sound:
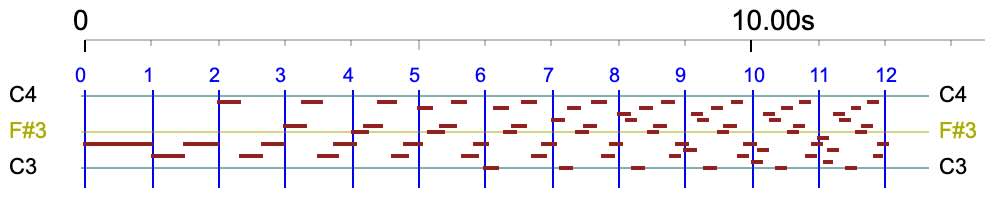
(This little "acceleration" piece was composed by Harm Visser to illustrate the period notation. Read his tutorial.)
Multiple interruptions are of course possible. Try this:
_script(wait for C3 channel 1) _transpose(12) _vel(60) E2 • D2 E2 • _vel(65) B2 D2 E2 • G2 B2 D2 E2 _script(wait for C4 channel 1) • _vel(70) F#2 G2 B2 D2 E2 • Bb2 F#2 G2 B2 D2 E2 • _vel(75) C2 Bb2 F#2 G2 B2 D2 E2 • _vel(77) G#2 C2 Bb2 F#2 G2 B2 D2 E2 • _vel(80) A2 G#2 C2 Bb2 F#2 G2 B2 D2 E2 • _vel(85) Eb2 A2 G#2 C2 Bb2 F#2 G2 B2 D2 E2 • _vel(87) C#2 Eb2 A2 G#2 C2 Bb2 F#2 G2 B2 D2 E2 • _vel(90) F2 C#2 Eb2 A2 G#2 C2 Bb2 F#2 G2 B2 D2 E2
Now the machine will start its performance after receiving a NoteOn of C3. It will then stop after three beats and wait for a NoteOn of C4. A noteworthy detail is that one second after an interruption, AllNotesOff is sent to all MIDI channels and the pedals are set to off. This prevents notes waiting for their NoteOff from being heard. This "All Notes Off" feature can be turned off in the preferences file.
MIDI input filters
Let us play with the continuous improvisation "Mozart’s musical dice game" (called "-gr.Mozart" in the "ctests" folder). If this project is set for real-time MIDI, the improvisation will not stop until we click on the STOP or PANIC button. Inserting a "wait for note…" at the beginning would of course stop the performance at the beginning of every variation. Beware that you will have to write "do2" instead of "C3" due to the note convention!
But let's try something else, using the external keyboard (the Pocket Key 25 or Yamaha piano) to play notes on top of the performance. How strange! We don't hear any notes played on the external keyboard unless it's connected directly to the output device.
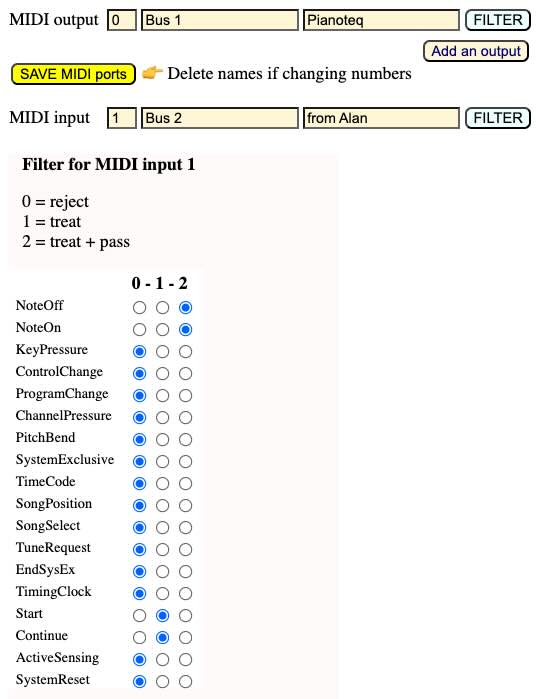
The reason for this becomes clear after clicking on the FILTER button for MIDI input 2:
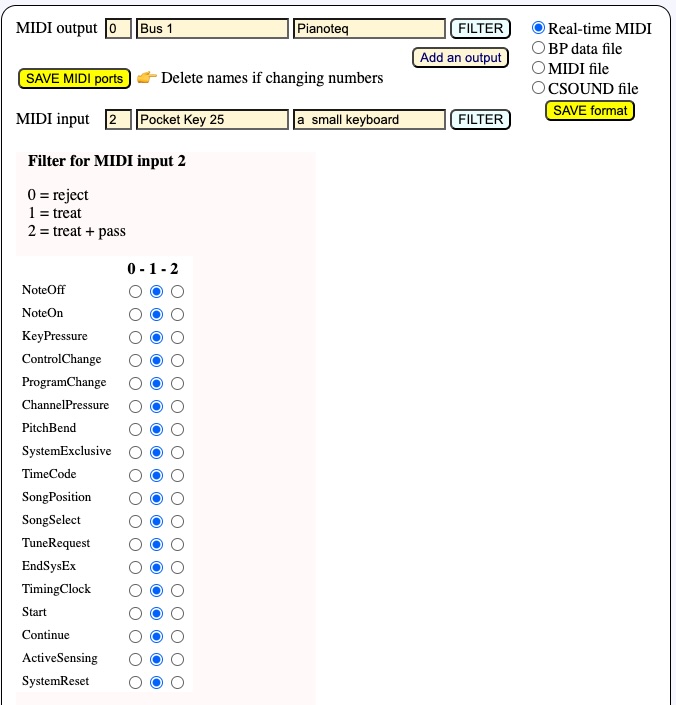
All types of MIDI events are listed along with how they are processed by BP3. Here we are only interested in NoteOn/NoteOff events. The default setting is '1', which means that they can trigger script commands, but are not forwarded to the MIDI output. This is why 'C3/do2' was able to start the performance, although we could not hear it.
To play notes over the performance, we need to set the status of NoteOn and NoteOff to '2'. Note: If we only set the NoteOn status, BP3 will automatically set the NoteOff status to avoid confusion. Once you have changed the settings, click SAVE MIDI ports, then PRODUCE ITEM(S).
Since the Pocket Key 25 keyboard sends only NoteOn/Noteoff messages, we could as well set other event filters (KeyPressure, etc.) to '0'.
These filter settings are stored, together with the MIDI port names or numbers, in a temporary file whose name depends on both the session number (created by your browser) and the project name. A copy of these settings is stored in the (permanent) folder "midi_resources". This storage makes it possible to launch several instances of BP3 on the same browser or on different browsers, as we will now see.
Several BP3s performing and communicating
From the previous description of interactions via MIDI events — limited for the time being to waiting for a particular note — you may have guessed that a great feature of the Bol Processor BP3 environment is the possibility of running several BP3s, on different machines, or even on a single machine and the same browser… in cooperation with real humans playing MIDI instruments!
Each instance of BP3 can be thought of as a 'musician' with their own compositional skills embedded in a grammar or data (a set of pre-composed musical fragments). We are working on interactions that will allow each musician to modify the behaviour of another musician's grammar, for example by changing rule weights — which may result in some rules being suppressed while others are activated — or changing metronome settings if they need to perform faster/slower, etc. All these features were part of earlier versions (BP2) several decades ago!
Let us start with an extremely simple example using the "wait for note…" script.
Create two projects that contain only data, for example "-da.Beatrix" and "-da.Alan":
-se.Beatrix
{2, C#4 Eb4 A4 G#4 C4 Bb4 F#4 G4 B4 D4 E4}
-se.Alan
_script(wait for E4 channel 1) {2, - F3 C#3 Eb3 A3 G#3 C3 Bb3 F#3 G3 B3 D3 E3}
Note that these melodies do not contain the same number of notes, but they will have the same duration (2 beats) because of their polymetric structures.
We want Alan's performance to start precisely after the last note of Beatrix's performance. As we don't want E4 to overlap with F3, we have put a silence '-' before F3. In the following, we'll have a solution to overcome this limitation.
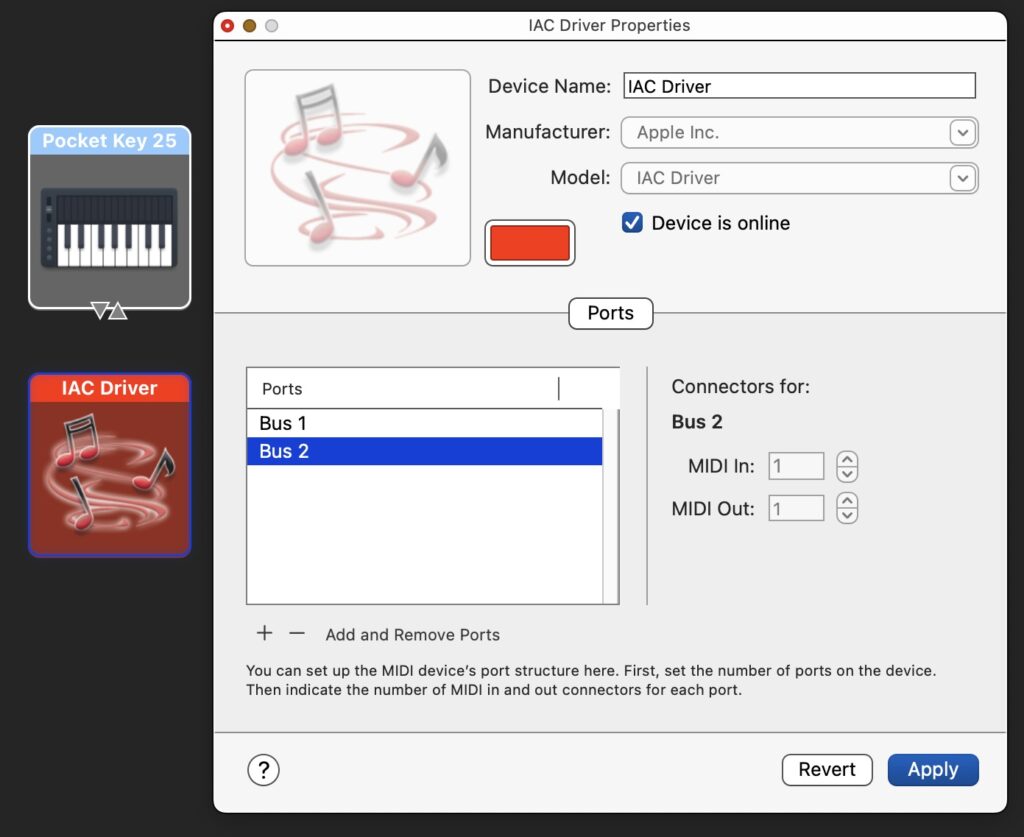
To manage the interaction in MacOS, we need an additional IAC port which is (automatically) named "Bus2". To do this, open Audi MIDI Setup and click on the IAC driver. Then add a port (see picture). You can create as many ports as you wish.
Set both Beatrix's MIDI output and Alan's MIDI input to "Bus2".
Now we want to hear both performances. Alan's MIDI output is sent to "Bus1" and will therefore be audible on the Pianoteq synthesiser.
Windows and Linux users can connect the two performers more easily: send both Beatrix's and Alan's messages to the external MIDI device, and connect Alan's input to the same MIDI device. But… the input filter should receive events and not forward them to the output, which is the same device, otherwise the loop will produce a disastrous bouncing effect!
Back to MacOS, there are two ways to send Beatrix's performance to the Pianoteq synthesiser:
- Pianoteq settings make it possible to listen to both "Bus1" and "Bus2" virtual ports.
- You can set up the MIDI event filter on Alan's project to route input NoteOn/NoteOff events to the current MIDI output. See above for filters.
To play the performance, click PLAY on Alan's project so that it is ready to perform. Then click PLAY on Beatrix's project. This is the result:
No doubt this sounds rather unmusical! In fact, we publish tasteless technical examples to encourage musicians to compose interesting pieces! 😀
Using out-time inaudible notes as signals
The idea of beginning Alan's performance with a silence that is filled by Beatrix's final note E4 is unelegant. Below is a better solution:
-se.Beatrix
{2, C#4 Eb4 A4 G#4 C4 Bb4 F#4 G4 B4 D4 E4} _vel(0) <<C0>>
-se.Alan
_script(wait for C0 channel 1) {2, - F3 C#3 Eb3 A3 G#3 C3 Bb3 F#3 G3 B3 D3 E3}
The secret is the expression "_vel(0) <<C0>>" which is an out-time expression of note C0 with velocity zero. The velocity ensures that the note won't be heard, and the out-time property gives it a null duration. Any note can be used here provided that it is mentionend in the "_script(wait…)" instruction.
If "_vel(0) <<C0>>" is followed by more notes, it is necessary to reset the velocity to its default value. The solution is to write it between curly brackets, so that _vel(0) only applies to the content of the expression: "{_vel(0) <<C0>>}"
Checking the time accuracy
Let us check that the real-time synchronisation is not affected by delays. We'll now ask Alan and Beatrix to play the same piece of music (one octave apart) in the same time.
This time, Alan will start:
_transpose(12) _vel(60) E2 • D2 E2 • _vel(65) B2 D2 E2 • G2 B2 D2 E2 • _vel(70) F#2 G2 B2 D2 E2 • Bb2 F#2 G2 B2 D2 E2 • _vel(75) C2 Bb2 F#2 G2 B2 D2 E2 • _vel(77) G#2 C2 Bb2 F#2 G2 B2 D2 E2 • _vel(80) A2 G#2 C2 Bb2 F#2 G2 B2 D2 E2 • _vel(85) Eb2 A2 G#2 C2 Bb2 F#2 G2 B2 D2 E2 • _vel(87) C#2 Eb2 A2 G#2 C2 Bb2 F#2 G2 B2 D2 E2 • _vel(90) F2 C#2 Eb2 A2 G#2 C2 Bb2 F#2 G2 B2 D2 E2
In MacOS, Alan will send MIDI events to "Bus2". Beatrix will listen to "Bus2" and send MIDI events to "Bus1" (Pianoteq). Beatrix will set her input filter to the pass option, routing the incoming events to the output. The Pianoteq synthesiser will be set to listen to "Bus1" only.
This is the score of Beatrix:
_script(wait for E3 channel 1) _transpose(24) _vel(60) E2 • D2 E2 • _vel(65) B2 D2 E2 • G2 B2 D2 E2 • _vel(70) F#2 G2 B2 D2 E2 • Bb2 F#2 G2 B2 D2 E2 • _vel(75) C2 Bb2 F#2 G2 B2 D2 E2 • _vel(77) G#2 C2 Bb2 F#2 G2 B2 D2 E2 • _vel(80) A2 G#2 C2 Bb2 F#2 G2 B2 D2 E2 • _vel(85) Eb2 A2 G#2 C2 Bb2 F#2 G2 B2 D2 E2 • _vel(87) C#2 Eb2 A2 G#2 C2 Bb2 F#2 G2 B2 D2 E2 • _vel(90) F2 C#2 Eb2 A2 G#2 C2 Bb2 F#2 G2 B2 D2 E2
To start the performance, first click on the PLAY button of Beatrix's project, then on the PLAY button of Alan's project.
Have you noticed that Beatrix is waiting for E3, which does not appear in Alan's score? Oh yes, it does! There is a _transpose(12) command that changes E2 (the first note) to E3. So, it works. This is the performance:
Not too bad? Despite the lack of musical interest, we must admit that the superimposition is technically acceptable, even if it is not perfect: there is a delay of about 60 milliseconds on the first note, the time it takes Beatrix's machine to detect that it has received a NoteOn for C3. The subsequent notes are programmed to compensate for this delay, but there are still discrepancies (which can be quantified on the Pianoteq MIDI input). They seem to be caused by delays outside BP3.
You can adjust the delay in Beatrix's project settings "-se.Beatrix". There is a parameter called "Sync delay", which is the number of milliseconds Beatrix's output events should be postponed after the synchronisation. We currently find that 380 ms is a good value.
In fact, the superimposition would sound even better if both performances were triggered by the same event, such as the conductor pressing a key on the external keyboard. This exercise was only intended to show that synchronisation between "virtual musicians" works well.
Working with multiple MIDI inputs
In the previous example, we could decide that Alan's performance will start when he receives a particular note from the Pocket Key 25 keyboard. In this case, we need to click on both START buttons, putting both 'musicians' in wait mode, and the performance will not start until the correct key is pressed on the keyboard.
This case is manageable with single inputs on each instance of BP3. More complicated cases, however, require external 'actors', such as a Pocket Key 25 keyboard sending to all the 'musicians' synchronisation messages, or messages modifying parameters in grammars, changing the metronome value, etc.
To achieve this, the Bol Processor is a able to manage multiple MIDI inputs.
The new game is as follows: both Beatrix and Alan will take turns playing variations of Mozart's musical dice game (see '-gr.Mozart'), one octave apart. They will use the Improvise mode to continue throwing the dice and creating unheard variations. But they will wait for a signal from the other to start playing a new variation.
In short, both musicians will use the same grammar, with only a small change for mutual synchronisation. Their settings must be carefully adjusted:
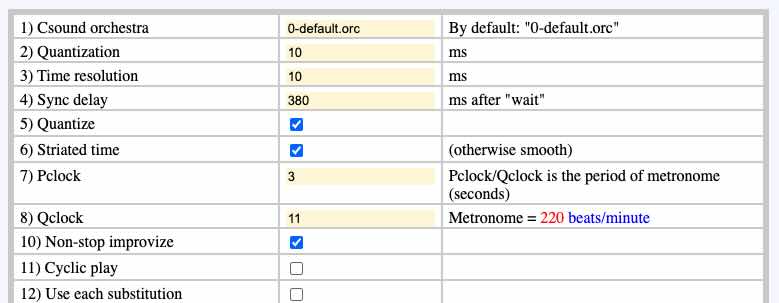
- Select Italian/Spanish/French as a note convention
- Check Non-stop improvise
- Adjust Pclock = 3 and Qclock = 11 to get the same metronome speed of 220 bpm
- Set Sync delay to 380 ms
- We don't want both musicians to repeat the same variations. So, set the Seed for randomization to different values, for instance '1' and '2'. Or set it to zero to instruct the machine to seed the random sequence with an arbitrary number of its choice.
In the current version of BP3, the easiest way to send a signal is to send a note with a velocity of zero, which will therefore go unheard. So we need to change the grammar to add these particular notes.
In fact, the same notes should never be part of the score, so that the signal is really sent at the end. This is easy with Mozart's game, for example we can use C# (do#) for the synchronisation. Below are the tops of the grammars used by Beatrix and Alan.
Beatrix '-gr.Beatrix':
-se.Beatrix
ORD
gram#1[1] S --> _script(wait for do#3 channel 1) _vel(80) A B _vel(0) do#2
gram#1[2] A --> A1 A2 A3 A4 A5 A6 A7 A8 A1 A2 A3 A4 A5 A6 A7 A'8
gram#1[3] B --> B1 B2 B3 B4 B5 B6 B7 B8 B1 B2 B3 B4 B5 B6 B7 B8
-------------------
LIN [Select rules randomly and apply from left to right]
etc.
Alan's '-gr.Alan':
-se.Alan
ORD
gram#1[1] S --> _script(wait for do#2 channel 1) _vel(80) _transpose(-12) A B _vel(0) do#4
gram#1[2] A --> A1 A2 A3 A4 A5 A6 A7 A8 A1 A2 A3 A4 A5 A6 A7 A'8
gram#1[3] B --> B1 B2 B3 B4 B5 B6 B7 B8 B1 B2 B3 B4 B5 B6 B7 B8
-------------------
LIN [Select rules randomly and apply from left to right]
etc.
Again, we put do#4 at the end of Alan's performance because it is played as do#3 (one octave lower) due to the _transpose(-12) instruction.
Now we need to set up the MIDI inputs and outputs. Beatrix will send events to "Bus 1" which is the Pianoteq synthesizer. She will receive events from "Bus 2", use them for synchronisation, and forward them to the output.
Alan will send events to "Bus 2" and listen to "Bus 1" for the synchronisation.
This is all perfect on paper, but who is going to start? We have created a chicken and egg situation, so we need a superpower to start the process! Actually, a real human pressing the do#2 key on a Pocket Key 25 keyboard will do.
The interface has a Add an input button. We click it on Alan's project and paste the name Pocket Key 25. We also use the comment fields to remember the use of each port:
To start the concert, we'll click START on both projects. The order is irrelevant. Then we'll press a key on the Pocket Key 25. Which key?
If we press the do#2 key, we will certainly trigger Alan's improvisation and the cycle will start. But if we press the do#3 key, nothing will happen because, by default, the filter of the Pocket Key 25's input in "-gr.Alan" does not transmit NoteOns to the output. So Beatrix won't hear it… By setting NoteOn to status '2' (treat and pass) on this filter, it is possible to decide who will start the performance: do#2 for Alan and do#3 for Beatrix.
Here we go (starting with Alan):
You can interrupt this dual performance at any time by clicking the Pause button (of either project) and resume it by clicking the Continue button. You can also insert musical fragments by running a project such as "-da.tryStopContinue" (see below), if Stop and Continue MIDI events are sent to both "Bus 1" and "Bus 2" ports. In both cases the synchronisation is maintained.
👉 This simple show should convince musicians to create "virtual bands" of BP3s playing different grammars and sending specific synchronisation signals according to which variation has just been produced. Along with human performers who join in the fun!
The "virtual musicians" can be on the same computer or remotely connected via network (BlueTooth) or MIDI cables and USB interfaces. If they are on the same computer, they can be run on different browsers and/or the same browser. In the latter case, BP3 will not allow the same project (grammar or data) to be run in the same session. In general, just like human musicians in an orchestra have individual scores, it makes sense that virtual musicians don't share the same project…
The number of MIDI inputs and outputs in a project is currently limited to 32. It is unlikely that a (human) musician will need more!
Synchronise to a sequence (or list) of notes
The following expression
gram#1[1] S --> _script(wait for C3 channel 1) - _script(wait for E3 channel 1) etc.
synchronises the production to the sequence of notes C3 E3 (whatever the duration and velocity). This creates interesting situations where a "virtual musician" is expected to start playing after receiving a signal (C3) from one partner, then a signal (E3) from another partner.
Note that there is a silence '-' between the two script instructions. If there is no silence, then BP3 will resume playing if either C3 or E3 has been received.
Remember that because of the MIDI channel specification (range 1 to 16), the detection of signals can be selective. They are also inaudible when transmitted by NoteOns with velocity zero.
Crashing the band!
In the example of Alan & Beatrix playing Mozart, the connection seems to create a loop: Beatrix sends events to Pianoteq and Alan ("Bus 1"), who in turn sends events to Beatrix ("Bus 2"). Isn't that dangerous?
The reason it doesn't crash is that Alan's input "fromBeatrix" ("Bus 1") is filtered: NoteOns are received and processed (for synchronisation), but not passed to the output ("Bus 2"), i.e. to Beatrix. You can try to change the filter of input "Bus 1" on Alan's project, setting NoteOns to status '2' (treat + pass): you will get a superb crash after a flood of notes!
➡ This probably will not happen because BP3's MIDI drivers have been equipped with an anti-bouncing mechanism.
Working with multiple MIDI outputs
The Bol Processor currently accepts up to 32 MIDI inputs and outputs.
Example of a project using two inputs and two outputs:
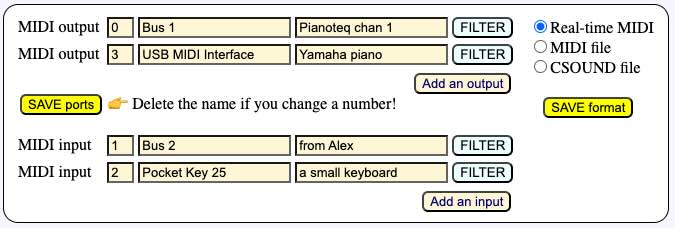
The procedure for adding outputs is the same as the one for adding inputs: click on the Add an output button, then enter the name of the MIDI device if you know it exactly, otherwise leave it blank and let the machine connect it by default to the next available output, while suggesting other options:
🎹 Your real-time MIDI settings:
MIDI output = 0: “Bus 1” - Pianoteq
MIDI output = 3: “USB MIDI Interface” - Yamaha piano
MIDI input = 1: “Bus 2” - from Alex
MIDI input = 2: “Pocket Key 25” - a small keyboard
🎹 Setting up MacOS MIDI system
MIDI output = 0: “Bus 1” 👉 the name of your choice
MIDI output = 3: “USB MIDI Interface” 👉 the name of your choice
MIDI input = 1: “Bus 2” 👉 the name of your choice
MIDI input 1 makes BP3 interactive
MIDI input = 2: “Pocket Key 25” 👉 the name of your choice
MIDI input 2 makes BP3 interactive
🎶 More MIDI output options were available:
MIDI output = 1: “Bus 2”
MIDI output = 2: “Pocket Key 25”
🎶 More MIDI input options were available:
MIDI input = 0: “Bus 1”
MIDI input = 3: “USB MIDI Interface”
The fact that a MIDI input or output is "available" does not guarantee that it will do what we want it to do. For example, sending MIDI messages to the Pocket Key 25 keyboard will actually do nothing.
Filtering MIDI outputs
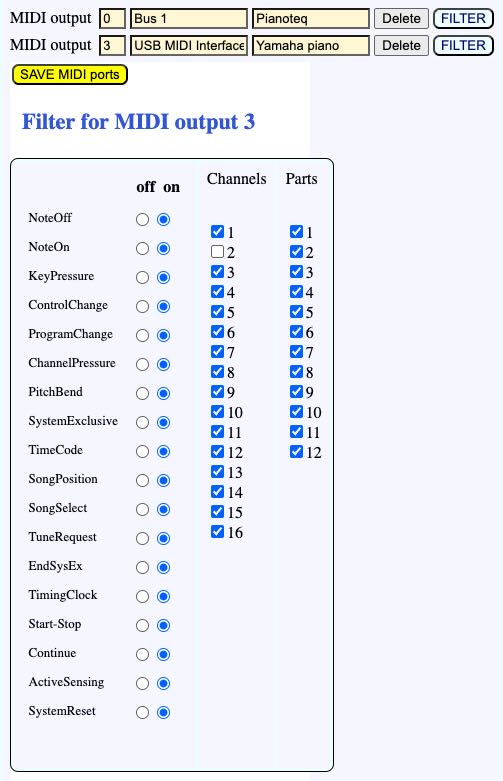
In the example above, MIDI output 3 (the Yamaha piano connected to the USB MIDI Interface) has the filter shown on this picture.
The channel filter specifies that the Yamaha piano will get all MIDI channels except those emitted on MIDI channel 2. Filtering MIDI channels makes it possible to send events exclusively to different instruments.
MIDI events can also be filtered by type. The idea is the same as for MIDI input filters, see above.
Filtering on parts has been explained above.
👉 If you do not hear any sound in real-time MIDI, you may consider checking the output MIDI filters before you kick the piano or screw up its cables! 😀
Using standard MIDI control
MIDI has standard control messages, namely Start, Continue and Stop, which can be used to coordinate multiple "virtual musicians" (instances of BP3). The advantage is the clarity of the data and the grammars programmed for interactions. The disadvantage is that these messages are not assigned to specific MIDI channels. This can be a problem with a large number of "virtual musicians". They also introduce a delay of about 250 milliseconds due to the time it takes for the MIDI device to process them.
Control messages can be used in two ways. The first, which we will now examine, is to "listen" to these messages via a script command. The second (see next section) is to respond to them as interruptions in the performance.
Let us look at a trivial example (of no musical interest), again with Beatrix and Alan playing together. This time, they take turns playing their items (simple sequences of notes).
It is important that the "Respond to Stop/Continue" option is unchecked in both the Alan and Beatrix project settings.
Alan will start first. Below is the data:
E3 D3 C3 _script(MIDI send Start) _script(wait for Continue) A2 B2 C3
In short, he will play three notes (E3 D3 C3), then send a START to Beatrix and wait for a CONTINUE from Beatrix, then on receipt play the final three notes A2 B2 C3.
This is Beatrix's data:
_script(wait for Start) E4 D4 C4 _script(MIDI send Continue)
Beatrix's project sends its output to "Bus 1", the Pianoteq synthesizer. Its input is connected to the virtual port "Bus 2".
Alan's project sends its output to the virtual port "Bus 2", and its input is connected to "Bus 1".
We'll start the performance with Beatrix. Her machine will stay waiting for START. Then we'll start Alan's part, which will play three notes, then send a START message to Beatrix, who will play her part, and return to Alan, via a CONTINUE message, for the final part…
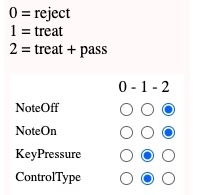
This all sounds logical, but it doesn't work! We do hear Alan's E3 D3 C3, but then nothing… The first reason is that Beatrix should be able to hear Alan's START command, which is no longer a NoteOn as in the previous examples. This means that the filter of her input "Bus 2", from which she receives Alan's MIDI messages, must be set correctly. The Start event should be received, see picture on the side. Also remember that NoteOn and NoteOff should be received and transmitted to the output (the Pianoteq synth).
Well, now we hear Alan's E3 D3 C3 followed with Beatrix's E4 D4 C4, but then… nothing! 😢
Careful analysis is needed to solve the problem. However, this is simple logic. Remember that Alan is playing on "Bus 2", which is not connected to any MIDI device. If we hear Alan's production, it is because it is received by Beatrix on "Bus 2" and then forwarded to "Bus 1" (the Pianoteq synth). The problem is that the final part A2 B2 C3 is sent to Beatrix, but she has already stopped listening because her own data is finished!
You can imagine a band in which one musician plays an improvisation and then gives a signal to another musician to start their own improvisation, but the careless musician has already vacated the place believing that the programme was finished. The solution is to tell the musicians not to go away until they receive a STOP signal. Maybe a signal from a conductor (here using the Pocket Key 25 keyboard), maybe a signal from the musician who is in charge of ending the performance. So we'll tell Alan to send a STOP signal at the end of his performance, and Beatrix to wait for Alan's STOP signal. Below are the revised scores.
// Alan
E3 D3 C3 _script(MIDI send Start) _script(wait for Continue) A2 B2 C3 _script(MIDI send Stop)
// Beatrix
_script(wait for Start) E4 D4 C4 _script(MIDI send Continue) _script(wait for Stop)
The MIDI messages Start, Continue, Stop have been used here to facilitate the reading of scores (or grammars), but these can be replaced by NoteOns with durations and velocities zero on different MIDI channels when working with a larger number of actors.
By the way, using MIDI messages Start, Continue and Stop can be problematic with physical or virtual MIDI devices. My Yamaha piano, for example, does not transmit these messages. So, when connected to an input, it will only send 3-byte messages such as NoteOn/NoteOffs. In the Windows environment, the Microsoft GS Wavetable Synth also does not transmit any message at all. The best way to exchange messages is via virtual MIDI ports created by "loopMIDI" (see below). In Linux, virtual ports such as 'VirMIDI 0-0' (see below) do not seem to transmit these Start, Continue and Stop messages.
For geeks: In the Bol processor, scripts are appended to the next following sound object. For example, _script(wait for Start) is appended to note E4 in Beatrix's score. But what about scripts at the end of a score? The secret is that BP3 creates an invisible MIDI event (ActiveSensing) at the end of each element to which it can append the final scripts.
Using control messages to interrupt a performance
This is the second way of using control messages. Let's try to stop a performance with a standard Stop MIDI message, play a few notes and then continue the performance with a standard Continue MIDI message.
We create a project "-da.tryStopContinue" as follows:
-se.tryStopContinue
_script(MIDI send Stop) _tempo(2) A2 G#2 C2 Bb2 F#2 G2 B2 _script(MIDI send Continue)
Running this project will interrupt a performance, for example "-da.Watch_What_Happens_by_Oscar_Peterson". For this to work, the "Respond to Stop/Continue" option must be checked in the Oscar Peterson data project.
Let us decide that the performance will be played on the Pianoteq synthesiser connected to "Bus 1" on a Mac.
The "-da.tryStopContinue" will send its data to a virtual port, for instance "Bus 2". To this effect, the "-da.Watch_What_Happens_by_Oscar_Peterson" project will have an input port listening to "Bus 2", accepting all messages and transmitting at least NoteOn/Noteoff.
Another solution is to set up another output port on the "-da.tryStopContinue" project, that sends all data to "Bus 1". The output to "Bus 2" will only send the Stop and Continue messages. The input port listening to "Bus 2" on the Oscar Peterson project will only accept Stop and Continue, and not transmit anything.
👉 It is a good practice to use the filters for restriction of message management to the necessary tasks.
Now, play the Oscar Peterson performance, and at any point start "-da.tryStopContinue". The performance will pause and you will hear the external musical phrase. The performance will then resume. You can, of course, do this several times and insert any variety of musical fragments. For example:
List of scripts for dealing with real-time MIDI
The list below will be kept up to date as there are many scripts on the agenda. These instructions are not case-sensitive.
Input scripts
When a note is specified, be sure to use the same note convention as in the project, e.g. C3 or do2 or sa3, etc.
| Wait for note channel c | Wait for a NoteOn of the specified note on channel c (1…16) |
| Wait for Start | Wait for a Start MIDI message (250) |
| Wait for Continue | Wait for a Continue MIDI message (251) |
| Wait for Stop | Wait for a Stop MIDI message (252) |
| Wait forever | Wait until STOP or PANIC button is clicked |
| Velocity param Kx = note channel c | Set parameter Kx (0 < x < 128) to the velocity (range 0…127) of the specific note on channel c (1…16) |
| Control param Kx = #y channel c | Set parameter Kx (0 < x < 128) to the value (range 0…127) of MIDI controller #y (0 < y < 128) on channel c (1…16) |
Output scripts
| Hold for x milliseconds | Delay all subsequent events by the specified duration x (integer). |
| Send Start | Send Start MIDI message (250) |
| Send Continue | Send Continue MIDI message (251) |
| Send Stop | Send Stop MIDI message (252) |
Scripts on top of a grammar
(To be continued)
Capture incoming events
The _capture() command allows incoming MIDI events to be recorded to a 'capture' text file. See the Capture MIDI input page for explanations.
Alternatives to IAC
Here are the equivalents of Apple's IAC (Inter-Application Communication) for each system:
Windows environment
On Windows, you can use software like loopMIDI or virtualMIDISynth to create virtual MIDI ports. These tools work similarly to the IAC Driver on macOS:
- loopMIDI: Created by Tobias Erichsen, loopMIDI is a popular choice for creating virtual MIDI ports on Windows. It allows you to create and manage several virtual ports which can be used by applications to communicate with each other.
- virtualMIDISynth: This is another tool that can be used to create a MIDI synthesizer device which can be accessed via a virtual MIDI cable.
These tools integrate with software applications that support MIDI, providing a seamless way to connect various MIDI applications without needing external MIDI hardware.
Linux environment
On Linux, ALSA (Advanced Linux Sound Architecture) provides capabilities to create virtual MIDI devices through its sequencing API.
- snd-virmidi: This ALSA MIDI driver provides virtual MIDI ports for sending and receiving MIDI between applications running on the same system. It's part of the standard ALSA module set and can be configured to provide multiple ports.
To set up virtual MIDI ports on Linux using ALSA, you typically need to load the snd-virmidi module. You can do this by running:
sudo modprobe snd-virmidi midi_devs=2
This command loads the snd-virmidi module and sets it up to provide two virtual MIDI devices (you can increase the number of devices by changing the midi_devs parameter). The virtual ports, namely 'VirMIDI 0-0' and 'VirMIDI 0-1' , can then be accessed by MIDI applications on the Linux system. Please note that they do not appear to transmit the Start, Stop and Continue messages.
👉 This is done automatically by the "install_bp3.sh" shell script installing BP3 on Linux/Ubuntu (download here).
Bernard Bel
June-December 2024