
This page complements the Quick install MacOS guide. However, it addresses the more general issue of setting up a local Apache server on a Mac.
You will not be able to run both MAMP and XAMPP Apache servers at the same time if they use the same ports. This wouldn't be a good idea anyway… So, you need to opt for the device of your choice.
Choosing between MAMP and XAMPP
Both XAMPP and the basic version of MAMP are free of charge and fully meet the need to run an Apache server on the Bol Processor. A MAMP PRO version is also available for a charge, in case you need to run projects with more requirements.
As of July 2026, XAMPP 8.2.4 includes manager-osx.app, but this utility was compiled for Intel-based Macs and therefore required Rosetta on Macs with Apple silicon, which won't be available after MacOS version 27. Apple recommends replacing Intel applications with Apple-silicon or Universal alternatives where possible (read Apple: Using Intel-based apps on a Mac with Apple silicon). The automatic startup service described here makes manager-osx.app unnecessary.
The latest XAMPP release announced by Apache Friends is version 8.2.12. However, the latest version actually available for macOS remains XAMPP 8.2.4 (see the download page). Its components are Intel (x86_64) binaries and therefore still require Rosetta on Macs with Apple silicon. A native ARM64 version has not yet been announced.
Installing MAMP
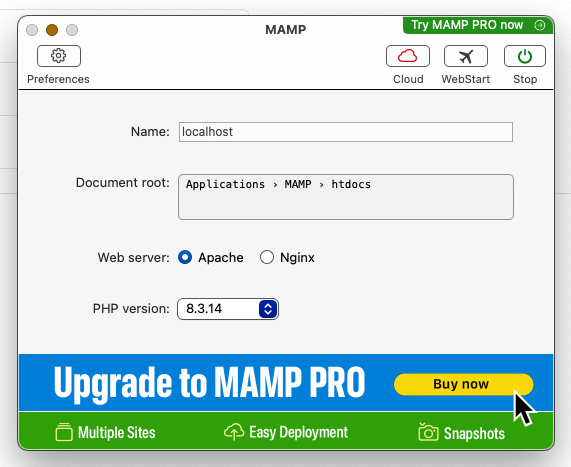
if you choose the (free) MAMP version, both MAMP and (commercial) MAMP PRO will be installed. The interface will occasionally prompt you to "upgrade" to MAMP PRO (see picture), but you can ignore this recommendation.
In the preferences of MAMP, do not check "Start servers". Also do not start Apache clicking the Start button. For geeks: this is to make sure that Apache will be launched with your own identifier.
It appears that the free version of MAMP has a script execution time of 30 seconds. This is sufficient for most small Bol Processor projects. However, there is a way to overcome this limitation without having to run MAMP PRO (for a charge). Do the following:
- Select the highest available version of PHP, e.g. 8.3.14 as shown on the picture.
- In Applications/MAMP/bin/php/ you will see a folder named "php8.3.14". Open it, open the "conf" folder and edit the "php.ini" file (with TextEdit).
- Replace
max_input_time = 60withmax_input_time = 300 - Replace
max_execution_time = 60withmax_execution_time = 300 - Save the "php.ini" file.
- Edit the Applications/MAMP/conf/apache/httpd.conf file. Look for the line:
FastCgiServer /Applications/MAMP/fcgi-bin/php.fcgi -socket httpdFastCGI.sock
and replace it with:
FastCgiServer /Applications/MAMP/fcgi-bin/php.fcgi -socket httpdFastCGI.sock -idle-timeout 3600 -flush
To start Apache, got to the Terminal and type:
/Applications/MAMP/Library/bin/apachectl startTo stop it, type:
/Applications/MAMP/Library/bin/apachectl stopWe will see below how the start instruction can be sent when the computer starts up.
Installing MAMP PRO
(For rich people)
After the (free) downloading MAMP, you will find MAMP PRO in the Applications folder, whereas MAMP (free) is located in Applications/MAMP. Also note that this version of MAMP runs on port "8888" by default, as we will see below.
- Launch MAMP PRO from the Applications folder.
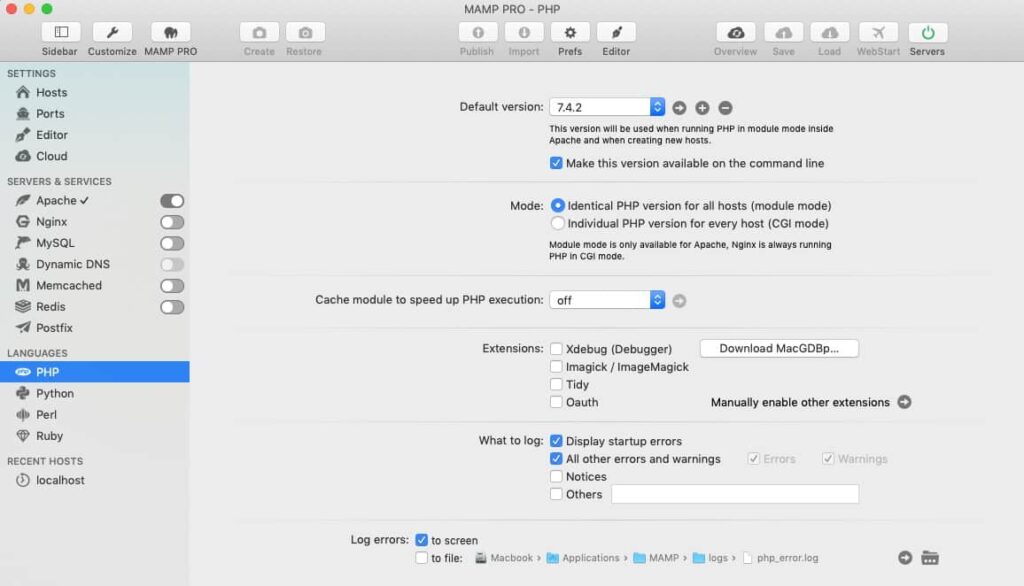
- In the MAMP main window, click the Apache Enable button (see image). No need for MySQL.
- The image shows the default settings for PHP, which is started with Apache.
- In case of trouble, check the settings for ports (see image) and of hosts (general and Apache).
Installing XAMPP
Your Mac may refuse to run the XAMPP installer because it is from an "unknown developer". You can override this by allowing the application in the Privacy & Security section of the Mac's System Settings. Unpacking the files takes several minutes, so be patient and wait for it to finish!
👉 Don't try the virtual machine version of XAMPP! It won't work on Macs with M1 chips (and above). Use the native installer.
Start Apache automatically at login
For ordinary web pages, Apache may be started in several ways. However, the Bol Processor’s real-time MIDI functions require Apache to be started in the graphical session of the logged-in user. This gives the "bp" console access to the MacOS CoreMIDI server.
Therefore Apache should start automatically at login, not at boot time. We do not use a LaunchDaemon system for this purpose. Instead, we use a LaunchAgent.
MAMP Apache at login
The MAMP application should NOT be added to the Login items in your System Settings. Also deactivate MAMP GmbH in the Login items.
Make sure that Apache is stopped. You can do this either by clicking the Stop button in the MAMP application window, or by running the following command in the Terminal:
/Applications/MAMP/Library/bin/apachectl stopNow, run the following commands in the Terminal:
mkdir -p ~/Library/LaunchAgents
nano ~/Library/LaunchAgents/org.bolprocessor.mamp-apache.plist
Paste the following text into the nano editor:
<?xml version="1.0" encoding="UTF-8"?>
<!DOCTYPE plist PUBLIC "-//Apple//DTD PLIST 1.0//EN"
"http://www.apple.com/DTDs/PropertyList-1.0.dtd">
<plist version="1.0">
<dict>
<key>Label</key>
<string>org.bolprocessor.mamp-apache</string>
<key>ProgramArguments</key>
<array>
<string>/Applications/MAMP/Library/bin/apachectl</string>
<string>start</string>
</array>
<key>RunAtLoad</key>
<true/>
</dict>
</plist>
Save the file by pressing Control-O, followed by Return. Then press Control-X to exit the editor.
Check that the file is valid:
plutil -lint ~/Library/LaunchAgents/org.bolprocessor.mamp-apache.plistThe result should be:
…org.bolprocessor.mamp-apache.plist: OKActivate the service immediately:
launchctl bootstrap gui/$(id -u) ~/Library/LaunchAgents/org.bolprocessor.mamp-apache.plistDo not use sudo for any of these commands. Apache will start immediately and subsequently each time you log in to your Mac.
Make sure you quit the MAMP application before shutting down your computer; otherwise, it will reopen if the "Reopen windows when logging back in" option is selected.
To disable the automatic MAMP Apache start later, enter:
launchctl bootout gui/$(id -u) ~/Library/LaunchAgents/org.bolprocessor.mamp-apache.plistAfter a MacOS upgrade, it may happen that MAMP no longer starts at login. If this happens, simply run the following:
launchctl bootout gui/$(id -u) ~/Library/LaunchAgents/org.bolprocessor.mamp-apache.plist
launchctl bootstrap gui/$(id -u) ~/Library/LaunchAgents/org.bolprocessor.mamp-apache.plist
XAMPP Apache at login
(For geeks) The XAMPP procedure below also uses a LaunchAgent, so that Apache starts in the graphical session of the logged-in user. This is required for the Bol Processor’s real-time MIDI functions.
These instructions assume that XAMPP is installed in its default location:
/Applications/XAMPP1. Find your macOS username
Open Terminal and enter:
whoamiMake a note of the result. It is your short macOS username.
2. Authorise the Apache startup command
The LaunchAgent must be allowed to start Apache without displaying a password request.
Enter:
sudo EDITOR=nano visudo -f /etc/sudoers.d/xampp-startapacheEnter your administrator password, then add the following line, replacing your_username with the result of the whoami command:
your_username ALL=(root) NOPASSWD: /Applications/XAMPP/xamppfiles/xampp startapacheFor example, if whoami returned mary, the line would be:
mary ALL=(root) NOPASSWD: /Applications/XAMPP/xamppfiles/xampp startapachePress Control-O, followed by Return, to save the file. Then press Control-X to leave the editor.
Test the authorisation:
sudo -k
sudo -n /Applications/XAMPP/xamppfiles/xampp startapache
Apache should start without requesting a password.
3. Create the user LaunchAgent
Enter:
mkdir -p "$HOME/Library/LaunchAgents"
nano "$HOME/Library/LaunchAgents/org.xampp.server.plist"
Paste the following text into the nano editor:
<?xml version="1.0" encoding="UTF-8"?>
<!DOCTYPE plist PUBLIC "-//Apple//DTD PLIST 1.0//EN"
"http://www.apple.com/DTDs/PropertyList-1.0.dtd">
<plist version="1.0">
<dict>
<key>Label</key>
<string>org.xampp.server</string>
<key>ProgramArguments</key>
<array>
<string>/usr/bin/sudo</string>
<string>-n</string>
<string>/Applications/XAMPP/xamppfiles/xampp</string>
<string>startapache</string>
</array>
<key>RunAtLoad</key>
<true/>
<key>ProcessType</key>
<string>Interactive</string>
<key>StandardOutPath</key>
<string>/tmp/xampp-startup.log</string>
<key>StandardErrorPath</key>
<string>/tmp/xampp-startup-error.log</string>
</dict>
</plist>
Save with Control-O, followed by Return, then leave the editor with Control-X.
Validate the file:
plutil -lint "$HOME/Library/LaunchAgents/org.xampp.server.plist"The result should end with:
OK4. Activate the LaunchAgent
Enter:
launchctl bootstrap gui/$(id -u) \
"$HOME/Library/LaunchAgents/org.xampp.server.plist"
Check that Apache is responding:
curl -I http://localhostYou may also inspect the LaunchAgent with:
launchctl print gui/$(id -u)/org.xampp.serverIf it shows state = not running together with last exit code = 0, this is normal. The startup command has finished, while Apache continues to run separately.
Apache will subsequently start automatically after you log in to your Mac. Verify that Apache is running by opening:
Be patient, as it may take two to three minutes to take effect…
Removing an older XAMPP startup service
If you previously installed the system-level XAMPP startup script, remove it before using the new method. First determine whether it is loaded:
sudo launchctl print system/org.xampp.serverThe displayed path identifies the old configuration file. A previously supplied script may have created:
/Library/LaunchDaemons/xampp.startapache.plistUnload the service:
sudo launchctl bootout system/org.xampp.serverThen move its configuration outside the active directory:
sudo mkdir -p /Library/LaunchDaemons-disabled
sudo mv /Library/LaunchDaemons/xampp.startapache.plist \
/Library/LaunchDaemons-disabled/
Afterwards, the following command should report that the system service cannot be found:
sudo launchctl print system/org.xampp.serverOnly the user service should remain:
launchctl print gui/$(id -u)/org.xampp.serverYou can also remove manager-osx.app from System Settings → General → Login Items. The new LaunchAgent replaces it.