With real-time Csound, you hear the music of a grammar or data project played by Csound instruments as soon as you click PRODUCE ITEM(S) or PLAY, just as with a MIDI synthesiser. There is no longer any need to wait for Csound to write a sound file and then listen to it.
This brings together the advantages of MIDI and Csound:
as with MIDI, the music starts at once, improvisation goes on as long as you wish, and it can be stopped, paused and continued;
as with Csound, pitches are exact: microtonal scales are played as they are tuned, without the tricks MIDI needs;
volume, panoramic, pitchbend and the other continuous parameters change smoothly during each note, and each instrument can have parameters of its own;
the instruments are those of a Csound orchestra: sampled piano and flute, plucked strings, string quartet, or instruments you design.
👉 More pages about Csound in the Bol Processor: follow this link. Programmers will find how it works on this page.
Csound 7 or later must be installed on the computer: download it from csound.com. The pages of grammar and data projects show whether a suitable version is found, and suggest an update when a new one is out. Nothing else is needed: no MIDI device, and no other program.
Playing
On the page of the grammar or data project, select the output format Real-time Csound and click SAVE.
Click PRODUCE ITEM(S) (grammar) or PLAY (data). The first time, Csound is started with the orchestra of the project, which takes a second or two. Then the music plays.
Csound keeps running in the background after the performance, so the next ones start at once. It quits by itself after 15 minutes without music, or when you click QUIT CSOUND. If you play a project with another orchestra, Csound is restarted with that orchestra, and the page says so.
During a performance, the page shows the time of the music. The buttons work as in real-time MIDI:
STOP ends the performance, letting the notes fade out naturally;
PAUSE silences the music, and CONTINUE resumes it where it stopped. Notes that were sounding are not resumed in the middle;
PANIC! silences everything at once.
In improvisation mode, a grammar produces item after item without limit, each one computed while the previous one is still playing, until you click STOP.
Instruments
The instruments are described in a Csound resource file (-cs), which names its orchestra. The project page shows this orchestra, and the Change instruments button chooses another resource file.
A project naming no resource file is played by the default instruments (-cs.0-default, orchestra 0-default.orc), with a light reverberation:
Instrument
Sound
_ins(1)
piano (recordings of the Salamander Grand Piano). Notes without _ins() are played by it.
_ins(2)
plucked string with chorus
_ins(3)
synthetic brass
_ins(4)
bowed string, with a parameter splash
_ins(5)
plucked string with echo
_ins(6)
flute (recordings of the University of Iowa), its vibrato set by _mod()
_ins(10)
sine wave
For example, C4 D4 E4 _ins(6) G4 A4 plays three notes on the piano and two on the flute.
Other resource files supplied with the Bol Processor give other sounds, for instance -cs.Vina (a plucked string sliding between frets, used by -gr.vina3) or the string quartet of -cs.Beethoven-fugue-b-flat-major. You can copy them, change them, or create your own. Your files are kept in the folder csound_resources_private, which updates of the Bol Processor never touch.
Gaps or crackles in the sound
Csound computes the sound in small blocks, kept in buffers before they reach the loudspeakers. If the computer is busy for a moment, a buffer may run out and the sound breaks up. This mostly happens in the first seconds of a performance, after a long time without Csound.
The Settings button below the output format changes the size of the buffers for this computer. Larger buffers prevent gaps, but delay the sound a little after you click PLAY: 2048 frames, the default value of the hardware buffer, delay it by 46 milliseconds, which is not noticeable when listening. The hardware buffer must be at least twice the software buffer. DEFAULT VALUES brings back the usual setting. The new buffers are used from the next performance.
Playing with other musicians and devices
Although Csound plays the notes, the MIDI ports of the project can still be used. Select them on the project page and save them. They are then used for interactions:
the music can wait for a musician: _script(wait for C3 channel 1) holds the performance until this key is played on a MIDI keyboard, then the music goes on from there;
_script(Hold for 1500 milliseconds) adds a silence of the given duration;
MIDI Start, Continue and Stop messages can be sent to other devices, and received from them if Respond to Stop/Continue is checked in the settings;
notes of duration 0, written <<C0>>, are sent to the MIDI output at the moment they are heard. They are silent, but another device, or another Bol Processor, can synchronise with them. The data projects -da.trySend and -da.tryReceive show how.
Keeping a recording
Real-time Csound plays the music without keeping it. To obtain a sound file of the same music, choose the output format Csound score: the Bol Processor writes the score, and Csound turns it into a sound file that can be played or downloaded. With the same random seed in the settings, the production is the same as the one you heard.
Good to know
Only one orchestra can play at a time. Playing two projects with different orchestras at the same time interrupts one of them.
If an item takes longer to compute than the end of the previous one, the music waits for it: a short silence is heard, then the rhythm continues.
If the instruments of the resource file do not match its orchestra, some notes may be missing. The page shows Csound's messages at the end of the performance.
On Linux, Csound may take over the audio output, so that other programs cannot play sound while it runs. Click QUIT CSOUND to release it.
If nothing is heard
Check that the project page finds Csound 7 or later. Otherwise, the format Real-time Csound is not offered.
Read the messages displayed when the performance starts: they tell whether Csound could open the audio output of the computer.
Check the volume and the audio output selected on the computer: Csound plays on the default output.
Click QUIT CSOUND and play again: Csound is restarted.
This page shows how to play Bol Processor productions with Ableton Live, so that its instruments, effects and plugins play the music in real time and it can be recorded as clips. Two connections are possible:
real-time MIDI, which works with every edition of Live and needs no extra software. This is the simplest way, and it is enough for playing notes;
real-time OSC (Open Sound Control), received by a Max for Live device supplied with the Bol Processor. Max for Live is included in Live Suite, and is an add-on of Live Standard. This connection is meant for users who want to extend the device in Max, for example to control the parameters of Live devices from the values of Bol Processor instruments.
Both connections can run on the same computer as Live. They have been described for Live 12 on MacOS. Live does not run on Linux.
👉 More about the real-time MIDI output of the Bol Processor: follow this link.
The Bol Processor sends MIDI messages to a virtual MIDI bus, and Live receives them on a MIDI track as if they came from a keyboard.
Create a virtual MIDI bus
On MacOS, the IAC Driver provides virtual buses:
Open Audio MIDI Setup (in Applications/Utilities), then Window > Show MIDI Studio.
Double-click IAC Driver and check Device is online.
Use a bus that no other program listens to. If Bus 1 is already used, for instance by Pianoteq, add a bus with the + button: Bus 2. Otherwise both programs will play the same notes.
On Windows, a virtual MIDI cable such as loopMIDI plays the same role.
Settings in the Bol Processor
On the page of the grammar or data project, select the output format Real-time MIDI and choose the bus (e.g. IAC Driver Bus 2) as the MIDI output. Then save the MIDI ports.
Settings in Live
Open Settings > Link, Tempo & MIDI. In the list of MIDI Ports, set Track to On for the input of this bus (e.g. In: IAC Driver (Bus 2)). Leave Remote off, otherwise Live may take some notes and controllers as commands.
Create a MIDI track. In its MIDI From menu, select the bus, and set Monitor to In.
Load an instrument on the track: Grand Piano, Wavetable, Sampler, a plugin…
Click PRODUCE ITEM(S) or PLAY in the Bol Processor: the track plays the notes.
Several instruments
The Bol Processor assigns MIDI channels to notes with _chan(). In Live, create one MIDI track for each instrument, all receiving from the same bus, and set the channel menu below MIDI From to a different channel on each track (Ch. 1, Ch. 2…). Each part of the music is then played by its own instrument. For example, _chan(1) C4 D4 E4 goes to the first track and _chan(2) C3 G3 to the second.
Recording clips
Arm the tracks (record button of each track) and start recording in Live, either in the Session view (a clip slot) or the Arrangement view, then play the item in the Bol Processor. The production becomes a MIDI clip that can be edited, quantised or played again by Live without the Bol Processor.
Live records at its own tempo. The dates of the notes are kept, but they fall on Live's bars only if both programs use the same tempo. To export a production without playing it, the output format MIDI file gives a file that can be dropped into Live.
Microtonal scales
In real-time MIDI, the Bol Processor plays microtonal scales with pitchbend messages, using a separate MIDI channel for each note (see this page). This needs an instrument accepting pitchbend on several channels, which Live's tracks do not provide in their usual setting.
Live 12 has its own solution: tuning systems, which it reads from SCALA files (.scl). On the page of a tonality resource (-to file), the Export to SCALA button saves each scale as a SCALA file. Drop this file into Live's window to make it the tuning system of the Live set, and the instruments play the notes in this scale. Bol Processor notes then only need to give the keys, as they do without a scale.
Interaction
The Bol Processor can also wait for MIDI events, for instance _script(wait for C3 channel 1) (see interactions). Live can send them: on a MIDI track, choose another bus (e.g. Bus 3) in MIDI To, and select this bus as the MIDI input of the Bol Processor project. Don't use the bus that brings notes from the Bol Processor, as the notes would loop between the two programs.
Real-time OSC with Max for Live
With the output format Real-time OSC, the Bol Processor sends each note as an OSC message over the network (UDP), at the time it should be played. A message /bp/note gives the number of the note, its instrument number and name, its MIDI key, its frequency in Hertz, its duration, velocity and channel, followed by named values of the instrument such as vol, pan or mod. A message /bp/off ends the note. The full description is in the file ReadMe.txt of the folder osc_resources.
Live does not receive OSC by itself. The device BP_OSC_to_Live.amxd, in the same folder, is a Max for Live MIDI effect that receives these messages and plays them as MIDI notes on the instrument of its track.
Installing the device
Find the folder osc_resources of the Bol Processor installation (inside the bolprocessor folder). The device can also be downloaded from a project page: select the output format Real-time OSC and click the Ableton Live link below it.
Create a MIDI track in Live and load an instrument on it.
Drag BP_OSC_to_Live.amxd from the Finder to this track, before the instrument. It can also be added to Places in Live's browser for later use.
In the Bol Processor, select the output format Real-time OSC. Below it, keep the host 127.0.0.1 (this computer) and the port 7400, or type the address of the computer running Live and click SAVE.
Play the item: the track plays the notes.
Controls of the device
Receive OSC: the device listens to the UDP port. With several devices in a Live set, keep it on in one device only. That device shares the messages with all the others, which would otherwise receive them twice.
Port: the UDP port, 7400 by default. It must be the port set in the Bol Processor.
Channel: the device plays only the notes of this MIDI channel (_chan()). 0 plays all channels.
Instrument: the device plays only the notes of this instrument (_ins()). 0 plays all instruments.
For several instruments, put a device on each track and set its Channel or Instrument. Selecting by instrument means a grammar written for Csound or SuperCollider, using _ins(), can be played by Live without changing its MIDI channels.
What the device plays
Each note is played with its MIDI key and velocity, and ends with the message /bp/off.
The frequency is not used: for microtonal scales, load their SCALA export in Live's tuning systems, as with MIDI.
At the beginning of each note, the values vol, pan and mod of the instrument are sent to the instrument of the track as controllers 7 (volume), 10 (panoramic) and 1 (modulation wheel, mod divided by 128). Whether they change the sound depends on the instrument.
Notes of duration 0 (out-time notes such as <<C4>>) are played as a note-on followed at once by a note-off.
Clicking STOP, PAUSE or PANIC in the Bol Processor sends /bp/stop, which turns off all keys.
MIDI from the track's input (e.g. a keyboard) passes through the device unchanged.
Going further
The point of OSC over MIDI is that every value of a Bol Processor instrument reaches Live by name. Click the Edit button of the device to open it in Max. The objects [zl iter 2] and [route vol pan mod] give the named values of each note. Additional parameters, for example _value(splash,250), can be added to the route and sent to [live.remote~] to control any parameter of a Live device, such as the cutoff of a filter. The exact frequency of each note can also be used by a synthesiser built in Max.
If nothing is heard
With MIDI, check that the track's MIDI From is the right bus and its Monitor is In. The MIDI activity indicator at the top right of Live's window flashes when notes arrive.
With MIDI, check that the channel of the track matches the _chan() of the notes, or set it to All Channels.
With OSC, check that Receive OSC is on in one device and that its port is the one set in the Bol Processor. The Max Console (Window > Max Console in the Max editor of the device) shows an error if the port is used by another program.
With OSC, a firewall may block UDP messages when Live runs on another computer. On the same computer, use the host 127.0.0.1.
Notes played twice: two devices have Receive OSC on, or two programs listen to the same MIDI bus.
Note: This page was entirely composed by Claude Opus 5.5 on 21 November 2026.
This page shows how the Bol Processor plays its productions in real time with SuperCollider, a free program for sound synthesis available for MacOS, Windows and Linux. With the output format Real-time SuperCollider, each note becomes a message to the SuperCollider server (scsynth), which plays it with a SynthDef: a synthesiser or sampler described in SuperCollider's language.
Compared with real-time MIDI, this connection offers:
exact pitches: notes are sent with their frequency in Hertz, so microtonal scales are played as they are, without pitchbend messages or separate MIDI channels;
every parameter of the instrument: volume, panoramic, modulation, pitchbend and additional parameters such as _value(splash,250) reach the SynthDef by name, with their changes during the note;
precise timing: notes are sent in advance with their date (time-tagged bundles), and the server plays them at that date;
the same instruments as Csound, with the same numbers and parameters, so a project made for Csound can be played in real time by SuperCollider.
The Bol Processor starts the SuperCollider server by itself and loads the instruments. No knowledge of SuperCollider is needed to use the instruments supplied with the Bol Processor, only to design new ones.
MacOS: SuperCollider.app in Applications (or in a SuperCollider folder inside Applications);
Windows: a SuperCollider folder in C:\Program Files;
Linux: scsynth and sclang in /usr/local/bin or /usr/bin, as installed by the package manager.
The pages of grammar and data projects then show the SuperCollider logo with the state of the program: installed, and whether its server is running. The output format Real-time SuperCollider is offered when SuperCollider is installed, or when a SuperCollider server is already answering.
Only the server (scsynth) is needed to play. The SynthDefs supplied with the Bol Processor are already compiled. The language (sclang) is used only to compile SynthDefs that have been created or changed.
👉 Starting the server has been tested on MacOS. It should work on Windows and Linux, but has not been tested there yet.
Playing a project
On the page of the grammar or data project, select the output format Real-time SuperCollider and click SAVE.
Click PRODUCE ITEM(S) or PLAY. The first time, the Bol Processor starts the SuperCollider server, loads the SynthDefs and the recordings of the sampled instruments (in less than 2 seconds), then plays.
STOP, PAUSE and PANIC silence the notes being played. The server started by the Bol Processor keeps running between performances, so the next ones start at once. It quits by itself after 15 minutes without a performance, or when you click QUIT SUPERCOLLIDER below the output format.
With the SuperCollider program open
If you have booted the server in the SuperCollider program (IDE), on its usual port 57110, the Bol Processor plays on this server instead of starting its own. Its messages, such as errors in SynthDefs, then appear in the Post window of SuperCollider, and the Bol Processor never quits this server.
The recordings of the sampled instruments need more buffers than a server has by default. If the Bol Processor says that the server has too few buffers, run this line in SuperCollider:
s.options.numBuffers = 16384; s.reboot;
or quit the server of SuperCollider, so that the Bol Processor starts its own.
Instruments
The instruments are listed in a SuperCollider resource file, whose name starts with -sc. It has the same form as a Csound resource file (-cs): the name, number and parameters of each instrument. The instrument named NAME is played by the SynthDef named NAME. The -sc file also names the file (.scd) in which these SynthDefs are written.
A project chooses its -sc file in a line on top of the grammar or data, for example -sc.Vina. On the project page, the Change instruments button adds or replaces this line. The Show/hide details button lists the instruments, their SynthDefs and the recordings they use, and points out any instrument whose SynthDef is missing.
Default instruments
A project naming no -sc file is played with -sc.0-default, whose SynthDefs (in 0-default.scd) imitate the instruments of the default Csound orchestra 0-default.orc, with the same numbers:
Instrument
Name
Sound
_ins(1)
piano
recordings of the Salamander Grand Piano, with velocity layers and dampers. Notes without _ins() are played by it.
_ins(2)
plucked_chorus
plucked string with chorus
_ins(3)
synth_brass
synthetic brass
_ins(4)
bowed_string
cello-like sound, its vibrato set by the parameter splash
_ins(5)
plucked_string
plucked string with echo
_ins(6)
flute
recordings of a flute (University of Iowa), its vibrato set by _mod()
_ins(10)
sine
sine wave
An instrument can be called by its number or its name: _ins(6) and _ins(flute) are the same. A reverb (bp_fx) is added to all of them.
Other examples
-sc.Beethoven-fugue-b-flat-major: a string quartet (violins, viola, cello) playing recordings, used by the data project -da.Beethoven-fugue-b-flat-major, imported from MusicXML.
-sc.Vina: a plucked string whose pitch slides while it vibrates, as on a vina. It is used by the grammar -gr.vina3, in which _pitchcont and _cont(slide) make the pitch follow continuous curves.
Projects made for Csound
A -cs file is only used by Csound. To play a project naming a -cs file in SuperCollider, it needs a -sc file with the same instruments, and a SynthDef for each instrument. A project using only the default Csound instruments (0-default.orc) sounds similar with the default SuperCollider instruments, as they have the same numbers and parameters.
Creating instruments
The files supplied with the Bol Processor are in the folder supercollider_resources. They are replaced by each update, so your own files go to supercollider_resources_private, which updates never touch. The page of the SuperCollider resource folder (link next to the SuperCollider logo) lists both, marking the supplied files (fixed). A fixed file can be copied to your folder and changed there.
To create an instrument:
Write its SynthDef in a .scd file of supercollider_resources_private. Read 0-default.scd first: its comments describe all the arguments sent by the Bol Processor.
Create a -sc file naming this .scd file, and give it an instrument with the name of the SynthDef, its number and its parameters, as in a Csound resource file.
Name this -sc file in the project and play it. The Bol Processor compiles the .scd files that have changed (this needs sclang) and loads them into the server. Errors in the SynthDefs are displayed on the page of the performance.
SynthDef names are shared by all projects. Those of supercollider_resources are loaded first, then yours, so a SynthDef of yours with the name of a supplied one replaces it.
What a SynthDef receives
Each note starts a new synth with named arguments. A SynthDef uses the ones it declares and ignores the others:
freq: the pitch in Hertz, including the tuning of the scale (_scale());
sustain: the duration in seconds;
vol, vol2: volume at the beginning and the end of the note (_volume(), 0 to 127);
vel: attack velocity (_vel()), if the instrument has this field;
pan/pan2, mod/mod2, press/press2, bend/bend2 (in cents): panoramic, modulation, pressure and pitchbend at the beginning and end;
NAME, NAME2: the additional parameters of the instrument, e.g. splash and splash2;
volenv, bendenv, pressenv, modenv, panenv, NAMEenv: the same values as envelopes over the duration of the note, when they follow continuous curves such as _pitchcont. A SynthDef reads them with EnvGen.kr(\volenv.kr(...), timeScale: sustain) (see Vina.scd);
p4, p5…: every field of the Csound score line of the note.
A SynthDef must end the note after sustain (doneAction: 2) and release it when its argument gate is set to 0: this is how STOP, PAUSE and PANIC silence the notes.
Sampled instruments
A .scd file declares the recordings its SynthDefs play with lines such as:
// BP_SAMPLES 1 Salamander_piano.json
The JSON file is a map of the recordings: the file of each sample, its measured pitch, its loop points, and the sample to play for each key and velocity layer. The Bol Processor loads these recordings into the server before playing, once until the server is restarted. In a SynthDef, ~bpSample.(set, channels, key, layer, freq) plays the recording of a key and layer, tuned to freq and looped if needed. Sets 1 to 9 are used by the Bol Processor: number yours from 10 to 99. The recordings are shared with Csound: those of the folder csound_resources (e.g. Salamander_piano/) need not be copied.
Interaction
The Bol Processor can wait for MIDI events during the performance, for instance _script(wait for C3 channel 1) (see interactions). With SuperCollider, the MIDI ports of the project page are used for this interaction only: select a MIDI input and save the MIDI ports. Notes of duration 0, such as <<C0>>, are also sent to the MIDI output at their date, as synchronisation signals for other programs.
If nothing is heard
Check that SuperCollider is installed at the place given above: the project page says SuperCollider was not found on this computer otherwise.
Click Show/hide details on the project page: the notes of an instrument whose SynthDef is not defined are not heard.
Read the messages on the page of the performance, which report errors of the server and errors in the SynthDefs. With a server booted in SuperCollider, look at its Post window.
Click QUIT SUPERCOLLIDER and play again: the server is restarted and everything is loaded again.
Check the audio output of the computer: the server started by the Bol Processor plays on the default output device.
👉 Other programs receiving Open Sound Control (Max, Pd, SuperCollider's language…) can be used with the output format Real-time OSC: follow this link.
Note: This page was entirely composed by Claude Opus 5.5 on 21 November 2026.
Open Sound Control (OSC) is a protocol for sending messages between music programs, on the same computer or over a network. With the output format Real-time OSC (Max, Pd…), the Bol Processor sends each note as an OSC message, at the time it should be played, to any program that listens to them. This program decides what to do with the notes: play them with its own synthesisers, control lights or video, display them…
Compared with real-time MIDI, OSC messages carry more information:
the frequency of each note in Hertz, including the tuning of microtonal scales, in addition to its MIDI key;
the name of the instrument and the values of its parameters by name, such as vol, pan, mod or an additional parameter like splash;
the duration of the note, known when it starts;
a number identifying each note, so that its end can be matched with its beginning even when the same key is played twice.
To play in SuperCollider, the output format Real-time SuperCollider, which needs no programming, is described on this page.
On the page of the grammar or data project, select the output format Real-time OSC (Max, Pd…) and click SAVE.
Click Show/hide settings below the format. Messages go to the host 127.0.0.1 (this computer) on UDP port 7400 by default. To reach a program on another computer, or listening to another port, type its address and port, then click SAVE. This destination is saved for this computer and used by all projects.
Start the receiving program, listening to this port, then click PRODUCE ITEM(S) or PLAY.
The Bol Processor starts no other program and gets no answer: if nothing listens to the port, the messages are lost without any error message.
Instrument names
Names and parameters of the instruments come from the resource file of the project: its SuperCollider resource file (-sc) if it names one, otherwise its Csound resource file (-cs). The Change instruments button of the project page chooses this file, and Show/hide details lists the instruments and their parameters. Without a resource file, instrument n (_ins(n)) is named bpn, and notes have no additional parameters.
The messages
Message
Meaning
/bp/start
A performance begins.
/bp/note id instrument name key freq duration velocity channel [name value]...
A note begins.
/bp/off id instrument name key channel
The note id ends (not sent for notes of duration 0).
/bp/stop
STOP, PAUSE or PANIC was clicked: silence all notes.
/bp/end
The performance is over.
Arguments of /bp/note:
id (integer): number of the note, repeated in its /bp/off;
instrument (integer) and name (string): number and name of the instrument (_ins());
key (integer): MIDI key, 0 to 127;
freq (float): pitch in Hertz, including the tuning of the scale (_scale());
duration (float): in seconds; 0 for out-time notes such as <<C4>>, which can be used as signals;
velocity (float): MIDI velocity, 0 to 127;
channel (integer): MIDI channel, 1 to 16 (_chan());
then pairs of a name and a value, depending on the instrument: vol/vol2 (volume at the beginning and end of the note, 0 to 127), vel (attack velocity), pan/pan2 (panoramic, 64 = centre), mod/mod2 (modulation, 0 to 16383), press/press2 (pressure), bend/bend2 (pitchbend in cents), and the additional parameters of the instrument, e.g. splash/splash2 for _value(splash,250).
For example, the data C4 _ins(6) D4 with the default Csound instruments (-cs.0-default) sends:
Each message is sent at the date of its event, not in advance, so the receiving program simply acts on messages as they arrive. The full description is in the file ReadMe.txt of the folder osc_resources of the Bol Processor installation, also linked below the output format.
Programs receiving OSC
Many programs understand OSC. The folder osc_resources contains ready-made receivers for some of them. The others need a few lines of code or a patch, which the examples below can serve as a starting point for.
Max
Max (Cycling '74) receives the messages with [udpreceive 7400] followed by [route /bp/note /bp/off /bp/stop]. The patch BP_OSC_receiver.maxpat prints the messages and plays each note with a sine wave, one note at a time. For polyphony, send /bp/note to the voices of a [poly~], using id to find the voice of each /bp/off.
Ableton Live (Max for Live)
The device BP_OSC_to_Live.amxd plays the notes on the instrument of a Live track, filtered by channel or instrument, and sends vol, pan and mod as MIDI controllers. Its installation and use are described on the page about Ableton Live.
Pure Data
Pd (Pure Data), free and open source, receives them with [netreceive -u -b 7400] → [oscparse] → [list trim] → [route bp] → [route note off stop]. The patch BP_OSC_receiver.pd does the same as the Max patch. For polyphony, use [clone].
SuperCollider's language
Besides the output format Real-time SuperCollider, which plays SynthDefs directly on the server, the language of SuperCollider (sclang) can receive the OSC messages and do anything with them, for instance trigger patterns or change the parameters of running synths. A minimal example, to run in the SuperCollider IDE after booting the server:
Sonic Pi listens to OSC on port 4560 once Allow incoming OSC is checked in its preferences. Set the port 4560 in the Bol Processor, then run:
live_loop :bp do
  use_real_time
  id, ins, name, key, freq, dur, vel, chan = sync "/osc*/bp/note"
  synth :piano, note: hz_to_midi(freq), sustain: dur, amp: vel / 127.0
end
Other programs
Csound, with the opcodes OSCinit and OSClisten, for a Csound instrument controlled by another program at the same time. For Csound alone, the output format Real-time Csound is simpler.
The Bol Processor can wait for MIDI events during the performance, for instance _script(wait for C3 channel 1) (see interactions). In real-time OSC, the MIDI ports of the project page are used for this interaction only: select a MIDI input and save the MIDI ports. The receiving program can then send MIDI to the Bol Processor, through a virtual MIDI bus, to start or synchronise the music.
If nothing is received
Check that the port set in the Bol Processor (Show/hide settings) is the one the program listens to. Only one program can listen to a port.
Start the receiving program first: messages sent while nothing listens are lost.
On the same computer, use the host 127.0.0.1. Towards another computer, a firewall may block UDP messages.
Run the Python script above to see whether the messages arrive and what they contain.
👉 The receivers supplied in osc_resources and the examples on this page have not been tested with every program listed.
Note: This page was entirely composed by Claude Opus 5.5 on 21 November 2026.
The Bol Processor can produce detailed lists of sound events as text files. This will facilitate connections with a great diversity of sound devices in replacement of the MIDI and Csound outputs.
When 'Event list' is selected on a Data or Grammar page, sound events are saved to a CSV file. The full description of the sound object prototypes used in production is saved to a JSON file. All used tonal scales are exported in Scala (SCL) and keyboard mapping (KBM) formats. Any Csound instrument used for the production of Csound score is exported as a JSON file.
The event list file
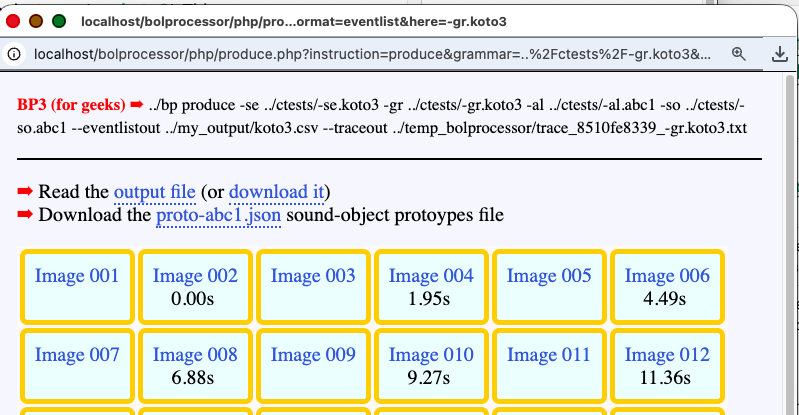
Click PRODUCE ITEM(s) on a grammar page, here for instance '-gr.koto3'. This yields:
No sound output (MIDI or Csound) has been produced. Instead, a file called 'koto3.csv' is available in the 'my_output' folder (by default). You can visualise this file by clicking the 'output file' link, or download it (get it here) for later use.
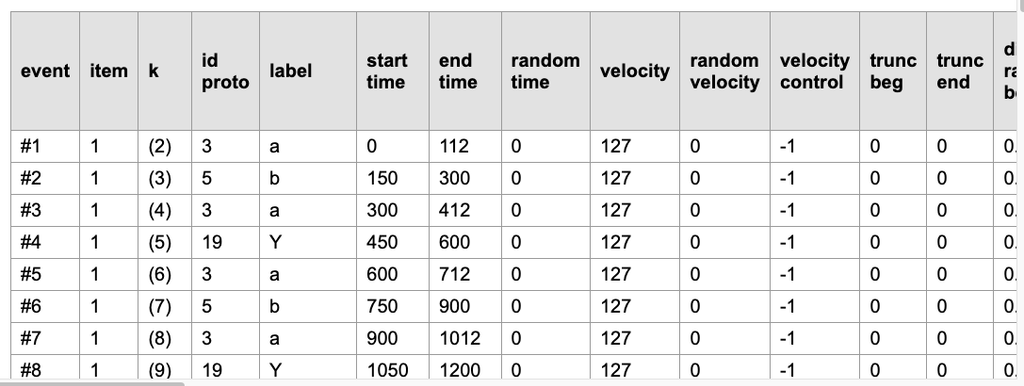
The event list contains many columns, a number which is likely to increase with new developments. It looks like this:
Beginning of the koto3.csv event list file
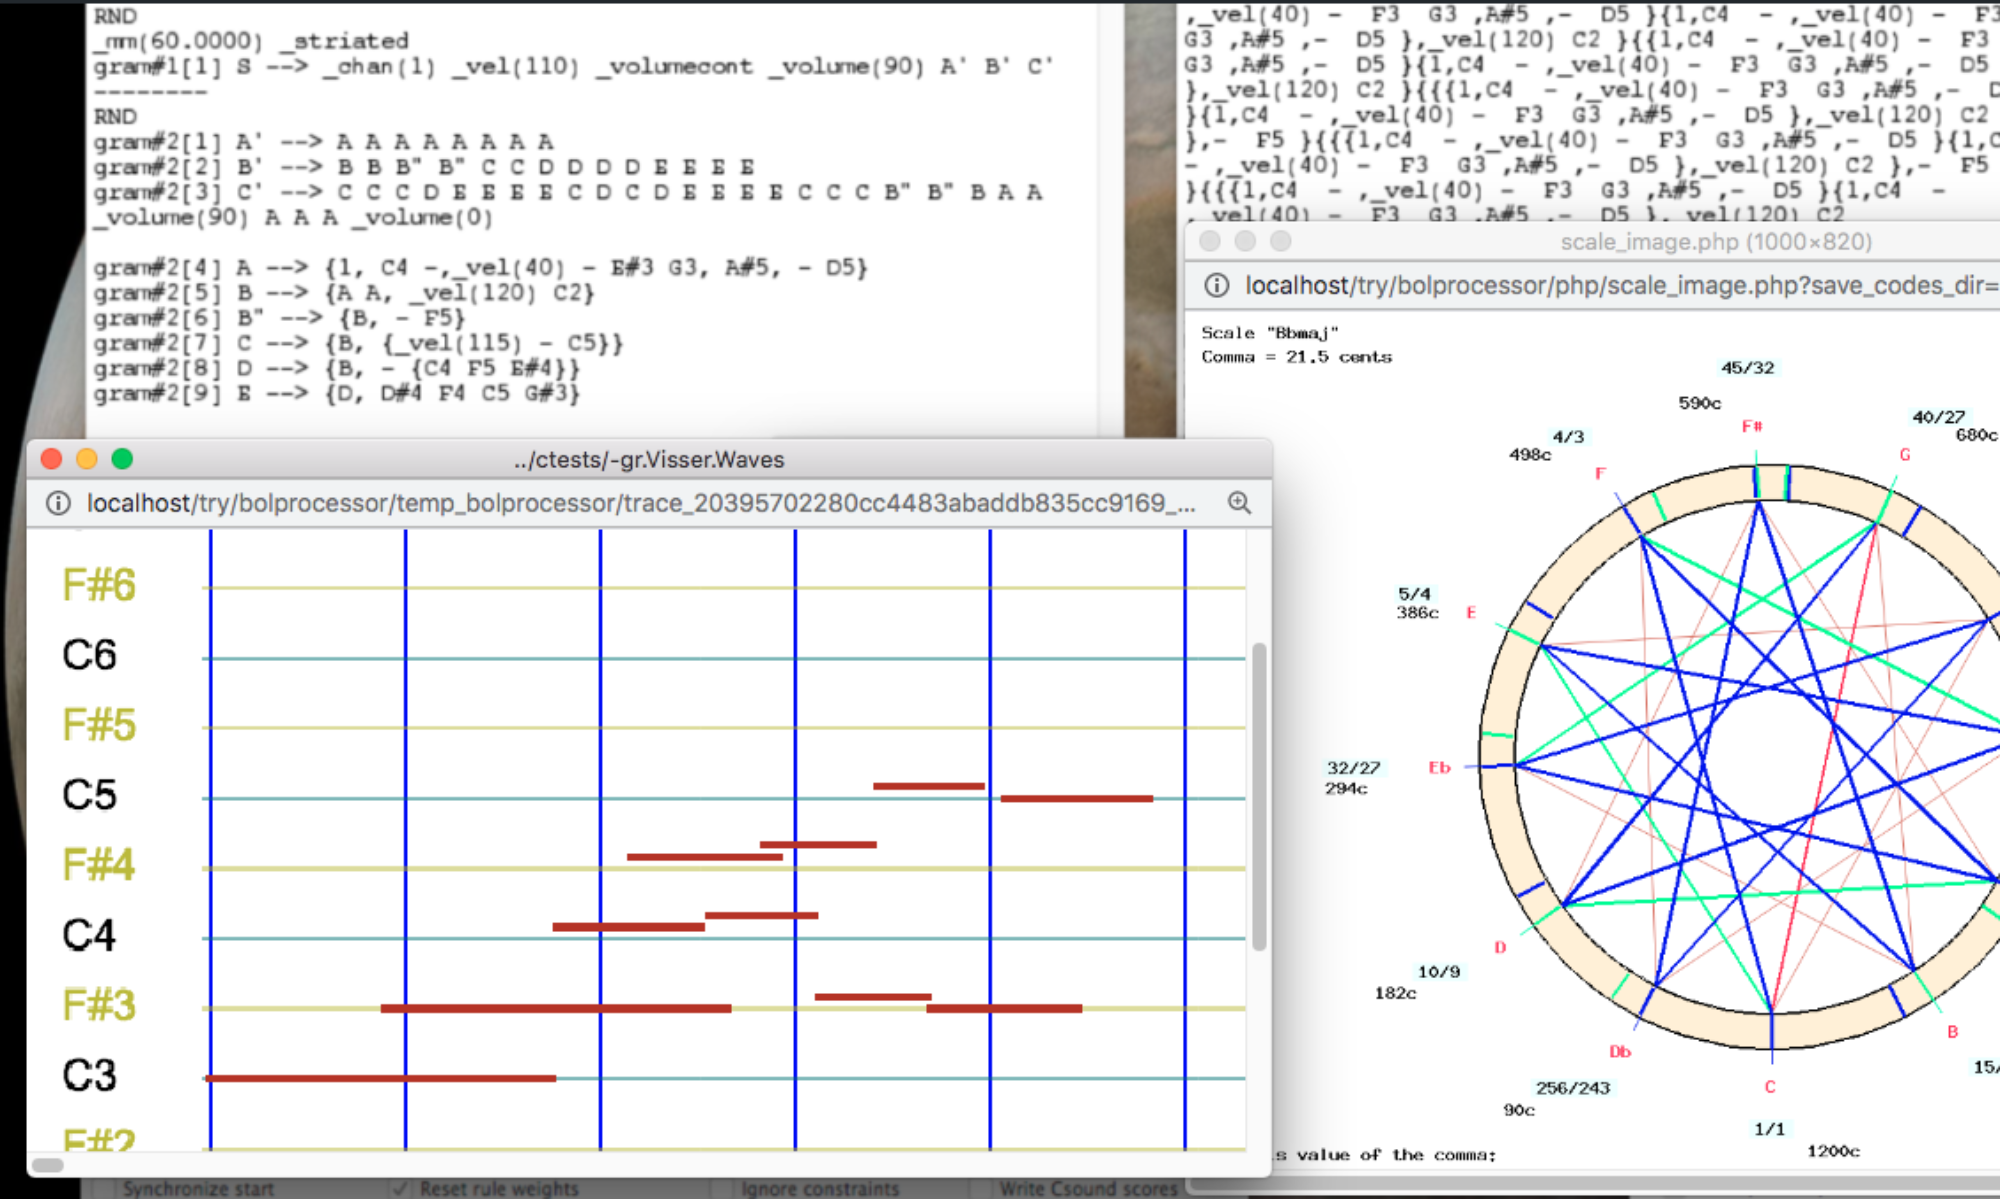
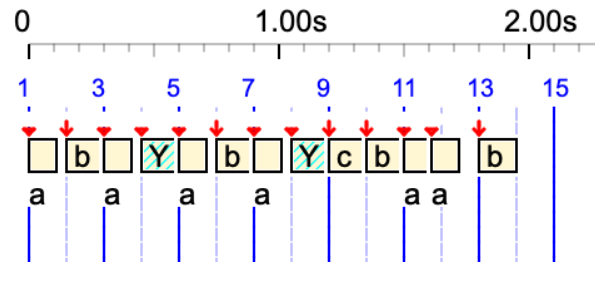
Each line of the event list is assigned to a sound-event with start and end times in milliseconds, as shown on the graphic display:
The labels 'a' and 'b' designate sound-objects, with respective prototype identifiers 3 and 5, as defined in the related '-so.abc1' file. The item labelled 'Y' is a silent sound-object created to represent the residual variable 'Y'.
The examples on this page may not contain all the information provided in the latest version of the event lists because the format is frequently updated.
The timings of sound-objects and simple notes in the event list are the accurate ones computed by the polymetric expansion and time-setting algorithms. Serial tools (e.g. _retro) modifying the order of events have been applied. However, serial tools modifying pitches (e.g. _transpose) have not been applied; therefore, their parameters are given in the event list. The second-to-last column contains the name of the tonal scale, if any (see below).
The sound-object file
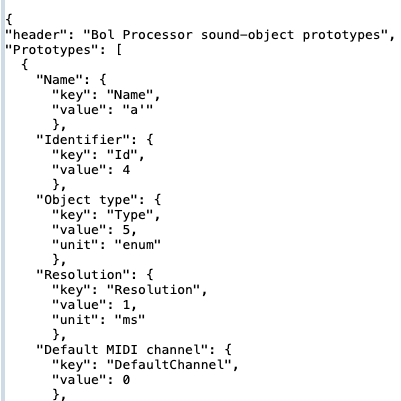
The '-so.abc1' file, which is used to define all the sound objects used in the '-gr.koto3' project, is in an unfriendly format produced by the PHP interface. Therefore, to facilitate further use, it is exported to a more readable JSON format ('proto-abc1.json'):
Top of the 'proto-abc1.json' file
Please note that each sound-object is identified by both a label and a numeric identifier. These parameters are displayed in columns 4 and 5 of the event list. Numbers make it easier to match objects in the event list with their descriptions in 'proto-abc1.json'.
👉 Since numeric identifiers are created when the alphabet is compiled, the values appearing in 'proto-abc1.json' are specific to the '-gr.koto3' project.
The tonal (scale) files
SCL and KBM files are produced wherever tonal scales are used in the production (read MIDI microtonality).
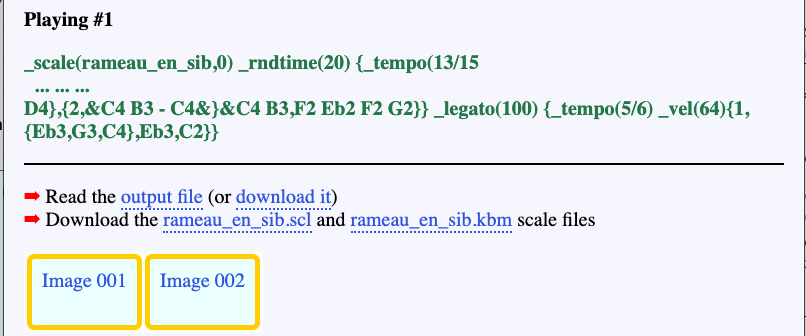
Let's try the '-da.Ombres_errantes' project. Check the 'Event list' output format and click 'PLAY'. Links for downloading the rameau_en_sib.scl and rameau_en_sib.kbm files are displayed:
If several scales have been used in the production, several download lines will be displayed.
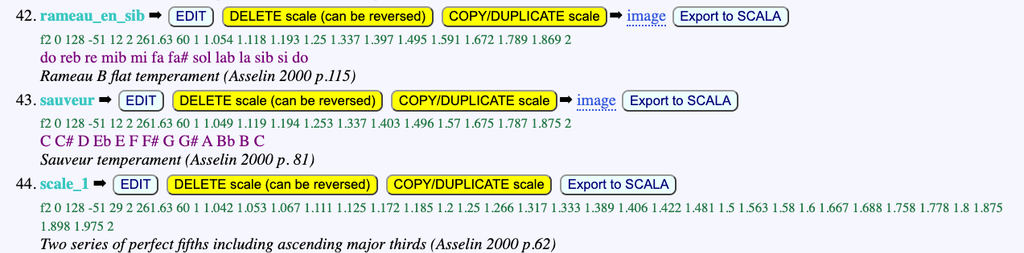
👉 These SCL and KBM file can also be exported via the tonality editor in the interface. The 'rameau_en_sib' scale is defined in the '-to.tryTunings' tonality framework which is displayed as follows:
(Click the EDIT button to reach the export to KBM)
The Csound instrument files
If a Csound resource file is declared at the top of the project, the full descriptions of instruments used in the production of items are exported to a JSON file.
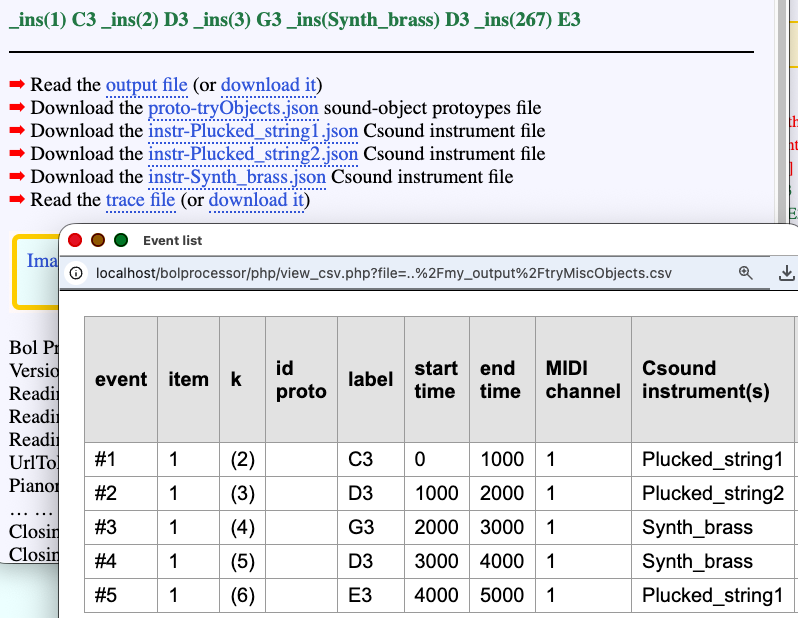
For example, in '-da.tryMiscObjects', the '-cs.tryTunings' Csound resource is declared. Let us play the following with the 'Event list' output option.
The _ins() instructions are calling several instruments described (or not) in '-cs.tryTunings':
Instrument 1 is 'Plucked_string1'
Instrument 2 is 'Plucked_string2'
Instrument 3 is 'Synth_brass'
Instrument 267 does not exist
These instruments are mentioned in the 9th column of the event list (see below). Their JSON files are exported and links are supplied to download them.
This result can be verified by clicking on the EXPAND button (near the PLAY button), as it explicitly reveals which instruments will be used:
Using sound-objects that contain Csound scores opens up more possibilities. These Csound scores contain instrument numbers in their first column.
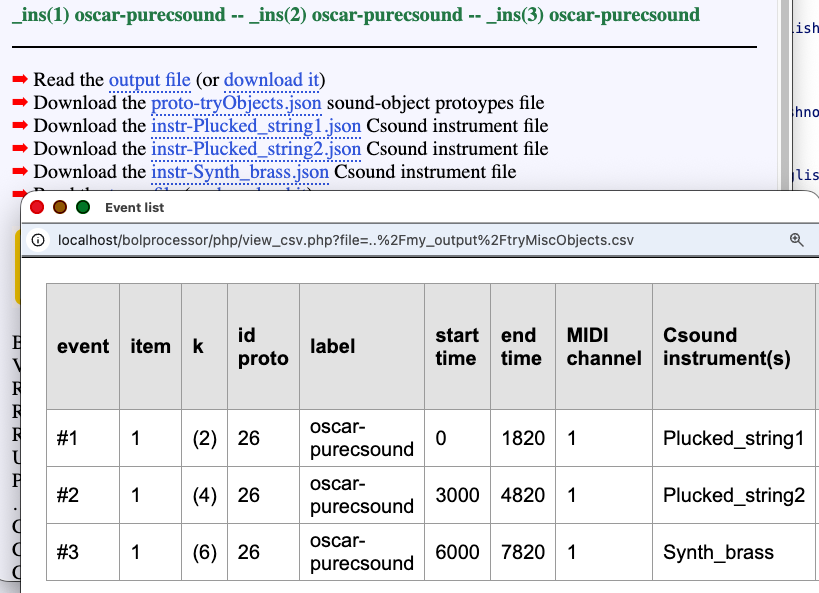
An option named 'GLOBAL_CS' tells the machine to use the instruments set by the context. This is the case of instrument 'oscar-purecsound'. Consequently, playing:
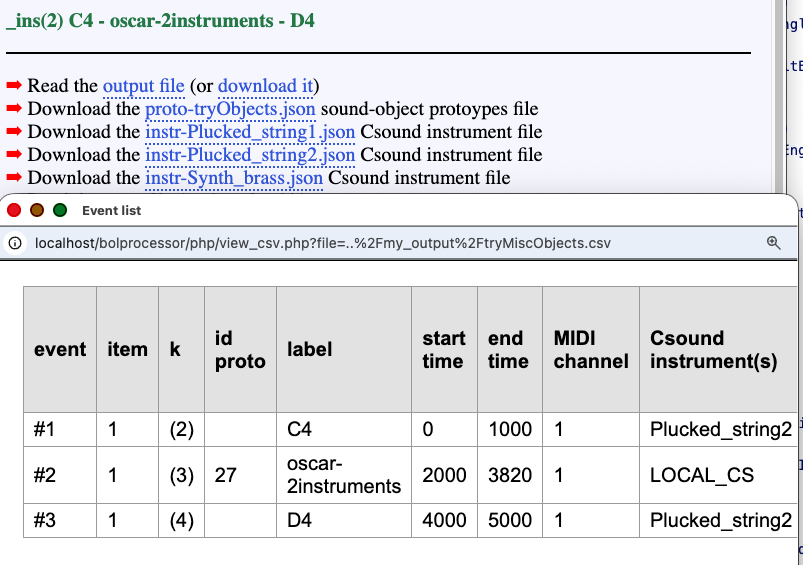
Another option named 'LOCAL_CS' tells that the Csound instruments listed in the sound-object's score should be used. This is the case of 'oscar-2instruments' which uses two instruments. So, playing:
_ins(2) C4 - oscar-2instruments - D4
will produce the following event list:
and a Csound score making it clear that notes C4 and D4 are performed with instrument #2, as instructed by ins(2):
In this example, the 'LOCAL_CS' mention in the 9th column indicates that the sound-object will use its own Csound instruments. These instruments are found in its score. In addition, the three files required for the performance have been exported: 'instr-Plucked_string1.json', 'instr-Plucked_string2.json' and 'instr-Synth_brass.json'. The index of each instrument is mentioned as 'CsInstrumentIndex' in each file.
An example of JSON instrument file is 'instr-Vina.json' produced by '-gr.vina3'.
Using command lines
Event lists and related files can be produced by calling the console via (Unix) command lines. For example,
This will produce 'Ombres_errantes.csv', 'rameau_en_sib.scl' and 'rameau_en_sib.kbm' in the 'my_output' folder. (If the --traceout option is not specified, no image will be created.)
When calling this production via a command line, we need to find out the names of scale files. Since 'rameau_en_sib' is not found in the command, a scan of the data or grammar is necessary to detect _scale(rameau_en_sib, …) instruction(s). If several scales are used in the production, each of them will export a pair of SCL and KBM files that can be identified in the same manner.
Designed by Bernard Bel, version 3.5.6 (Fall 2026)
In May 2024, the Bol Processor BP3 acquired the ability to manage the input and output of MIDI events. This allows it to "communicate" in real time with external MIDI devices (keyboards, synthesizers) and even with other instances of BP3 running on the same machine.
For geeks and programmers: This feature had already been implemented in the earlier (MacOS only) version called 'BP2'. However, the implementation in a C language 'console' to work in MacOS, Linux and Windows environments was more technical. In addition, the concept of "real time" in the current MIDI setup is different from the previous one using Opcode Music System.
The following examples will work the same in MacOS, Windows and Linux. They have been tested on a recent PowerBook running MacOS (Sonoma) with 16 Gb RAM, and an HP Intel Core computer with 8 Gb RAM running Windows 10 (64-bit) and LinuxLite 7.0 (in Ubuntu). Memory size can become critical if many MIDI devices or virtual ports are connected.
Using microtonal scales is now possible in real-time MIDI. Read the Check MIDI microtonality page for details.
Let us assume that you have successfully downloaded, installed and compiled the Bol processor BP3, as described on the page Bol Processor ‘BP3’ and its PHP interface.
In Bol Processor jargon, a 'project' is either a grammar (with a '-gr' prefix) or a set of data (with a '-da' prefix). So, create or load a simple project, e.g. "-da.acceleration" which can be found in the "ctests" folder (download it here).
An output
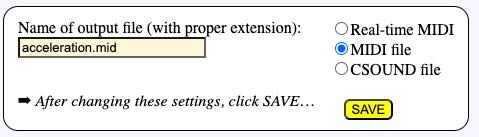
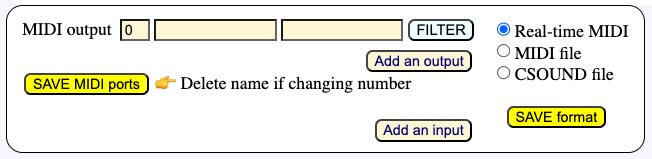
By default, a project is set up to create MIDI files, as shown on the selector (see picture). Make sure your project is working! Then select Real-time MIDI and click SAVE format.
The selector will now display a different image, as shown below:
By default, the MIDI output used for sending events is numbered '0' — and the MIDI input used for receiving events will be numbered '1'. This is a common situation. In MacOS and Windows, these numbers are taken as 'ports'. In Linux they are considered as 'clients', each 'client' having its own 'ports', so certainly numbers '0' and '1' won't work… Never mind this issue, BP3 will take care of it when scanning real or virtual devices and trying to connect. Read more below.
We cannot rely on "port numbers" alone because they change when we turn on and off MIDI devices connected to the computer. In Linux, the client number is more specific to a MIDI device. In fact, the only reliable identification is its name, which is empty by default: the next field at the right of the input/output number.
Let us check the MIDI output. Windows does this automatically. The good news is that Windows 10 (and presumably later versions) comes with a built-in MIDI device called Microsoft GS Wavetable Synth. The Bol Processor will automatically detect it and connect to it if no other device is connected to the system.
Linux also connects, by default, the output to a virtual device whose client number is '0', but it won't produce any sound in the basic installation of Ubuntu. So, to try real-time MIDI on Linux, you need to connect an external MIDI device via its USB/MIDI interface, or to install a software synthesizer. Read more below.
Clicking Add an input will create fields for you to select an input device. We'll use this later.
To connect external MIDI input/output devices to Windows, you may need to install an environment similar to IAC on MacOS. Read details below. However, most tests shown on this page can be performed on Windows without any additional installation.
The following paragraphs are for MacOS users. Windows and Linux users can happily jump to the next section.
Turn on a MIDI device (synthesizer, piano, etc.) connected to the computer. On my personal Mac, I usually use the Pianoteq synthesiser, which produces a physical model synthesis of various keyboard instruments. It communicates with BP3 via a device called the Inter-Application Communication (IAC) architecture — read this if you need details.
The IAC driver is installed by default on recent MacOS systems. (It is a part of the CoreMIDI framework provided by Apple.) It allows you to create virtual MIDI ports that enable MIDI applications to communicate internally within the same machine. Equivalent devices exist in the Linux and Windows environments, see below.
The IAC also communicates with external MIDI devices via the USB ports, BlueTooth and possibly more network protocols. We'll try it later.
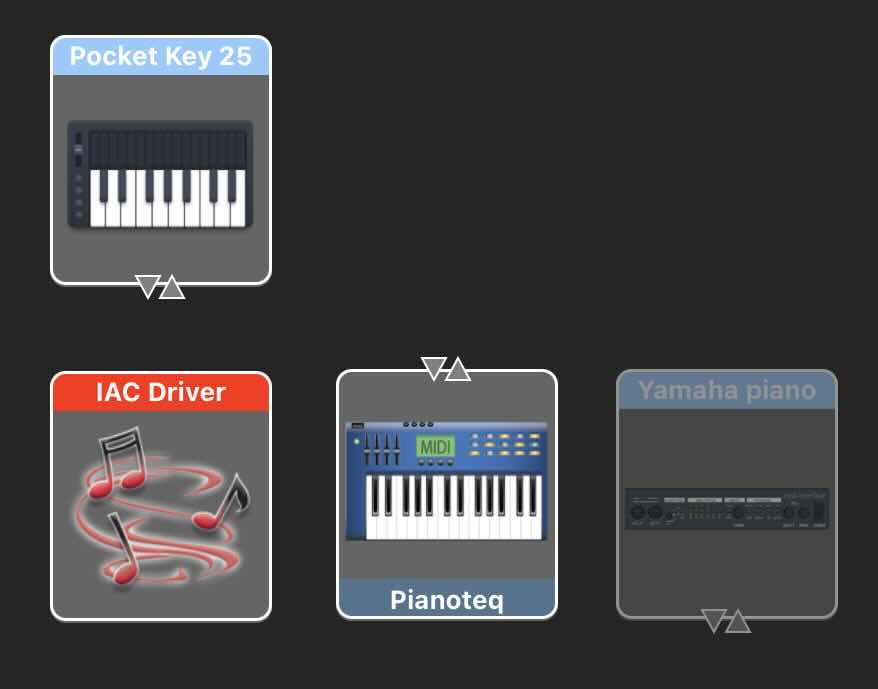
To set up the IAC, run the Audio MIDI Setup application (in the Utilities folder). Ask it to show "MIDI Studio". On my personal computer, it looks like this: the IAC driver, the Pianoteq synthesiser, a Pocket Key 15 keyboard connected to a USB port, and a Yamaha piano connected by standard MIDI cables and a USB MIDI interface. The Yamaha piano appears grey because it is switched off.
On active MIDI devices you will see triangles indicating input/output ports. These are used to connect devices directly by drawing a 'cable' to connect them. We don't need to use these 'connectors' as BP3 communicates via the IAC MIDI ports.
Check output options
(MacOS, Linux and Windows)
The easiest way to proceed now is to run any project in the Real-time MIDI mode, and see if sounds are produced… Whatever the result, at the end of the (potentially silent) performance, you will see a Show all … messages button along with a blinking red signal "=> 1 warning". Click on the button to read detailed explanations of the failure (or success):
🎹 Setting up MIDI system MIDI output = 0: “Bus 1” 👉 the number of your choice
MIDI settings saved to ../temp_bolprocessor/trace_974dd9ab22_-gr.tryTimePatterns_midiport 🎹 Name(s) of MIDI input or/and output changed and will be updated when saving the page of your project
(For MacOS users)
This all makes sense given the Audio MIDI Setup shown above. The Bol Processor scanned all output (and input) MIDI ports. Given port '0' as an output by default, it assigned it to "Bus 1" which the 'port' set up in IAC.
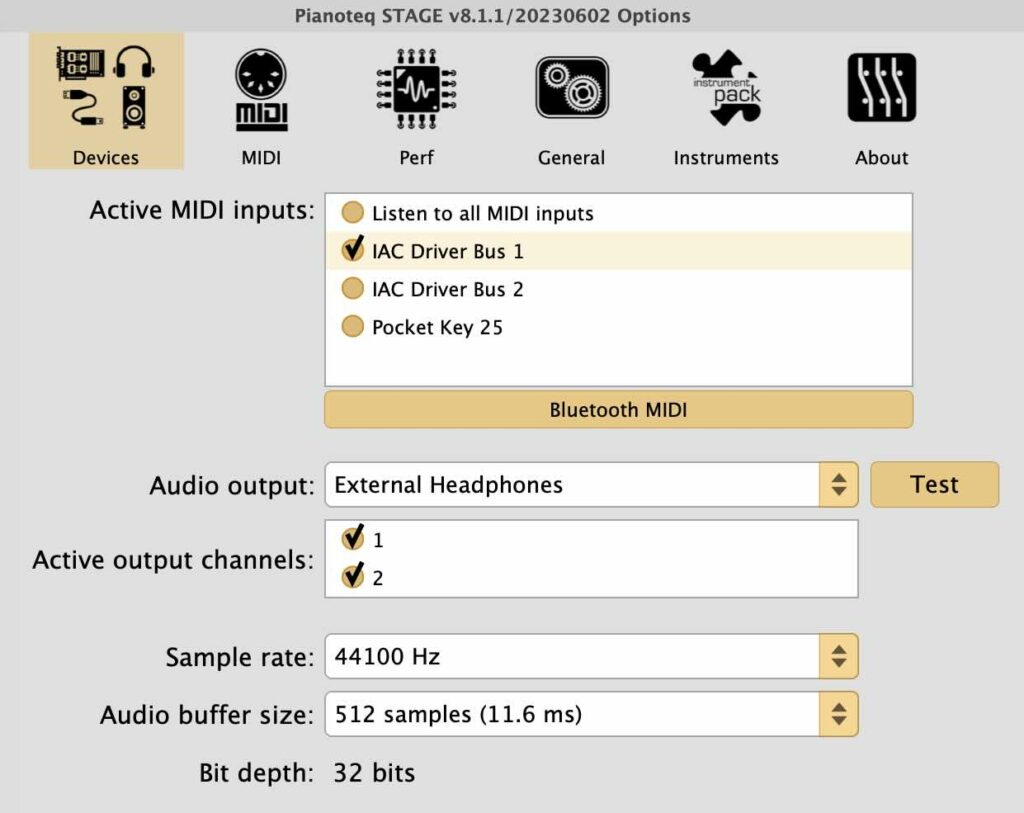
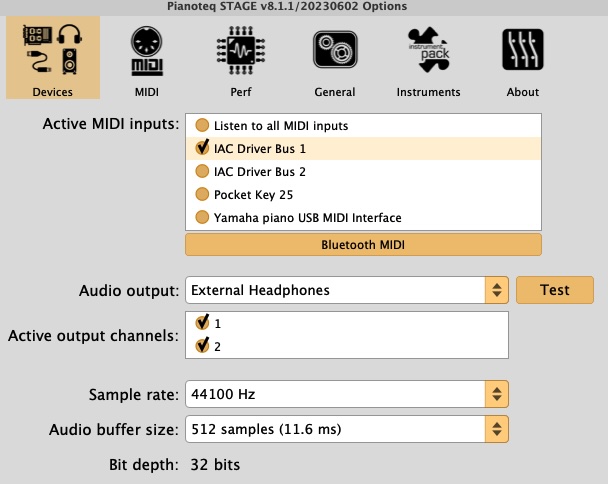
If your synthesiser happens to be connected to "Bus 1", you will hear sounds and the problem is solved. Let us suppose that you are running Pianoteq and hear nothing. Open the settings of Pianoteq and select "Devices". All you have to do is check "IAC Driver Bus 1". You might also check other inputs, including Pocket Key 25 if you want to connect your small keyboard directly to Pianoteq, but these are extra procedures.
Opening Pianoteq settings informed us that it is communicating with IAC, and it suggested to use a IAC 'Bus' for this communication. The 'Bus 1' port is technically called a virtual port.
Screenshot
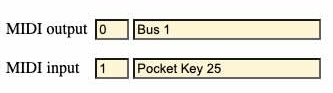
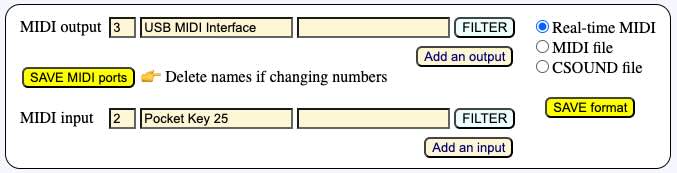
All you need to do to ensure that the connection remains correct when more devices are switched on/off and MIDI port numbers change. The only reliable way is to write the name "Bus 1" as the MIDI output. You can also write "Pocket Key 25" (or whatever is detected as your input MIDI device) to the MIDI input, as we will use it later. Note that MIDI port numbers are now irrelevant, as names take precedence. BP3 will correct them automatically.
Click the SAVE MIDI ports button to store this setting. Clicking on the SAVE format does the same thing, so don't worry about confusing buttons!
To the right of the MIDI port name is an empty field where you can enter a comment. For example, write "Pianoteq synth" to the right of "Bus 1".
Let us now switch on a Yamaha piano which is connected via a USB MIDI interface. The interface I use has a green light that indicates it has power. If the piano is actually communicating with it, we should see a flashing red light. In MacOS, sometimes it is necessary to restart the computer after switching on the piano… But in Windows and Linux the red light flashes immediately.
As soon as the red light flashes, open the Pianoteq settings. Great! We can now see that the Yamaha piano is recognised and connected to the IAC.
The easiest way to connect the Yamaha piano to BP3 is to click PLAY. Whatever happens, we'll get a warning and see the following diagnosis:
🎹 Setting up MacOS MIDI system MIDI output = 0: “Bus 1” 👉 the name of your choice Trying to assign ports to 1 input(s) without names but possibly with numbers MIDI input = 1: “Bus 2” 👉 the number of your choice MIDI input 1 makes BP3 interactive
MIDI settings saved to ../temp_bolprocessor/trace_974dd9ab22_-gr.tryTimePatterns_midiport 🎹 Name(s) of MIDI input or/and output changed and will be updated when saving the page of your project
The MIDI input identified as "Pocket Key 25" is correctly connecting to port '2'. But the Yamaha piano is identified as "USB MIDI Interface". This is the name we need to copy to the MIDI output, then SAVE MIDI ports and PLAY. Another option is to leave the name empty and enter the MIDI output number '3'.
We hear the output on the Yamaha piano, although port numbers were incorrect on the interface. The inconsistency is resolved by the MIDI driver selecting ports by name in order of priority. Port numbers (and names) are updated as soon as you save or reload the project (data or grammar). Then you get:
Why does the name "Yamaha piano" appear in Pianoteq settings, but not in the MIDI ports scanned by BP3? This is a mystery that expert users of a MIDI studio could probably solve… For the time being, just write "Yamaha piano" in the comment field at the right of "USB MIDI interface".
The Pause and Continue buttons
During real-time playback, Pause and Continue buttons are displayed. These are self-explanatory. Clicking the Continue button will resume the performance with the exact timing.
These buttons affect all instances of BP3 that are playing together, if any (see below).
The _part() command
It is possible to send parts of a Bol Processor score to separate outputs. Parts are identified by the "_part(x)" command in which 'x' is an integer in range 1..30. We will be able to handle more than 30 parts if it turns out to be necessary.
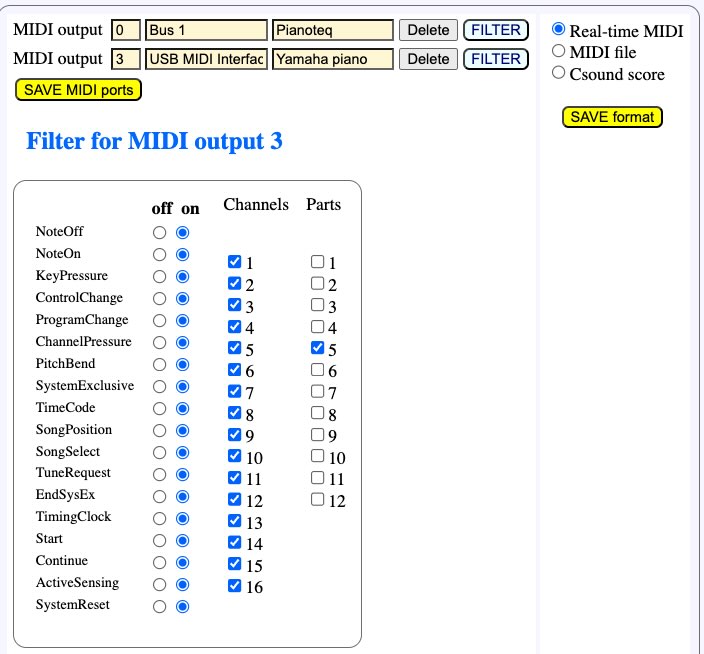
The "_part(x)" command directs MIDI messages to a specific MIDI output, which in most cases will be an instrument. The image on the side shows the mapping of port #3 (USB MIDI interface) to part #2, as set up in its filter.
By default, MIDI outputs "hear" all 30 parts, but here we've restricted this one to part #2.
For MIDI port #0 (Bus 1) we've restricted the output to part #5.
Let us play the following score:
C3 D3
This sequence of notes is heard on both instruments. As there is no "_part()" command in the score, all outputs send the MIDI messages.
Now let us try:
G2 _part(5) C3 _part(2) D3
Note G2 is heard on both instruments. But, as expected, the note C3 is heard on Bus 1 and D3 is heard on the USB MIDI interface.
The "_part()" command has exactly the same syntactic behaviour as "_chan()" and "_ins()". For example, it "follows" the score along the fields of polymetric structures:
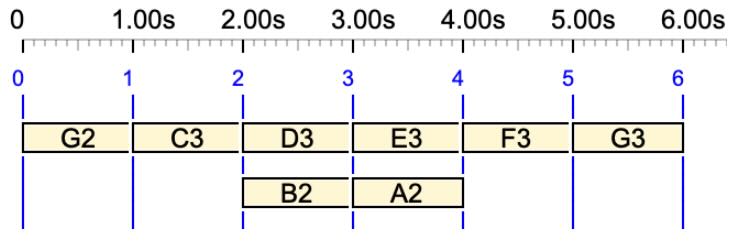
In this example, G2 is heard on both instruments. Then C3 is sent to Bus 1, as well as D3 and E3, since they are the first field of the polymetric structure. In the same time, B2 is sent to the USB MIDI interface, then A2 to Bus1. At the output of the polymetric structure, F3 is sent to Bus 1 which was the mapping before the structure. At last, G3 is sent to the USB MIDI interface.
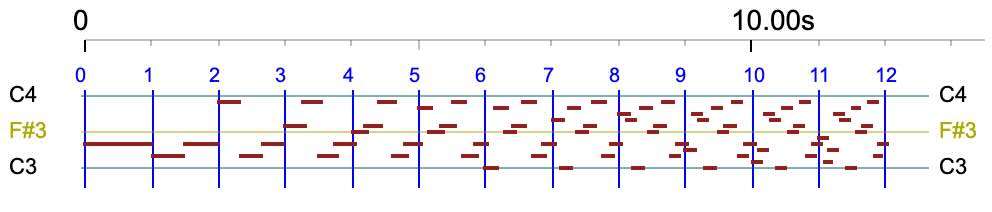
The sound-object graph shows that D3 and B2 are played together, although on different instruments, and E3 and A2 are played together on the instrument connected to Bus 1.
Parts are mostly relevant when importing digitised scores. They are used to declare instruments in MusicXML files. When importing a score, the Bol Processor will optionally place "_part()" or "_chan()" commands in the imported score, so that it can be played on the same set of digital instruments.
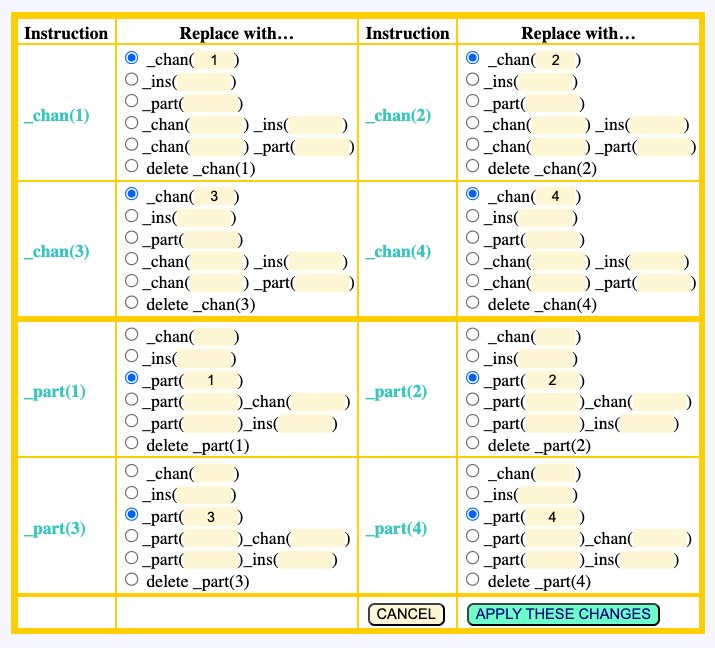
Using "_part()" is a better option than "_chan()" to name an instrument, because MIDI channels can be modified to handle microtonal adjustments. On the Data page, there is a MANAGE _chan(), _ins(), _part() button that opens a dialog for converting parts to/from channels, parts to/from instruments, etc.
An input
Setting up an input follows exactly the same protocol as setting up the output. For example, we can set up the input on "Pocket Key 25” as shown above. “USB MIDI Interface” (the Yamaha piano) is another possible choice. Let us continue with Pocket Key 25.
Windows users can simply plug their external MIDI keyboard (e.g. "Pocket Key 25”) to a USB port of their computer, as it will be automatically recognised and set up by the system.
Connecting an input to BP3 is of little interest if BP3 does nothing with input events. The instructions it can handle are listed in the section List of scripts for dealing with real-time MIDI below. "Wait for note…" means that BP3 will stop playing until it receives a NoteOn of the note in question — even with velocity zero.
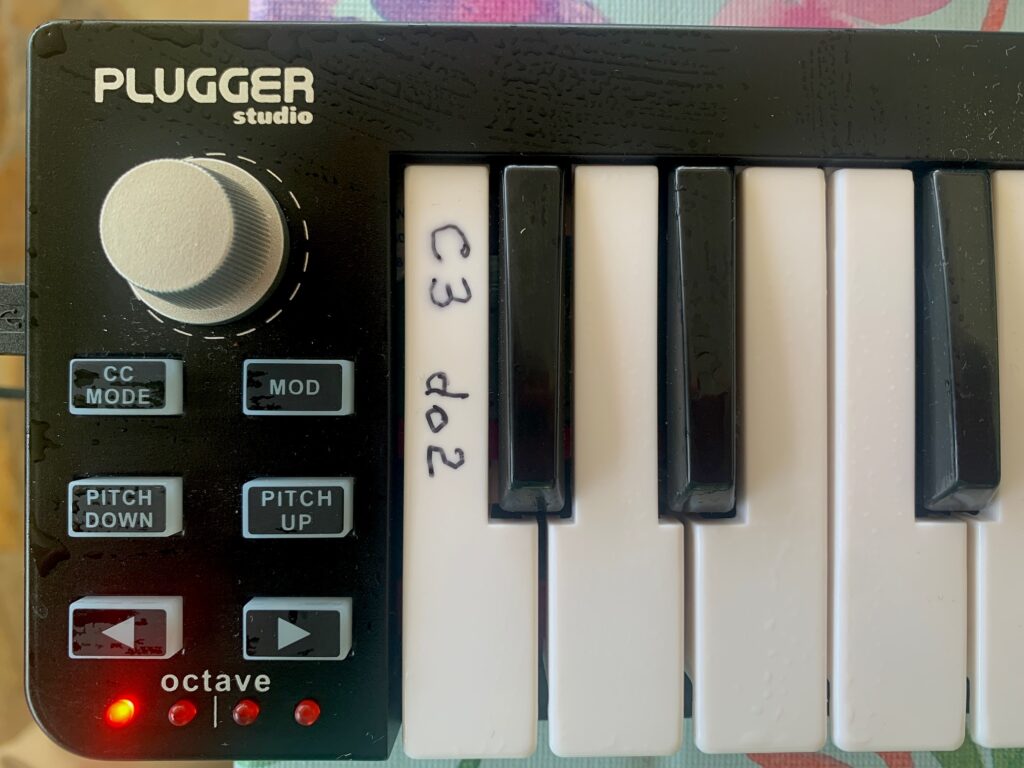
The script command tells that the performance should start when note C3 is received on MIDI channel 1. To avoid any confusion about octave numbers, I have written the name on the lowest key of my Pocket Key 25 (see photo). This confusion is made worse by the fact that the Italian/Spanish/French convention uses lower octave numbers!
So, the labelled key is the one we need to press to start this show. Let's try it…
When the PLAY button is clicked on the Data page, a flashing STOP button is displayed. The machine would wait forever unless the correct MIDI event has been received. The STOP button — or the PANIC button at the top right — can be used to abort the process cleanly. If all goes well, pressing the C3 key should produce this sound:
Harm Visser's '-da.acceleration' example
Notice that the _transpose(12) instruction plays notes one octave higher!
(This little "acceleration" piece was composed by Harm Visser to illustrate the period notation. Read his tutorial.)
Multiple interruptions are of course possible. Try this:
Now the machine will start its performance after receiving a NoteOn of C3. It will then stop after three beats and wait for a NoteOn of C4. A noteworthy detail is that one second after an interruption, AllNotesOff is sent to all MIDI channels and the pedals are set to off. This prevents notes waiting for their NoteOff from being heard. This "All Notes Off" feature can be turned off in the preferences file.
MIDI input filters
Let us play with the continuous improvisation "Mozart’s musical dice game" (called "-gr.Mozart" in the "ctests" folder). If this project is set for real-time MIDI, the improvisation will not stop until we click on the STOP or PANIC button. Inserting a "wait for note…" at the beginning would of course stop the performance at the beginning of every variation. Beware that you will have to write "do2" instead of "C3" due to the note convention!
But let's try something else, using the external keyboard (the Pocket Key 25 or Yamaha piano) to play notes on top of the performance. How strange! We don't hear any notes played on the external keyboard unless it's connected directly to the output device.
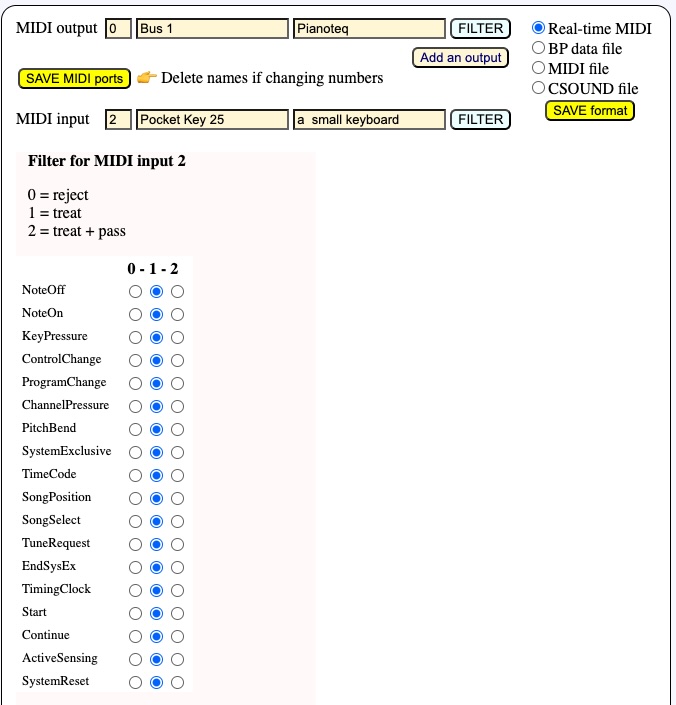
The reason for this becomes clear after clicking on the FILTER button for MIDI input 2:
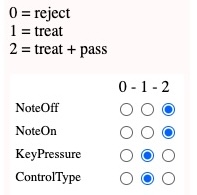
All types of MIDI events are listed along with how they are processed by BP3. Here we are only interested in NoteOn/NoteOff events. The default setting is '1', which means that they can trigger script commands, but are not forwarded to the MIDI output. This is why 'C3/do2' was able to start the performance, although we could not hear it.
To play notes over the performance, we need to set the status of NoteOn and NoteOff to '2'. Note: If we only set the NoteOn status, BP3 will automatically set the NoteOff status to avoid confusion. Once you have changed the settings, click SAVE MIDI ports, then PRODUCE ITEM(S).
Since the Pocket Key 25 keyboard sends only NoteOn/Noteoff messages, we could as well set other event filters (KeyPressure, etc.) to '0'.
These filter settings are stored, together with the MIDI port names or numbers, in a temporary file whose name depends on both the session number (created by your browser) and the project name. A copy of these settings is stored in the (permanent) folder "midi_resources". This storage makes it possible to launch several instances of BP3 on the same browser or on different browsers, as we will now see.