From the outset, I have viewed the Bol Processor project as a research endeavor rather than a straightforward software design project. Its focus is on computational musicology, which involves using computational models to explore musicology across and beyond cultural boundaries.
The research nature of this project necessitates an open-access ethic. As such, the Bol Processor — including its installation and source files — will remain freely accessible. Software developers are encouraged to reuse the source code to create variants or updated versions of BP3.
However, there is a practical reason why I have chosen not to decline personal donations: I am increasingly incurring costs for various tools required for software development. These include hosting fees, the remuneration of "virtual" assistants (AI tools), and, when necessary, human experts.
For this reason, if you are so inclined, you can make a donation using the PayPal link below. Any funds not used for project related activities will be transferred to charities.
This page is a demo of the handling of microtonality in the real-time MIDI and MIDI file environments of the Bol Processor BP3 (version 3.0.7 and higher). Install BP3 by following the instructions for MacOS, Linux and Windows on the page Install the Bol Processor.
All examples here are from the "-da.tryMPE" project, which is part of the ctests folder (download here). The syntactic model for microtonality is explained here. For details on working with real-time MIDI, read the Real-time MIDI page. Some Csound scores are shown for the sake of clarity, as the handling of microtonality in the Csound environment of BP3 produces the same results as MIDI.
👉 The following is a comprehensive but detailed presentation of all aspects of the use of microtonality in BP3. It is not necessary to understand the details when starting with microtonality! The explanation is only intended to assist musicians who wish to create new material by combining several tuning schemes in the same musical work. To try the microtonal process on real musical works, listen for instance to the comparison of temperaments, or play François Couperin's Les Ombres Errantes (in the ctests/Imported_MusicXML folder) on a MIDI instrument using its optimal tuning scheme rameau_en_sib:
Couperin's Les Ombres Errantes, Csound rendering with scale rameau_en_sib ➡ ImageCouperin's Les Ombres Errantes, PianoTeq rendering with scale rameau_en_sib ➡ Image
For geeks: Microtonality in real-time MIDI and MIDI files mimics the MIDI Polyphonic Expression (MPE) method of modifying pitchbend values on notes distributed on separate channels (up to 15 simultaneous notes). However, it works on devices that are not MPE-compliant.
Check pitchbender sensitivity
Make sure that your output MIDI device is sensitive to pitchbend messages. Try the following:
You should hear C4 F4 D4 Bb3 C4 instead of C4 C4 C4 C4 C4. This shows that the MIDI device accepts pitchbend messages and that its range is ± 200 cents, or ± 2 semitones. This is the range we use for microtonality.
For geeks: The actual values are in the range 0 - 16383, but thanks to the "_pitchrange(200)" instruction, the actual cent values can be used.
The "_pitchbend()" commands will be taken care of, and their values will be added to the pitchbend commands that adjust the pitches to the microtonal scale. If this combination exceeds the range of ± 200 cents, an error message will be displayed.
MIDI channels
In the previous example, MIDI events (notes and pitchbender commands) were sent on channel 2. This is to ensure that your MIDI output device is receiving and mixing all channels, technically MIDI mode 4 (omni off, mono).
It was possible to send messages on channel 2 because the Microtonality mode was not set. This mode is set on as a "_scale()" command is found. In this case, the "_chan()" commands are ignored, as all channel assignments are made by the microtonality process.
Diapason tuning
Since note frequencies are displayed when the Trace microtonality mode is activated in "-se.tryMPE", the tuning of the diapason (note A4/la 3 on a conventional keyboard) is important.
By default (in Bol Processor settings and on MIDI devices) this setting is 440 Hz. If you change the value in the settings, the note frequencies will change accordingly. The BP3 will send a message to the MIDI device to tune the diapason, but many devices do not understand this command. (This is the case with PianoTeq Stage.) In this case, tune the device independently.
Microtonal scales
On top of project "-da.tryMPE" you can see the line:
-to.tryMPE
This refers to a tonality resource stored in the "tonality_resources" folder. This resource has been downloaded to your computer when running an installer (or a Linux script) as explained on pages Quick install MacOS, Quick install Windows, or Quick install Linux.
At the bottom of the project page there is a button called EDIT '-to.tryMPE'. This will take you to this resource:
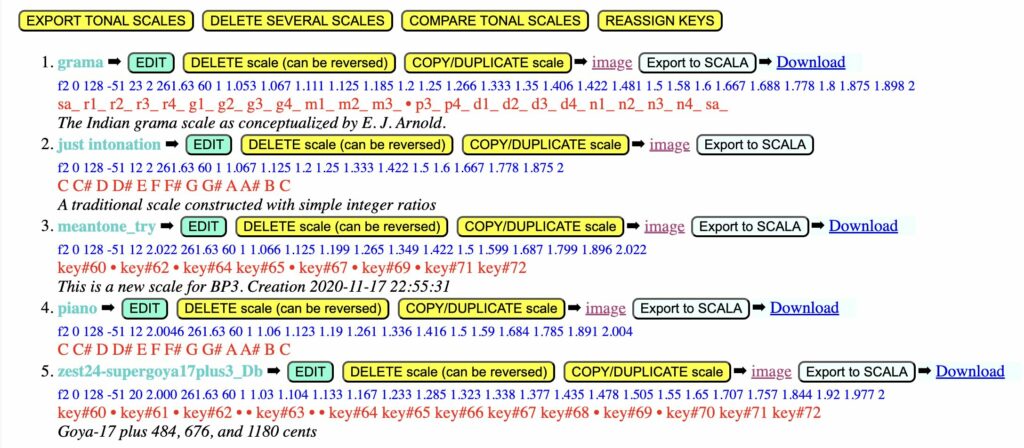
Here are the scales stored in "-to.tryMPE":
Most of these are "exotic" in the sense that they won't produce interesting music. They have been designed to highlight technical features:
The grama scale is an interpretation of the Indian system that divides the octave into "twenty-two shrutis", see The two-vina experiment for details. We use one particular (probably incorrect) solution, which sets the pramana shruti at 21 cents. Technically speaking — the reason for this choice — this scale has 23 grades which count as 22 notes. Click the EDIT button to see its structure.
The just intonation scale is a standard scale with 12 grades and 12 notes, probably suitable for use in some harmonic contexts. Click the EDIT button and display the image to see that it has a wolf's fifth between D and A.
The meantone_try scale is purely technical. It has 12 grades and 7 notes. The grades are approximately semitones and the notes suggest the white keys of a piano keyboard. Another feature is that it has an extended octave of 1219 cents instead of 1200. Notes are labelled by key numbers.
The meantone_try2 scale is identical to meantone_try except that its base key is #64 instead of #60. This may be necessary to use specific key numbers of the keyboard of the MIDI output device.
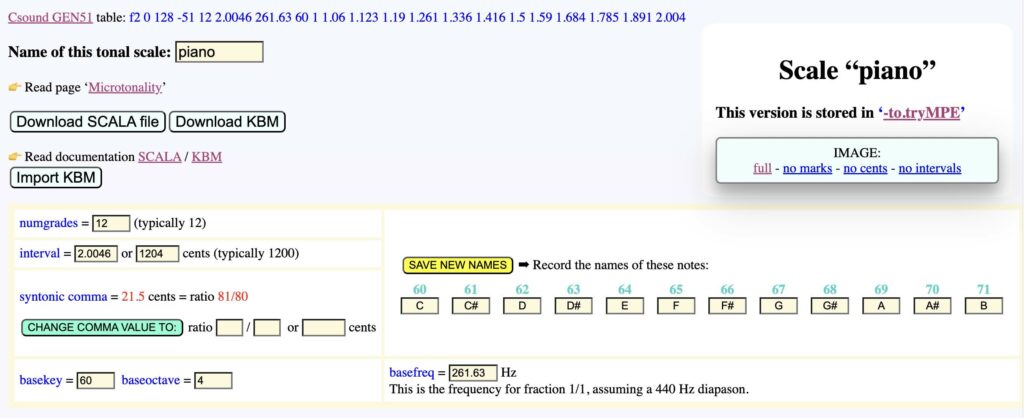
The piano scale has 12 grades and 12 notes. It is an equal-tempered scale with an extended octave of 1204 cents. An interesting point is that all its fifths are perfect (see picture).
The zest24-supergoya17plus3_Db scale was created by importing its SCALA definition (from this archive). It covers a conventional octave (ratio 2/1) with 20 grades, but the SCALA file did not contain any note names. So, 12 notes were chosen at random, with key numbers as their names.
The Bohlen-Pierce scale which has a "tritave" interval of ratio 3/1 instead of 2/1 in the octave. The tritave is divided into 13 grades and 13 notes (see Wikipedia and picture).
These scales cover all the cases necessary to check the technical operation of microtonality handling in real-time MIDI, MIDI files, and Csound environments. Don't expect to hear interesting music in the following examples! Only make sure that Trace microtonality is checked in "-se_tryMPE", so that you can read cent corrections in the trace.
The second argument to the "_scale()" command is called the block key. It is the key whose frequency should remain equal to that of a conventional 12-grade equal-tempered scale (a standard tuning of electronic instruments). If it is set to 0 or 60, this means that the block key is the 60th key on a piano keyboard, usually called "middle C" or C4/do3. If the A4/la3 is 440 Hz, key #60 should be 261.63 Hz, which we call the base frequency, following the practice in Csound..
See for example the top of settings of the piano scale in the tonality resource "-to.tryMPE":
For geeks:The Csound GEN51 line at the top is purely informative. It could be placed on top of Csound scores, but the Bol Processor uses note frequencies instead when unconventional positions are required — see Csound tuning in BP3.
Looking at the trace of the process when playing the "_scale(piano,0)" sequence yields the following:
The first thing we notice is that the frequency of C4 (key #60) is 261.630 Hz, the base frequency of the block key. One octave higher, the frequency of C5 is 525.260 Hz. This gives an octave ratio of 2.0034, which equates to a stretching of 3 cents, close to 4 cents due to the rounding.
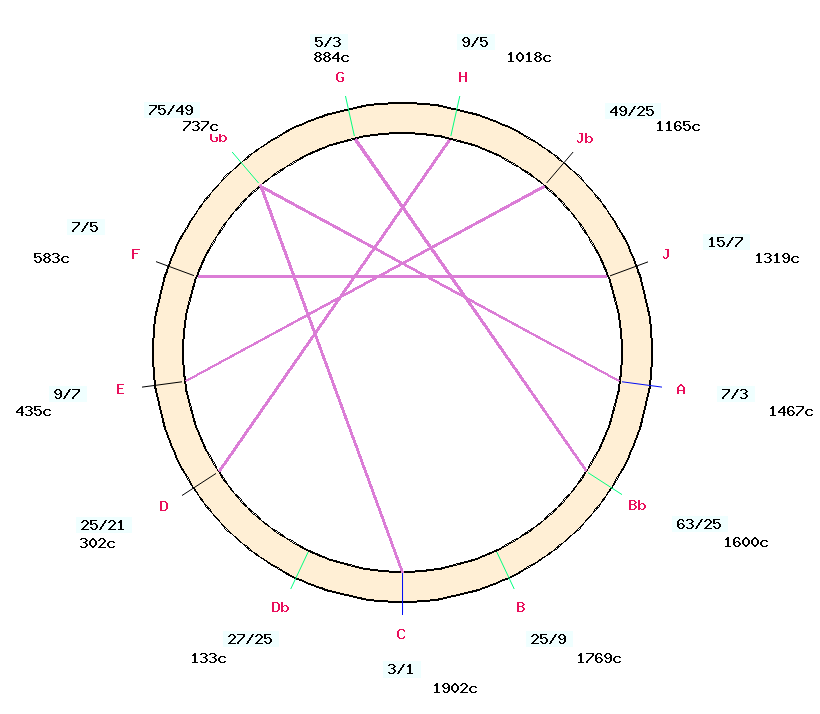
When the frequencies are displayed using the just intonation scale, the octave ratio is exactly 2/1. Listen to the scale with decreasing velocities:
On the same scale, listen to a series of fifths C4/G4, D4/A4, E4/B4, F5/C5 showing that they are perfect except the wolf's fifth D4/A4 (see picture):
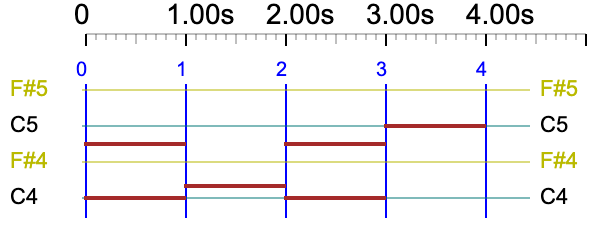
Due to rounding (3 cents instead of 4) in the piano scale, check that rounding errors do not accumulate over octaves. The following is also an exercise for those whose ear is trained in piano tuning. We'll play identical notes in two scales: the piano scale with its extended octave, then the standard equal temperament scale with an octave of 2/1:
The instruction "_scale(0,0)" sets the scale to the standard standard equal temperament scale. The layout of the notes in this polymetric structure is as follows:
There is a short delay (1/16 beat) on the notes of the second line to emphasise the beats, if there are any. You can hear beats in the first part, as scales are different, but perfect unison in the second part. This is how it sounds on a PianoTeq Stage physical modelling synthesiser:
This result should not be taken as a radical statement about how to tune a piano! Pianoteq synthesizers already reproduce the octave stretching that piano tuners tend to do to compensate for the inharmonicity of the strings. An additional octave stretching of four cents is therefore not worth mentioning.
The trace only shows notes whose frequencies have been corrected:
We note that 5 octaves gives a total stretch of 18 cents, or 3.6 cents per octave. The frequency ratio between C4 and C7, three octaves higher, is 2106.381/261.630 = 8.0509, whose cube root is 2.0042, again very close to the ratio of 2.0046 in the piano scale definition. Unsurprisingly, the C-sound score reveals exactly the same numbers.
Effect of the block key
Let us superimpose two phrases of the same notes in the same scale but without the same block key:
First, key #72 (C5) of scale #4 has 0 cents correction because the block key of this scale is C4 and it has no octave stretching. The same for key #69 (A4) of scale #3 whose block key is A4.
Pitch values can be deduced from the image of the just intonation scale., For instance, A4 (key #69) has 0 cent correction on the score because it is the block key. The corrected C4 frequency of this scale is 263.907 Hz (i.e. 15 cents above its base frequency 261.63 Hz) and the frequency ratio for A is 5/3, which yields 440.007 Hz as shown above.
Secondly, since notes C4 and C5 are superimposed with different cent corrections, i.e. different pitchbender settings, they must be sent on different MIDI channels: 2 and 3. This is the approach borrowed from MPE. Same for D4/D5, E4/E5, A4/A5. Note that each MIDI channel is reused as soon as it is free of notes.
For geeks: In this example, the notes G3 A3 B3 played at the beginning are not modified by a microtonal scale. They are therefore played on the standard equal tempered scale of the MIDI device. As a result, they appear on the Csound score in octave point pitch-class format:
Let us use meantone_try and meantone_try2 scale to play the same phrase. We call these scales "exotic" because the names of their notes are not in the English, Italian/Spanish/French, or Indian standard. Here we use the key numbers of the MIDI output device.
The only difference is the key numbers. In meantone_try2, the base key is #64 instead of #60.
The frequency of key#69 is 440 Hz since it is the block key. The actual sequence heard on the MIDI output device is C4 D4 F4 A4 C5. Note that the octave ratio C5/C4 is 527.204/260.875 which is greater than 2 because this scale has an octave stretched by 19 cents.
Note again that the frequency of the base key #73 is 440 Hz. The frequencies are identical, the only change is the key numbers associated with the notes. The actual sequence played on the MIDI output device should again be C4 D4 F4 A4 C5, assuming that key #64 is the middle key of its keyboard.
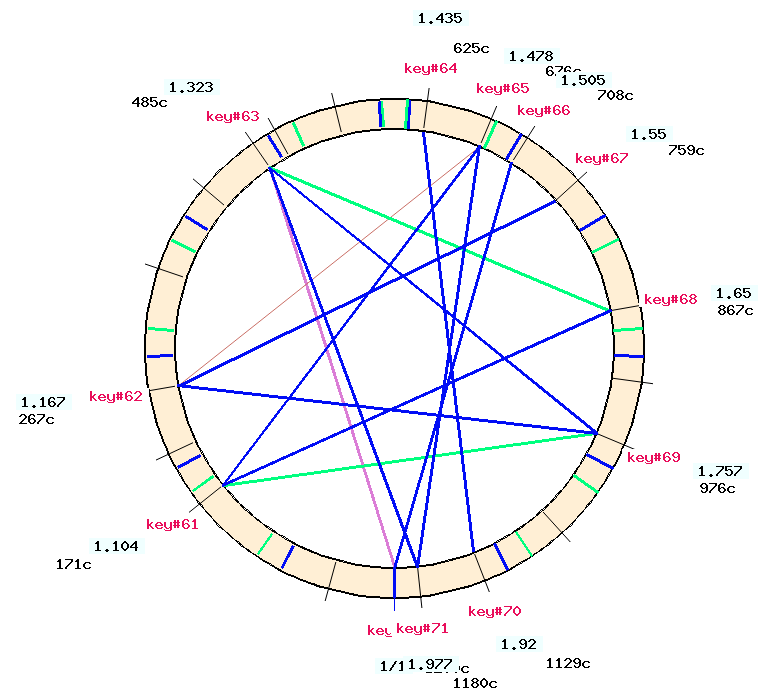
A very exotic scale
The scale called zest24-supergoya17plus3_Db is more "exotic" than the previous one because it has 20 grades and 12 notes. The original scale downloaded from an archive did not have note names, so we decided to label twelve positions with the key numbers #60 to #71. As you can see in the picture, the intervals are very irregular. The choice of 12 tones is motivated by the desire to be able to map them onto the 12 keys of a standard piano keyboard. We'll see a different case later.
Key #60 is the base key and its frequency is 261.630 Hz as declared in the tonality resource. Note that the key #72, an octave higher, also has "key#60" as its note name. Its frequency of 523.260 Hz is twice 261.630 since octaves are not stretched.
Looking at the picture, we can calculate the frequency of key#65 which has a frequency ratio of 1.478. This gives 1.478 x 261.63 = 386.69 Hz, which is very close to that in the score. Minor errors are due to the rounding of cents to whole numbers.
If you play this score on a conventional MIDI device, you won't hear the correct frequencies unless the device is tuned to a 20-grade equal temperament scale. Conversely, the rendering in C-Sound is accurate.
When a scale has more than 12 grades, the reference tempered scale must have the same number of grades, regardless of the number of notes (which is indeed smaller). Apart from the musical aspect — which we won't discuss here — this has a technical advantage: the cent corrections, which are deviations from the equal temperament scale, will always be less than 100 cents. This is important because the sensitivity of pitchbenders is set to ± 200 cents.
The Bohlen-Pierce scale
The Bohlen-Pierce scale has a "tritave" interval of ratio 3/1 instead of 2/1 in the octave. The tritave is divided into 13 grades and 13 notes (see Wikipedia).
The "just-intonation" version has been implemented in the tonal resource -to.tryMPE — see picture.
The frequency ratio C5 / C4 is, as expected, 784.457 / 261.630 = 3.
The Bohlen-Pierce scale played on Pianoteq
Since the scale covers a tritave that would extend from A4 (key #60) to G5 (key #79) on a conventional 12-note MIDI device, each note is mapped to the key that requires the least amount of pitchbend. As a result, pitchbend corrections are never greater than ± 100 cents.
To convert to Bohlen-Pierce notes played on an external MIDI device, connect it to the input of BP3, then run the following "tuning daemon" (see below):
In the following example, two phrases are played on top of each other, using different microtonal scales.
On the pianoroll (see picture), key#60 is shown as C4. The note key#62, shown as D4, seems to be unique, although two key#62 notes are superimposed with slightly different cent corrections. The same is true with key#72 shown as C5.
The second (key 62) and last (key 72) notes are identical, but because they belong to different scales, their frequencies are not identical. For this purpose, they are played on different MIDI channels. The superimposition creates (nasty) mismatches that reflect the differences in tuning:
Use of _scale(0,0)
So far we have used "_scale(0,0)" to specify the return to a 12-grade equal tempered scale after using a microtonal scale. It can also be used to force microtonal mode in a musical item that does not require specific microtonal scales.
Pitchbend adjustments are not shown on this graph
This is a (rather silly) way of creating a sequence of notes using the same note with pitchbend corrections. In fact, we are looking forward to hearing:
C4 C#4 {B3, D4} C#4 C4
The first solution does not work because the chord {B3, D4} consists of two of the same note A4 with different pitchbend values. It works in Csound, but in MIDI we hear:
An incorrect rendering of C4 C#4 {B3, D4} C#4 C4
Proper notation, without the aid of microtonality, would be, for example:
So we have to send the two C4s of the polymetric expression on separate MIDI channels. But the microtonal calculation does this automatically. So, putting "_scale(0,0)" at the beginning won't change the tuning but it will force the microtonal mode:
For geeks:It wouldn't be a good idea to set microtonality mode by default for all musical works, because (1) channel assignment takes up processing time, and (2) this would render all "_chan()" commands ineffective. In some MIDI environments, MIDI channels are used to send messages to different instruments.
Combination with pitchbend commands
The following is an example of combining a microtonal phrase with a global pitchbend command of + 100 cents:
The "_chan(4)" command is used here to prove that it is ignored in microtonality mode. The MIDI trace shows that an additional correction has been applied. Therefore, the frequency values are not those played on the output MIDI device. However, the Csound score is explicit:
The numbers 99.988 and 99.988 are the pitchbend corrections (in cents) at the beginning and end of the note declared on each line.
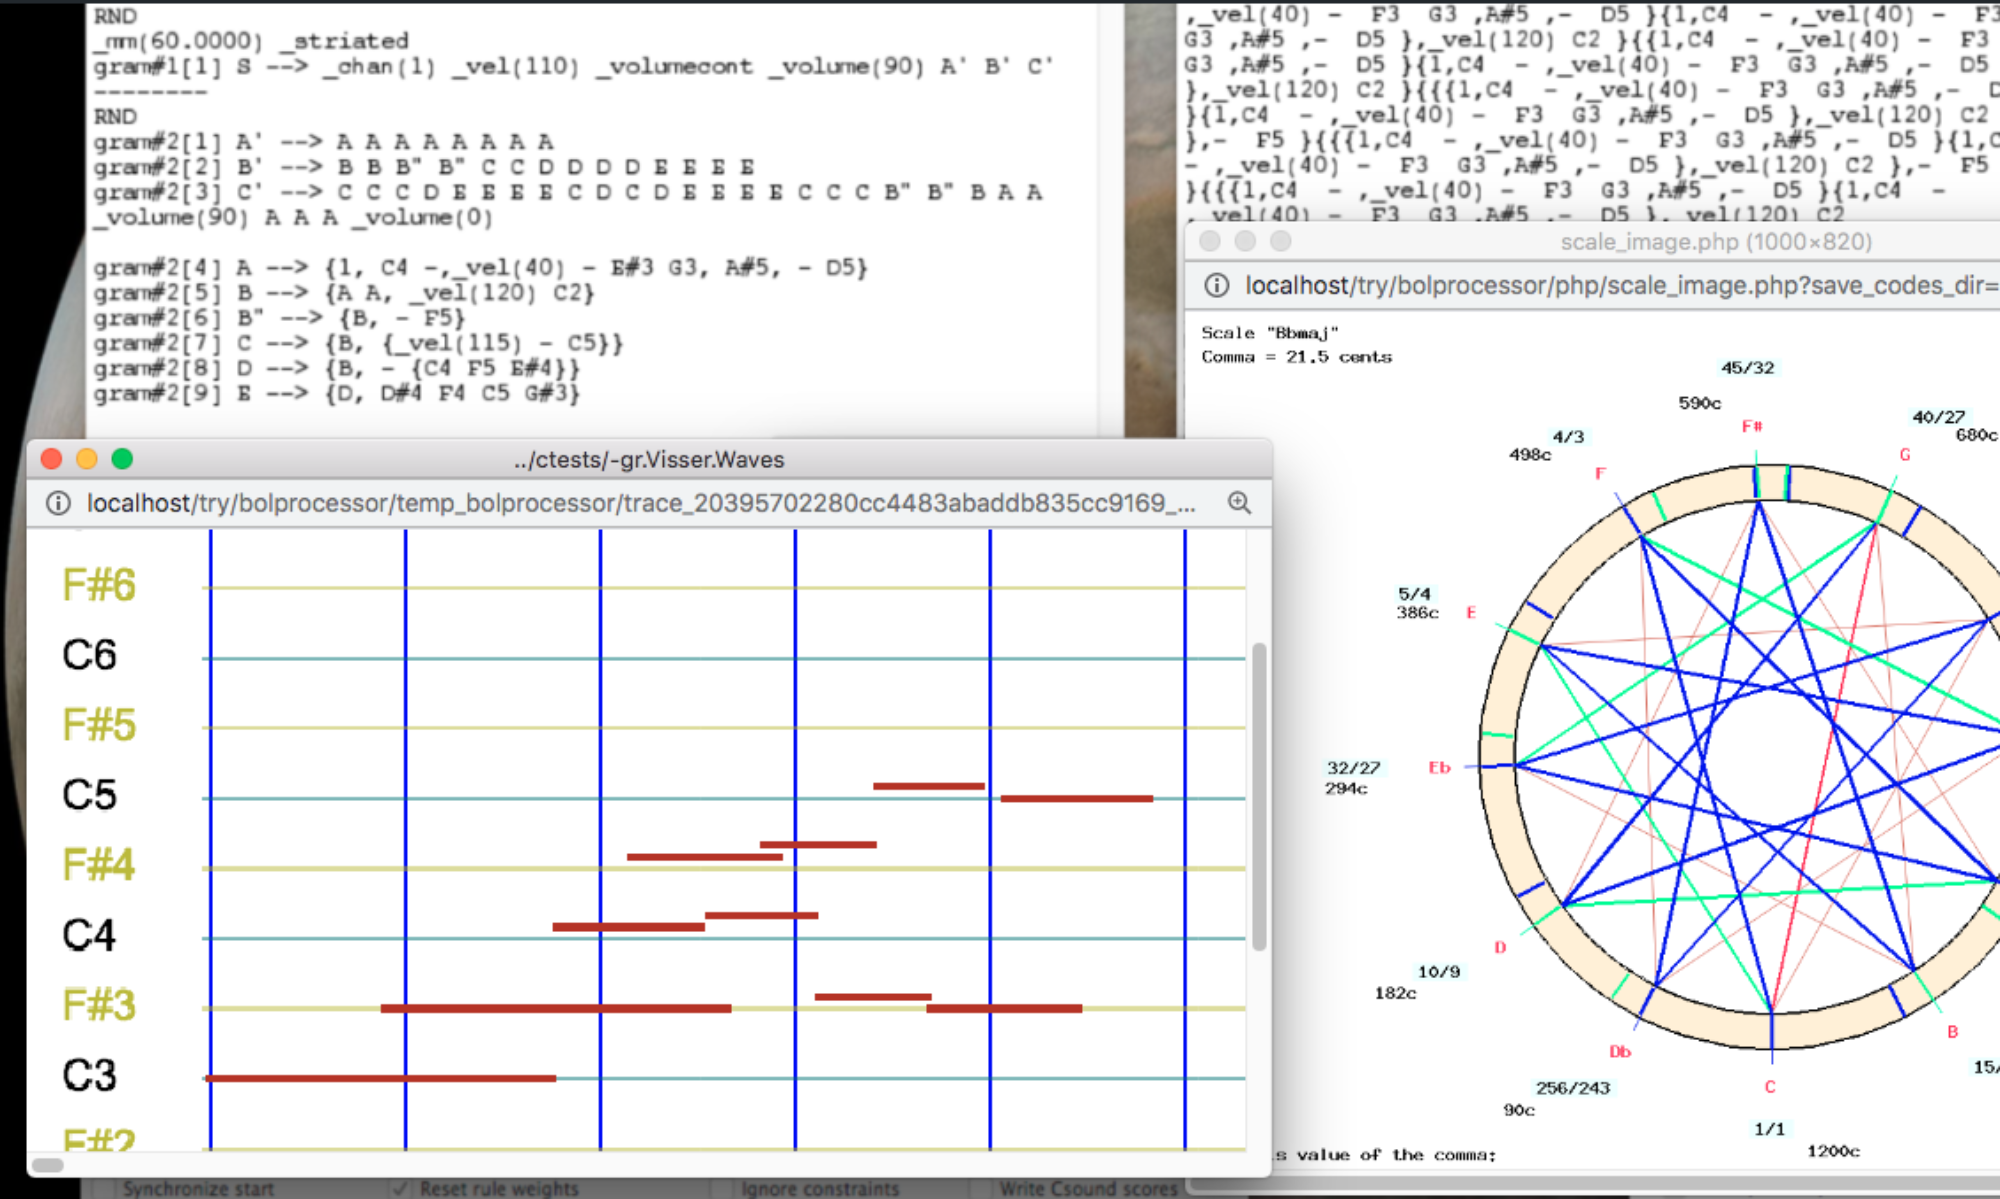
The "grama" Indian scale
The grama scale
We have already discussed the ancient Indian tonal system which divides the octave into "twenty-two shrutis", see The two-vina experiment for details. We'll try this grama scale by setting the pramāņa ṣruti to 21 cents.
In short, this tuning scheme is a twelve degree chromatic scale: Sa, Re komal, Re, Ga komal, Ga, Ma, Ma tivra, Pa, Dha komal, Dha, Ni komal, Ni. These names stand for C, Db, D, Eb, E, F, F#, G, Ab, A, Bb, B in English notation.
Each note of the Indian scale, except Sa (C) and Ma tivra (F#), can occupy two enharmonic positions. This explains why the grama tuning scheme has 23 positions and 22 notes.
In accordance with the syntax of the Bol processor, notes are referred to as sound objects in lower case. For example, the two enharmonic positions of Re komal are called r1_ and r2_, and the two positions of Re are called r3_ and r4_. A trailing '_' is necessary to indicate octave numbers unambiguously: the note d3_4 is the low position of Dha in the 4th octave, which is admittedly close to A4 in the Western scale.
The pramāņa ṣruti is the tonal distance between all pairs of enharmonic positions, for instance between r1_ and r2_. For the sake of simplicity, we've set it to 21 cents (a syntonic comma), which is a common mistake made by Western and Indian musicologists. In reality it is a variable value — see Raga intonation.
Listen to the same scale played against a drone (read the Microtonality page):
The Csound rendering of the grama scale (23 grades) played against a drone. This version has an additional note m4_ that does not belong to the preceding scale.
We said earlier that, in the grama tuning scheme, d3_4 occupies the position of A4 in the Western scale. Since the block key is #76 (d3_4), the frequency of d3_4 is close to 440 Hz. Consequently, the position of sa_4 (263.907 Hz) is 15 cents higher than the base frequency (261.63 Hz).
This scale can be played on any MIDI device that accepts pitchbend commands. The 22 notes of the scale, covering an octave, are mapped to the 12 keys of a MIDI keyboard. Each note is mapped to the key that requires the least amount of pitchbend. As a result, pitchbend corrections are never greater than ± 100 cents. For example, d3_4 is mapped to key #69, which happens to be that of A4 on a conventional keyboard.
Read the Raga Intonation page to see how this theoretical framework can be adapted for modelling real music.
Microtonality in sound-objects
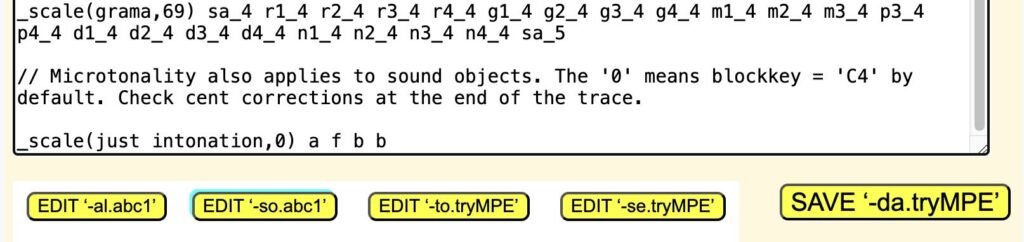
A sound-object is a sequence of MIDI events and/or Csound score lines — read Sound-object prototypes for details. Therefore the pitches of notes it contains can be modified by microtonal scales. In the "-da.tryMPE" project, try for instance:
_scale(just intonation,0) a f b b
and check frequency corrections in the trace (both MIDI and Csound):
The position of A on the just intonation scale (see picture) is 884 cents above C, which is 15 cents below its position on the equal temperament scale (900 cents). The same goes for B which is 1088 cents above C, and thus 11 cents below its position on the equal temperament scale (1100 cents).
Applying microtonal corrections to MIDI input notes
This demonstrates the BP3's ability to act as an interface between MIDI devices, retuning the input in real time to a microtonal scale.
The filter of the input MIDI device should be set to "treat & pass" for all categories of events that will be transmitted (see picture).
We show a temporary solution that works very well, but will be simplified in the future.
If, for example, you want to retune the input to the just intonation scale, run the following "tuning daemon":
_script(wait for C0 channel 16) _scale(just intonation,A4) _vel(0) C0
The "wait for C0 channel 16" command that causes the machine to hang up while it listens for some kind of input. In fact, the note "C0 channel 16" should not be part of the stream of notes you need to retune, otherwise it will stop the process!
The note C0 with velocity 0 is inaudible and will not be played unless the note "C0 channel 16" releases the waiting state. This note is needed for attaching the script instruction.
The "wait forever" command causes the machine to hang until the STOP or PANIC button is pressed. Again, we need a dummy (inaudible) note C0, at the end of which the script instruction is appended.
Because multiple instances of BP3 can be run simultaneously (read Real-time MIDI), you can set up a bank of "tuning daemons" that interact with people and MIDI devices to create interesting variations of tonal structures.
This installation is checked with Ubuntu +Linux Lite 7.0 running on an HP Intel Core i5-6200U (64-bit, 8 Gb RAM).
Install XAMPP
The installation of BP3 should take place after the installation of the local Apache server XAMPP. Follow instructions here: https://www.apachefriends.org/
XAMPP creates a /opt/lampp/htdocs/ directory that will contain "bolprocessor". The "bolprocessor" folder will contain (language C) source files for the "bp3" console, the "MakeFile" to compile them, and all the data files. It will also contain a "php" folder filled with PHP pages and some related files for running the interface.
If you wish to open XAMPP automatically at startup, read this page. (This can be done later.)
These zip files are updated regularly. Major updates are announced on the BP developers list and uploaded to their GIT repositories. Make sure that they can be found in your Downloads folder: /home/linuxlite/Downloads
Install the Bol Processor
Safely do the installation using the shell scripts "linux-scripts" downloaded here. Current version: 4 February 2025, size 14124 bytes. Unpack and copy these scripts to the /home folder:
cd /home/linuxlite/Downloads/ unzip linux-scripts.zip -x "__MACOSX/*" sudo chmod -R 775 linux-scripts cd linux-scripts sudo cp -a . /home/ cd /home/ sudo chmod +x *.sh
Scripts "modify_xampp.sh", "prepare.sh", "unpack_bp3.sh", "install_bp3.sh" and "get_ready_bp3.sh" have been copied to the /home folder.
Four more scripts: "update_console.sh", "update_interface.sh", "update_data.sh" and "restart_xampp.sh", have been copied to the /home folder. They will be used later.
The installation procedure is similar to that for MacOS and Windows, but includes a few actions specific to Linux.
Run the scripts in the following order. 👉 You will be asked for your password the first time, as they need to be run in "admin" mode (the "sudo" command).
sudo /home/modify_xampp.sh will adjust XAMPP settings.
sudo /home/prepare.sh will install required resources on your machine, and create two virtual MIDI ports if they are not yet existing.
sudo /home/unpack_bp3.sh will unpack the zip files.
sudo /home/install_bp3.sh will create the /opt/lampp/htdocs/bolprocessor/ directory and fill it with the contents of BP3 packages. Files/folders already existing will simply be updated.
sudo /home/get_ready_bp3.sh will configure the virtual MIDI ports and update the sudoers entry.
In the "bolprocessor" folder, the owner is "daemon" (the same one used by XAMPP), which is assigned to the groups "audio" and "linuxlite", and the permissions are set to "775". 👉 The content of "bolprocessor" is strictly private. No risk setting up permissions!
Avoid running the same script more than once, although this should not create duplicates or unwanted effects.
Once the Bol Processor BP3 is installed and running, you should delete the "zip" files in the Downloads folder. This will allow downloading new versions.
Compile the 'bp3' console
Start the XAMPPApache server. You can send the terminal command:
sudo /home/restart_xampp.sh
Point your browser at localhost/bolprocessor/php/. This will display the home page of the Bol Processor.
If you see this frame in the image at the top right of the page, your life will be easy! All you have to do is click on the link to compile the console, which will take less than a minute.
f you don't see the link to compile, and instead a mention that 'gcc' is not responsive, you are in great trouble! This suggests a bug in the interface (contact us) or in your installation.
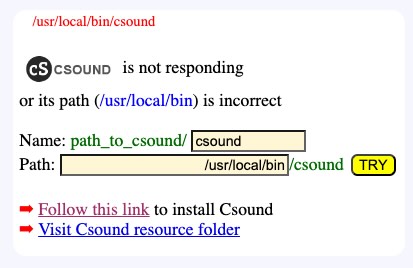
Install Csound
Csound is not required to run the Bol Processor, as you can work with MIDI files and real-time MIDI. However, it will give you access to a different approach to sound synthesis, and it will handle microtonality in its own way.
If you wish to install Csound, simply type the following commands:
sudo apt update sudo apt install csound
Then verify the installation and check the path to the console:
csound --version which csound
By default, the Bol Processor sets the path to "usr/bin", which seems to be standard on Linux. It is given by the "which csound" command.
A frame asking for a correction of the path to Csound. The path "/usr/local/bin" is incorrect in Linux.
The BP3 interface will be able to figure out the location of "csound" and fix its path accordingly. If it does not respond, you will be asked to change the path and perhaps the name of the Csound console (see image).
👉 Currently, the Csound orchestra file "0-default.orc" does not work on Linux. We're trying to fix this… In the settings of your projects, enter "BP2test.orc" as replacement, or select other files such as "new-vina.orc".
😀 Enjoy Bol Processor BP3 on Linux!
Restarting XAMPP after a crash
If you blow up the memory, for example with a quantization that is too low for the size of a piece played in realtime MIDI, the XAMPP server may freeze: the browser will refuse to display pages.
To restart XAMPP, go to the terminal and run the following script:
sudo /home/restart_xampp.sh
Updating to new versions
👉 If you update the "bp3" console, you should also update the PHP interface, as the two are linked.
(1) Update the "bp3" console: Delete the graphics-for-BP3.zip file if it exists in your Downloads folder. Download https://github.com/bolprocessor/bolprocessor/archive/graphics-for-BP3.zip Run the (superfast!) script: sudo /home/update_console.sh This script deletes the 'bp3' console to force a compilation of the new version.
(2) Update the PHP interface: Delete the php-frontend-master.zip file if it exists in your Downloads folder. Download https://github.com/bolprocessor/php-frontend/archive/master.zip Run the (superfast!) script: sudo /home/update_interface.sh Note that this script will preserve the "_settings.php" file (if it exists), which contains your project settings.
(3) Update the set of examples: this will only update the contents of the "ctests" folder. If you have created folders and files for your personal data, these will not be affected. However, if you have modified a sample file without changing its name, it will be reverted to its distribution version. Delete the bp3-ctests-main.zip file if it exists in your Downloads folder. Download https://github.com/bolprocessor/bp3-ctests/archive/main.zip Run the (superfast!) script: sudo /home/update_data.sh
👉 Please send your suggestions or modified files to our contact.
Relocating "bolprocessor"
The Bol Processor can be installed outside the "htdocs" folder created by XAMPP (on your boot drive). You might want it near related projects, or use extra space from an external hard drive. There may also be situations where creating files on the boot drive is restricted.
Fortunately, the process of relocating is very straightforward. Not all cases have been tested, but installation and update scripts are designed to handle redirections.
You should have already created a "bolprocessor" folder by running the installer. Now, drag it to the desired location and delete it from the "htdocs" folder.
Then, open a terminal and point it to the "htdocs" directory. You can type the instruction "ls -al" to see the contents of "htdocs", which is normally empty.
Let's say you've created an empty folder "bolprocessor" inside a folder called "MUSIC" on an external drive called "EXT". You first need to find the path to the external drive. Plug in the drive, then type "lsblk". Look for the device name (e.g., "/dev/sdb1") and its mount point, e.g. "/media/username/EXT", where "username" is your own user name.
The command to create the symbolic link would then be:
Make sure that the symbolic link you created points to the correct location: you will now see a "bolprocessor" icon in the "htdocs" folder. Double-click it, it should open the destination folder.
You can now safely run the update scripts and proceed to compile the 'bp' console. Don't try to run the installation scripts!
👉 Never change the names of the "bolprocessor" folder and symbolic link, otherwise the installation will fail.
The first time you run the Bol Processor, XAMPP may ask your permission to display files outside its "htdocs" folder. Please contact us if you're experiencing issues with this relocation!
You can also use symbolic links to relocate folders outside the "bolprocessor" folder, as explained here.
Uninstall the Bol Processor
Uninstalling the Bol Processor and all the data downloaded or created for its use, is very simple: delete the "htdocs/bolprocessor" folder, or the relocated "bolprocessor" folder and the symbolic link pointing to it.
A one-click notarized installer of Bol Processor BP3 is available. It is called "BolProcessorInstaller.pkg" and it can be downloaded from here (unique location).
The Bol Processor on MacOS is now a standalone application "BolProcessor.app" (based of PHP Desktop) that no longer requires an additional installation. The option to use this version is offered each time you run the installer. You will then be asked to select the Applications folder or any other location on your computer.
The installer (or the script) is used for both initial installation and updates. Each time you run it, it will download the latest versions of the BP3 console source files, the precompiled 'bp' console, the interface PHP files and the sample set contained in the 'ctests' folder. Data, grammars and scripts that you've created will not be deleted. However, if you have modified files in the 'ctests' folder, they will be reverted to the current distribution version.
Geeks may prefer an equivalent method using a script included in this package, see below.
Install MAMP or XAMPP
👉 Using the standalone application "BolProcessor.app" does not require MAMP or XAMPP. So you can jump directly to the Csound installation (in case you need it).
If you try to run the installer of Bol Processor, it will first check that a local Apache server (either MAMP or XAMPP) has been installed. Both are suitable since the Bol Processor interface contains exclusively HTML, PHP and JavaScript code. No database is required.
As of January 2025, it appears that the free version of MAMP has a script execution time of 30 seconds that cannot be overridden by the PHP scripts. If this limitation is confirmed, we will recommend the use of XAMPP (free) or MAMP PRO (for a charge).
Your Mac may refuse to run the XAMPP installer because it is from an "unknown developer". You can override this by allowing the application in the Privacy & Security section of the Mac's System Settings. Unpacking the files takes several minutes, so be patient and wait for it to finish!
👉Don't try the virtual machine version of XAMPP! It won't work on Macs with M1 chips (and above). Use the native installer.
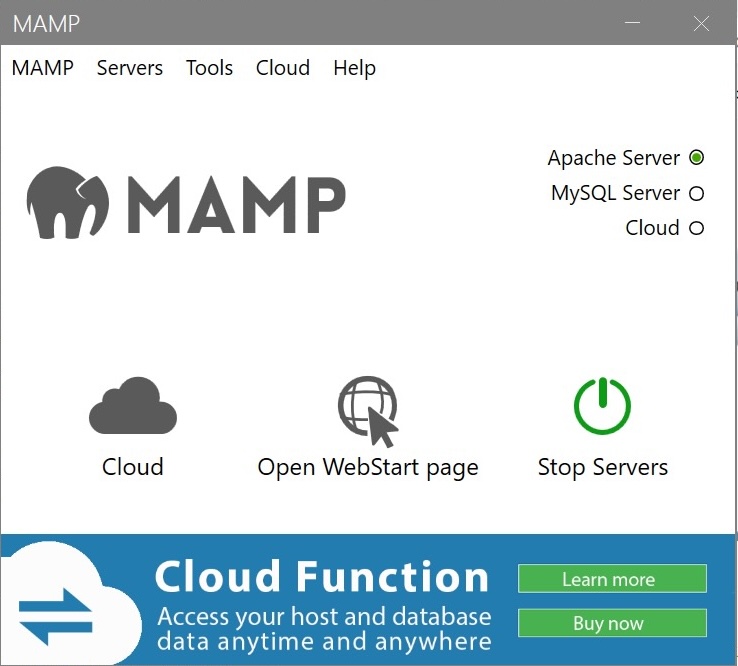
Free MAMP on MacOS. Note that the top right icon indicates that the Apache server is running.
if you choose the (free) MAMP version, both MAMP and (commercial) MAMP PRO will be installed. The interface will occasionally prompt you to "upgrade" to MAMP PRO (see picture), although you don't need it for the Bol Processor!
Note that after downloading MAMP, you will find MAMP PRO in the Applications folder, whereas MAMP (free) is located in Applications/MAMP. Also note that this version of MAMP runs on port "8888" by default, as we will see below.
For MAMP, the "htdocs" folder is in Applications/MAMP. For XAMPP, it is in Applications/XAMPP/xamppfiles. The installer will find it in both cases.
👉You will not be able to run both MAMP/MAMP PRO and XAMPP Apache servers at the same time if they use the same ports. This wouldn't be a good idea anyway…
Start Apache at boot time
If you want Apache to start automatically when you start your computer, this process is easy with MAMP: check Login items in the system settings.
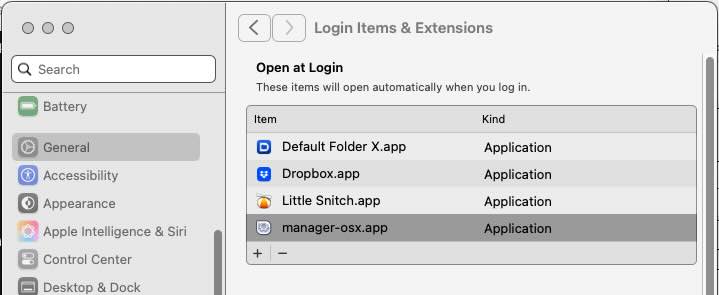
For XAMPP, things are a bit more complicated.
For geeks:You have the offer to create a startup script but is not entirely satisfactory with the current version (8.2.4). It allows XAMPP to restart Apache at boot time and PHP pages are displayed correctly. However, when real-time MIDI is used, MIDIClientCreate() returns an error.
Until this problem is fixed, the easiest way is to find the Application Manager manager-osx.app (in XAMPP/xamppfiles) and add it to the Login Items of the General settings of your MacOS system:
You can also place an alias of "manager-osx.app" on the desktop and click on it at startup if you intend to run the Bol Processor.
MAMP PRO
Below are instructions for (rich) people running MAMP PRO.
The MAMP PRO main page on MacOS (version 5.7)
Launch MAMP PRO from the Applications folder.
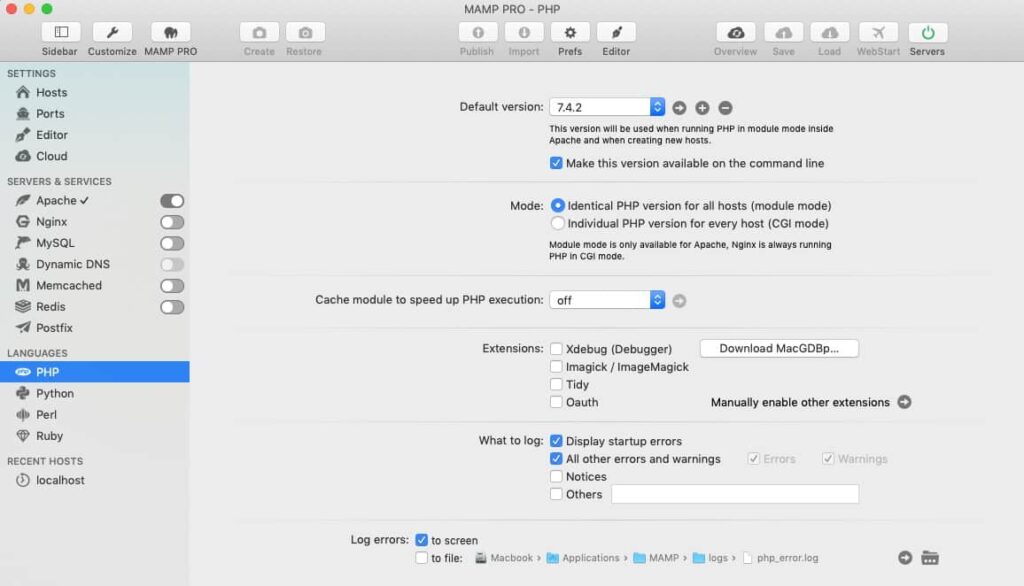
In the MAMP main window, click the Apache Enable button (see image). No need for MySQL.
The image shows the default settings for PHP, which is started with Apache.
In case of trouble, check the settings for ports (see image) and of hosts (general and Apache).
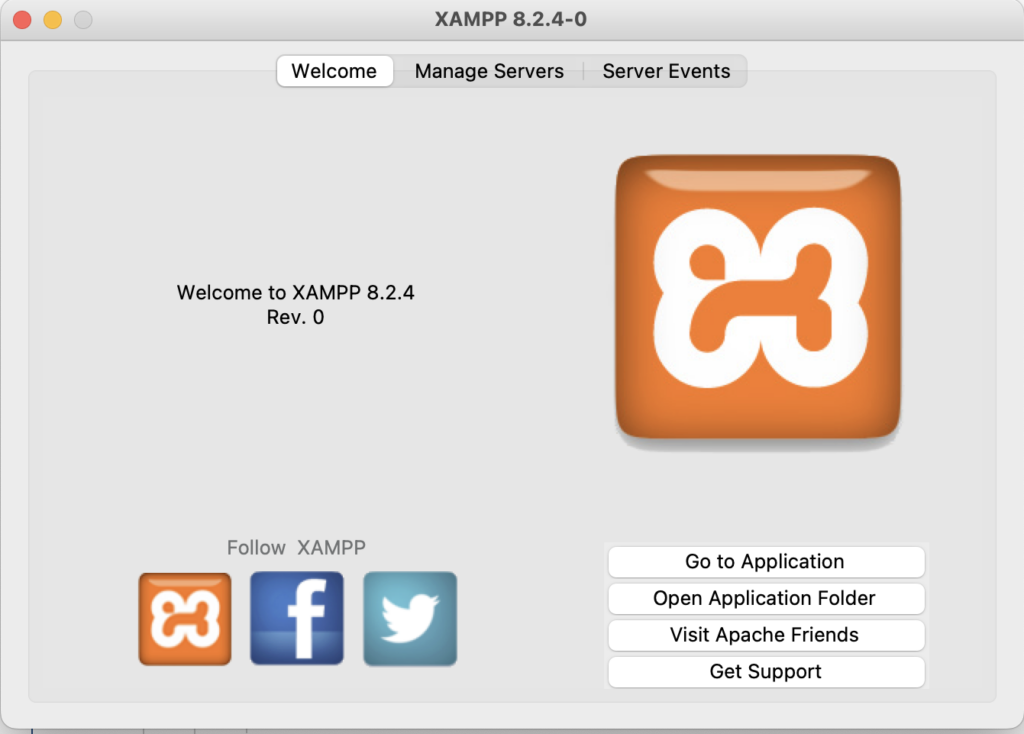
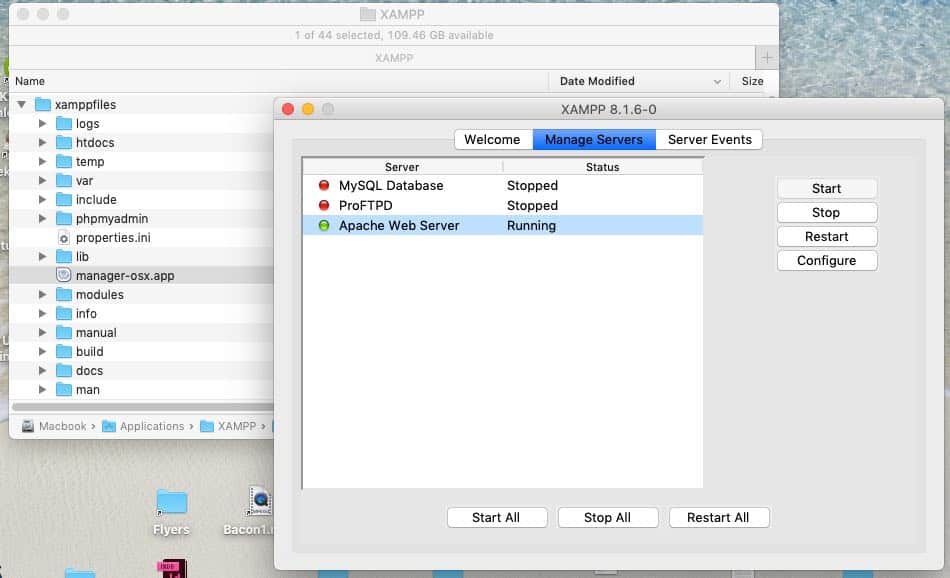
XAMPP
Open the XAMPP folder in the Applications folder and launch manager-osx.app as shown below.
The XAMPP main page will appear. If you click on the Manage Servers tab and select Apache Web Server, then Configure, you can make sure that the server is running on port "80". This can be changed (e.g. to "81") if it creates a conflict.
Then click the Start button. If there is no conflict with the ports, Apache will show up as "running":
The XAMPP folder (in the Applications folder on a Mac) and the XAMPP main page
Once Apache is running, you can click on the Welcome tag and the Go to Application button. This should display a (local) page about XAMPP in the path http://localhost/dashboard. Both the dashboard and (later) bolprocessor folders will be located in the Applications/XAMPP/xamppfiles/htdocs folder.
Install the Bol Processor
After installing XAMPP or MAMP, you can run the installer "BolProcessorInstaller.pkg" (or the "install_bolprocessor.sh" script). Both are equivalent.
By default, all Bol Processor program, documentation and data files will be created in a folder called "bolprocessor" and will be contained in the "htdocs" folder created by XAMPP or MAMP — in other words, on your startup disk. This is not a problem as the whole set does not take up much space, typically less than 60 Mb when installed, and the Bol Processor data is basically pure text.
However, you may wish to install the "bolprocessor" folder to a different location, including an external device. In this case, follow the instructions for Relocating "bolprocessor" before running the installer or the script.
Using the installer
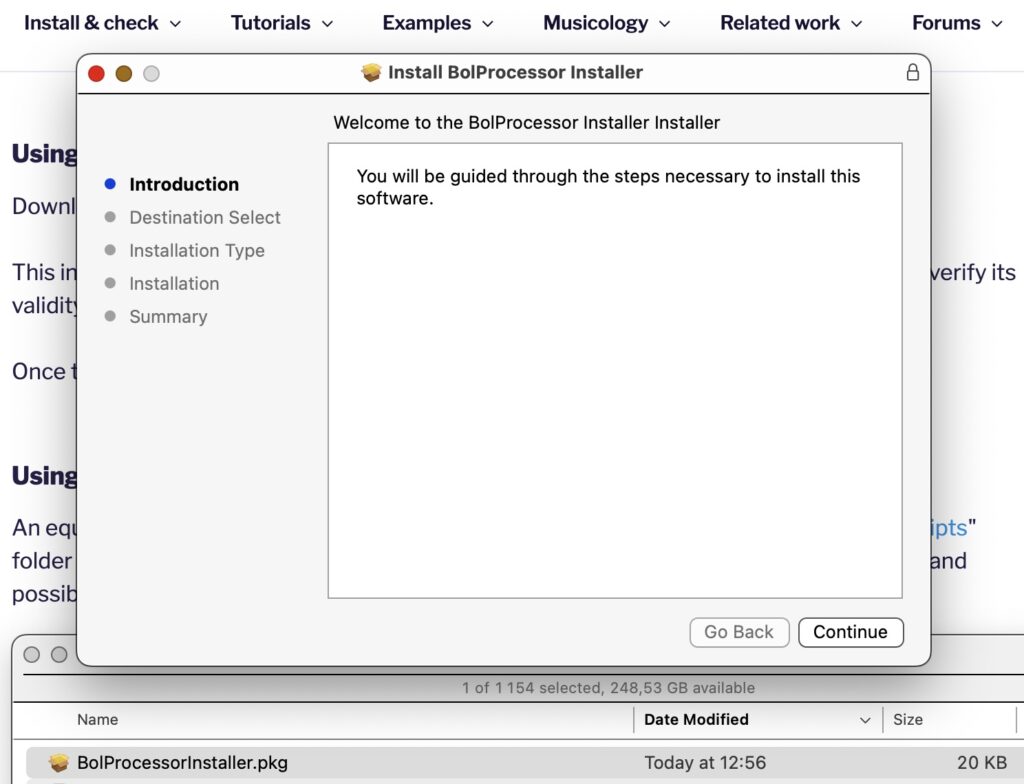
Download "BolProcessorInstaller.pkg" from here and double-click it.
👉 If you have previously downloaded an older version of the installer, your browser may be delivering the old version instead of the latest. The safest thing to do is to check the size of "BolProcessorInstaller.pkg" (reed below the Security section). If necessary, use a different browser for the download.
This installer has been notarized, which means it contains information that allows Apple to certify its validity. The only changes you will have to confirm are usual software installation procedures on your Mac.
If you have chosen the option of the standalone application called "BolProcessor.app", the installation is now complete. You can proceed to install Csound if you need it. Otherwise, follow the guided tour on page Bol Processor ‘BP3’ and its PHP interface.
For geeks using XAMPP or MAMP:The installer sets up user/group parameters in the "bolprocessor" folder: "daemon:admin" if XAMPP is the Apache server. If MAMP is used, the "<user_id>:admin" setting is retained.
An equivalent method is to run the "install_bolprocessor.sh" script found in the "macos-scripts" folder downloaded here. This makes it possible to understand each step of the installation and possibly suggest improvements.
After downloading "macos-scripts.zip", open the Terminal and type:
cd Downloads unzip -qo macos-scripts.zip cd macos-scripts sudo ./install_bolprocessor.sh
Installation issues
There are currently no known installation issues with the standalone "BolProcessor.app" application. A minor problem that we hope to resolve soon is that on rare occasions a page may need to be reloaded to display.
If the installer (or the script) does not find a "htdocs" folder created by XAMPP or MAMP, it will suggest using the standalone "BolProcessor.app" application.
👉 The installer will create or feed a "bolprocessor" folder in the "htdocs" folder used by XAMPP (first choice) or MAMP (second choice). If you have used XAMPP in the past and want to switch to MAMP, you will need to rename the "XAMPP" or "xamppfiles" folder before running the installer.
There is a Go to Application button on XAMPP manager and a WebStart button on MAMP (free) which will display a page confirming that the Apache server is running.
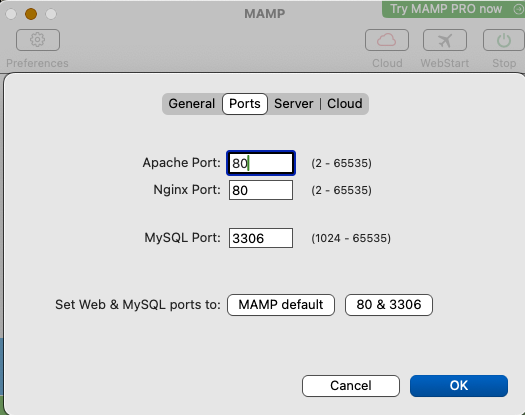
MAMP setting of the port
Now, assuming that the installation was successful, and the Apache server is running, start XAMPP or MAMP and point your browser to localhost/bolprocessor/php/ or (if it doesn't work) to localhost:8888/bolprocessor/php/.
One of these will display the home page of the Bol Processor. The default port used by the free MAMP is "8888", but you can change it to "80" in MAMP settings (see picture), so that the ":8888" option is no longer required.
Compile the 'bp' console
👉 From 23 February 2025, the compiled 'bp' console will be installed (or updated) by the install script. So normally this step is no longer needed, except for geeks who wish to modify the source files in the "bolprocessor/source/BP3" folder.
If you see this frame in the image at the top right of the page, your life will be easy! All you have to do is click on the link to compile the console, which will take a minute or two.
👉 It is very unlikely that the compilation will fail. If it ever happens, please contact us!
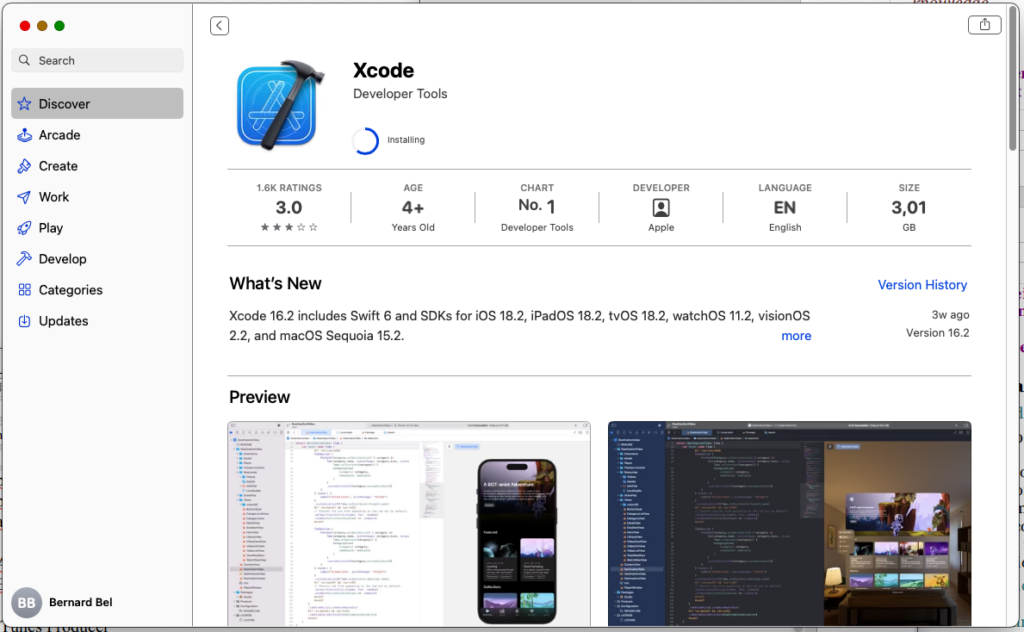
Installing Xcode via the Mac App store. No charge!
If you don't see the link to compile, and instead a mention that 'gcc' is not responding, you may need to install the Xcode toolkit on your machine (link to App Store).
Install and launch Xcode (free) to enable the compilation. Click "Cancel" when Xcode asks you to "create a project", go back to the Bol Processor page and reload it.
Now, you should see the compilation link.
👉 There are other methods of installing 'gcc'. Fans of Terminal commands can simply try the command:
brew install gcc
Install Csound
Csound is not required to run the Bol Processor, as you can work with MIDI files and real-time MIDI, including microtonal corrections. However, it will give you access to a different approach to sound synthesis.
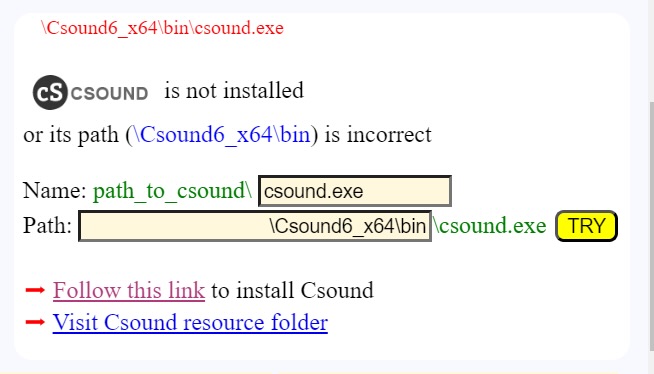
A frame asking for a correction of the path to Csound
The BP3 interface should be able to figure out the location of "csound" and fix its path accordingly. If it does not respond, you will be asked to change the path and perhaps the name of the Csound console (see image).
😀 Now, the Bol Processor is fully operational! You can try examples contained in the 'ctests' folder, or follow the guided tour on page Bol Processor ‘BP3’ and its PHP interface.
Updating to new versions
To update the Bol Processor console, its PHP interface and examples (the contents of the "ctests" folder), simplyrerun "BolProcessorInstaller.pkg". Using the latest version is safe!
The installer will download and install current versions of the software and data.
Updating will not modify or delete any data you have created in the "ctests" folder or outside it. However, if you have modified a sample file without changing its name, it will be reverted to its distribution version.
The installer will also preserve the "_settings.php" file (if it exists), which contains your project settings.
Security
You are right to be concerned about security. Can you be sure that you have downloaded the correct (and latest) version of "BolProcessorInstaller.pkg"? Normally yes, this installer is safe because it has been notarized.
The size of the "BolProcessorInstaller.pkg" file is exactly 21651 bytes and its MD5 is bcff82a7501a861690a04e2e91007a29. You can calculate the MD5 checksum on this page. These numbers will indeed be subject to change with the release of new versions of the installer. Current version: 3 March 2025.
Geeks may want to customise it for their own use. Just download this folder which contains the script files (install_bolprocessor.sh and postinstall) along with instructions on how the installer has been built.
For readers not conversant with Unix shell scripts, the following is a description of the process in human language:
Check that an Apache server MAMP or XAMPP is installed by finding either MAMP/htdocs or xampp/htdocs on the computer (not case-sensitive). If it is not found, exit with the warning that either MAMP or XAMPP should be installed.
Download the latest distribution files from GitHub: https://github.com/bolprocessor/bolprocessor/archive/graphics-for-BP3.zip https://github.com/bolprocessor/php-frontend/archive/master.zip https://github.com/bolprocessor/bp3-ctests/archive/main.zip
Unzip these three files. They create folders with names: bolprocessor-graphics-for-BP3 php-frontend-master bp3-ctests-main
Create a folder named "bolprocessor" (if it does not yet exist) inside the "htdocs" folder of the Apache server
Copy bolprocessor-graphics-for-BP3/source to bolprocessor/ If there is already a "source" folder, delete it
Copy bolprocessor-graphics-for-BP3/Makefile to bolprocessor/ Copy bolprocessor-graphics-for-BP3/BP3_help.txt to bolprocessor/ Copy bolprocessor-graphics-for-BP3/Credits.txt to bolprocessor/ Copy bolprocessor-graphics-for-BP3/BP3-To-Do.txt to bolprocessor/ Copy bolprocessor-graphics-for-BP3/License.txt to bolprocessor/ Copy bolprocessor-graphics-for-BP3/ReadMe.txt to bolprocessor/
Copy bolprocessor/php/_settings.php to bolprocessor/ (if it exists)
Copy php-frontend-master/php to bolprocessor/ If there is already a "php" folder, delete it
Copy bolprocessor/_settings.php to bolprocessor/php/ (if it exists)
Create a folder bolprocessor/csound_resources if it does not yet exist
Copy the content of php-frontend-master/csound_resources to bolprocessor/csound_resources Files that already exist should be replaced with their updated versions
Create a folder htdocs/bolprocessor/ctests if it does not yet exist
Copy the content of bp3-ctests-main to bolprocessor/ctests Files that already exist should be replaced with their updated versions
Delete the temporary download directory
Set permissions of the bolprocessor folder recursively to "775", and owner/group to <your_id>:admin if MAMP is used, or daemon:admin if XAMPP is used.
➡ There is no security risk in setting "775" permissions, as the MAMP or XAMPP Apache server will be running on your private computer. The Bol Processor never creates/modifies files outside of its "bolprocessor" folder.
Delete bolprocessor/bp if it exists and replace it with the current 'bp' console.
Relocating "bolprocessor"
👉 Apparently, relocated installations do not work with XAMPP after a reboot, unless the "BolProcessorInstaller.pkg" installer is run again. We're trying to fix this problem. In the meantime, you can at least relocate your data using symbolic links.
The Bol Processor can be installed outside the "htdocs" folder created by MAMP or XAMPP (on your boot drive). You might want it near related projects, or use extra space from an external hard drive. There may also be situations where creating files on the boot drive is restricted to the super admin.
Fortunately, the process of relocating is very simple.
If you have already created a "bolprocessor" folder by running the installer, drag it to the desired location and delete it from the "htdocs" folder. If not, create an empty "bolprocessor" folder in the desired location.
Then, open the Terminal (in the Applications folder) and point it to the "htdocs" directory. For those unfamiliar with Unix commands, you will need to type "cd " (followed by a space) and drag "htdocs" to the end of this command, then press "return". You can type the instruction "ls -al" to see the contents of "htdocs", which is normally empty.
Let's say you've created an empty folder "bolprocessor" inside a folder called "MUSIC" on an external drive called "EXT". The instruction creating the symbolic link is:
Make sure that the symbolic link you created points to the correct location: you will now see a "bolprocessor" icon with a small arrow in the bottom left corner. Double-click it, it should open the destination folder.
👉 You may wonder why symbolic links are used instead of MacOS aliases, which do not require the use of the Terminal. The reason is that the Apache servers don't accept alias redirections.
👉 Never change the names of the "bolprocessor" folder and symbolic link, otherwise the installation will fail.
The first time you run the Bol Processor, MAMP or XAMPP may ask your permission to display files outside its "htdocs" folder. Please contact us if you're experiencing issues with this relocation!
If you're not afraid of symbolic links, you can use the same technique to relocate some data files outside the "bolprocessor" folder, for example to a location in your Dropbox (including shared folders), as explained here.
Uninstall the Bol Processor
Uninstalling the Bol Processor, and all the data downloaded or created for its use, is very simple: delete the "bolprocessor" folder, and the "bolprocessor" symbolic link if you have created it.
A one-click installer of Bol Processor BP3 is available. It is called "BolProcessorInstaller.exe" and it can be downloaded here (unique location).
This installer is used for both initial installation and updates. Each time you run it, it will download the latest versions of the BP3 console, including its source files, the interface PHP files, and the sample set contained in the 'ctests' folder. Data, grammars and scripts that you've created will not be deleted. However, if you have modified files in the 'ctests' folder, they will be reverted to the distribution version.
This installation is checked with Windows 10 running on an HP Intel Core i5-6200U (64-bit, 8 Gb RAM) and MAMP (free) running PHP 8.3.1. It should work fine with Windows 11, please check it and report!
👉 26 January 2025: The installer "BolProcessorInstaller.exe" is now certified. It should not display a "malicious software" warning. Once opened, before starting the installation, it should mention the name of its creator: "Bernard Bel". Contact us if it doesn't work on your computer!
First install MAMP or XAMPP
The (free) MAMP device running on Windows 10 (July 2024). Note that Apache Server is active. You can click "Open WebStart Page" to check that it is effective.
If you try to run the installer (see below), it will first check that a local Apache server (MAMP or XAMPP) has been installed. Both are suitable since the Bol Processor interface contains exclusively HTML, PHP and JavaScript code. No database is required.
if you choose the (free) MAMP version, both MAMP and MAMP PRO will be installed, and the interface will occasionally invite you to "upgrade" to MAMP PRO. But you don't need it for the Bol Processor!
For MAMP on Windows, the "htdocs" folder is in "C:\MAMP". For XAMPP on Windows, the "htdocs" folder is in "C:\xampp". (To be verified)
If you want Apache to start automatically when you start your computer, this process is easy with MAMP, but a bit more complex with XAMPP: try this method.
Create the 'bp.exe' console
After installing MAMP or XAMPP, run the installer "BolProcessorInstaller.exe" downloaded here.
👉 The installer creates a "bolprocessor" folder in the "htdocs" folder used by MAMP or XAMPP. Make sure that there is only one such folder on your machine, notably if you tried both MAMP and XAMPP in the past. It is safe to rename any unused "htdocs" folder before running the installer.
If you plan to install the "bolprocessor" folder outside the "htdocs" folder, follow the instructions in Relocating "bolprocessor"before running the installer.
As "BolProcessorInstaller.exe" is not yet certified, you may receive a warning that it is from an "unknown source". Click on the option to ignore the warning. If you don't feel confident about doing this, please read the section on Security below.
All steps of the installation are displayed to ensure that they are successful. At the end you'll be asked to press a key.
Now start MAMP or XAMPP. There is an Open WebStart Page button on MAMP (free) which will display a page confirming that the Apache server is running. Probably you will find a Go to Application button on XAMPP manager.
Point your browser at localhost/bolprocessor/php/. This will display the home page of Bol Processor BP3. Otherwise, check that MAMP or XAMPP is set to use port #80.
If you see this image at the top right of the page, the console is ready. Click on the lamp if you prefer to use the light mode for the interface.
You can ignore the next section. 😀
Compile the 'bp.exe' console (if necessary)
The Windows installation of Bol Processor includes the pre-compiled console (named 'bp.exe' ). If, some some reason, the console is not responding, or if you modified its source code (in the source/BP3 directory), you may need to recompile it.
If you see this image at the top right of the page, your life will be easy!
All you have to do is click on the link to compile the console, which will take a minute or two.
If the frame says that 'gcc' is not responding (see picture) you need to install MinGW. This is the main drawback of Windows: its default installation does not handle 'gcc' (the standard C compiler). You need 'gcc' to compile the Bol Processor console, and perhaps other applications to come. So, install MinGW, carefully following instructions on this page. It is simple, but you shouldn't miss a step!
Once 'gcc' is responding, reload the Bol Processor home page and click on the link to compile the console.
Install Csound
Csound is not required to run the Bol Processor, as you can work with MIDI files and real-time MIDI. However, it will give you access to a different approach to sound synthesis.
A frame asking you to correct the path to Csound. This is the default path for Windows 10, by the way. We tricked the interface into saying it was wrong!
The BP3 interface will be able to figure out the location of "csound.exe" and fix its path accordingly. If it does not respond, you will be asked to change the path and perhaps the name of the Csound console (see image). Once it works after a modification, please contact us so that we can update the default paths and names of Csound in your installation of Windows.
To update the Bol Processor console, its PHP interface and examples (the contents of the "ctests" folder), simply rerun the installer. It will download and install the latest versions of the software and data. It will also delete and replace the precompiled "bp.exe" console.
The installer will not modify or delete any data you have created in the "ctests" folder or outside it. However, if you have modified a sample file without changing its name, it will be reverted to its distribution version.
The installer will also preserve the "_settings.php" file (if it exists), which contains your project settings.
Security
You are right to be concerned about security. Can you be sure that you have downloaded the correct version of "BolProcessorInstaller.exe"? As this executable is certified, there is no known risk of malicious modification.
The size of this file is exactly 1811159 bytes and its MD5 is 34e937fe36ce022f961a22560d5f82e4. You can calculate the MD5 on this page. These numbers will indeed be subject to change with the release of new versions of the installer. The current version is dated 14 July 2025.
You may also want to know all the details of how it works. Geeks may want to customise it for their own use. Just download this folder which contains the source files (installer.ps1 and setup.iss) along with a summary of how to build the installer.
For readers not conversant with WindowsPowerShell, the following is a description of the process in human language:
Check that an Apache server MAMP or XAMPP is installed by finding either MAMP\htdocs or xampp\htdocs on the computer (not case-sensitive). If it is not found, exit with the warning that either MAMP or XAMPP should be installed.
Download the latest distribution files from GitHub: https://github.com/bolprocessor/bolprocessor/archive/graphics-for-BP3.zip https://github.com/bolprocessor/php-frontend/archive/master.zip https://github.com/bolprocessor/bp3-ctests/archive/main.zip
Unzip these three files. They create folders with names: bolprocessor-graphics-for-BP3 php-frontend-master bp3-ctests-main
Create a folder named "bolprocessor" (if it does not yet exist) inside the "htdocs" folder of the Apache server
Copy bolprocessor-graphics-for-BP3/source to htdocs/bolprocessor/ If there is already a "source" folder, delete it
Copy bolprocessor-graphics-for-BP3/Makefile to htdocs/bolprocessor/ Copy bolprocessor-graphics-for-BP3/BP2_help.txt to htdocs/bolprocessor/ Copy bolprocessor-graphics-for-BP3/Credits.txt to htdocs/bolprocessor/ Copy bolprocessor-graphics-for-BP3/BP3-To-Do.txt to htdocs/bolprocessor/ Copy bolprocessor-graphics-for-BP3/License.txt to htdocs/bolprocessor/ Copy bolprocessor-graphics-for-BP3/ReadMe.txt to htdocs/bolprocessor/
Copy bolprocessor/php/_settings.php to bolprocessor/ (if it exists)
Copy php-frontend-master/php to htdocs/bolprocessor/ If there is already a "php" folder, delete it
Copy bolprocessor/_settings.php to bolprocessor/php/ (if it exists)
Create a folder htdocs/bolprocessor/csound_resources if it does not yet exist
Copy the content of php-frontend-master/csound_resources to htdocs/bolprocessor/csound_resources Files that already exist should be replaced with their updated versions
Create a folder htdocs/bolprocessor/ctests if it does not yet exist
Copy the content of bp3-ctests-main to htdocs/bolprocessor/ctests Files that already exist should be replaced with their updated versions
Delete the temporary download directory
Replace htdocs/bolprocessor/bp.exe with the updated version.
Relocating "bolprocessor"
The Bol Processor can be installed outside the "htdocs" folder created by MAMP or XAMPP (on your boot drive). You might want it near related projects, or use extra space from an external hard drive. There may also be situations where creating files on the boot drive is restricted.
Fortunately, the process of relocating is very simple.
If you have already created a "bolprocessor" folder by running the installer, copy it to the desired location and delete it from the "htdocs" folder. If not, create an empty "bolprocessor" folder in the desired location.
Let's say you've created an empty folder called "bolprocessor" inside a folder called "MUSIC" on an external drive labelled "D", and MAMP is installed on drive "C". Right-click the start icon at the bottom left of the screen, and select Windows PowerShell (admin). Then type the following command to create a symbolic link — in fact a junction (/J instead of /D):
If you are using XAMPP, replace "\MAMP\" with "\xampp\".
Make sure that the symbolic link you created points to the correct location: you will now see a "bolprocessor" icon in the "htdocs" folder. Double-click it, it should open the destination folder.
You can now safely run the installer. Updates to new versions will be the same way.
👉 Never change the names of the "bolprocessor" folder and symbolic link, otherwise the installation will fail.
The first time you run the Bol Processor, MAMP or XAMPP may ask your permission to display files outside its "htdocs" folder. Please contact us if you're experiencing issues with this relocation!
You can use the same technique to relocate some data files outside the "bolprocessor" folder, for example to a location shared by Dropbox.
You can also use symbolic links to relocate folders outside the "bolprocessor" folder, as explained here.
Uninstall the Bol Processor
Uninstalling the Bol Processor and all the data downloaded or created for its use, is very simple: delete the "bolprocessor" folder and the "htdocs\bolprocessor" symbolic link, if you have created one.
If you need to start XAMPP automatically after a reboot, here's a basic way to do it using systemd, which is the init system for most Linux distributions:
1) Create a systemd service file
Open a text editor to create a new file, for example:
sudo nano /etc/systemd/system/xampp.service
Add the following content to the file:
[Unit] Description=XAMPP Control Panel After=network.target
In May 2024, the Bol Processor BP3 acquired the ability to manage the input and output of MIDI events. This allows it to "communicate" in real time with external MIDI devices (keyboards, synthesizers) and even with other instances of BP3 running on the same machine.
For geeks and programmers: This feature had already been implemented in the earlier (MacOS only) version called 'BP2'. However, the implementation in a C language 'console' to work in MacOS, Linux and Windows environments was more technical. In addition, the concept of "real time" in the current MIDI setup is different from the previous one using Opcode Music System.
The following examples will work the same in MacOS, Windows and Linux. They have been tested on a recent PowerBook running MacOS (Sonoma) with 16 Gb RAM, and an HP Intel Core computer with 8 Gb RAM running Windows 10 (64-bit) and LinuxLite 7.0 (in Ubuntu). Memory size can become critical if many MIDI devices or virtual ports are connected.
Using microtonal scales is now possible in real-time MIDI. Read the Check MIDI microtonality page for details.
Setting up the MIDI environment
Let us assume that you have successfully downloaded, installed and compiled the Bol processor BP3, as described on the page Bol Processor ‘BP3’ and its PHP interface.
In Bol Processor jargon, a 'project' is either a grammar (with a '-gr' prefix) or a set of data (with a '-da' prefix). So, create or load a simple project, e.g. "-da.acceleration" which can be found in the "ctests" folder (download it here).
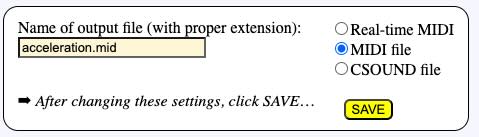
An output
By default, a project is set up to create MIDI files, as shown on the selector (see picture). Make sure your project is working! Then select Real-time MIDI and click SAVE format.
The selector will now display a different image, as shown below:
By default, the MIDI output used for sending events is numbered '0' — and the MIDI input used for receiving events will be numbered '1'. This is a common situation. In MacOS and Windows, these numbers are taken as 'ports'. In Linux they are considered as 'clients', each 'client' having its own 'ports', so certainly numbers '0' and '1' won't work… Never mind this issue, BP3 will take care of it when scanning real or virtual devices and trying to connect. Read more below.
We cannot rely on "port numbers" alone because they change when we turn on and off MIDI devices connected to the computer. In Linux, the client number is more specific to a MIDI device. In fact, the only reliable identification is its name, which is empty by default: the next field at the right of the input/output number.
Let us check the MIDI output. Windows does this automatically. The good news is that Windows 10 (and presumably later versions) comes with a built-in MIDI device called Microsoft GS Wavetable Synth. The Bol Processor will automatically detect it and connect to it if no other device is connected to the system.
Linux also connects, by default, the output to a virtual device whose client number is '0', but it won't produce any sound in the basic installation of Ubuntu. So, to try real-time MIDI on Linux, you need to connect an external MIDI device via its USB/MIDI interface, or to install a software synthesizer. Read more below.
Clicking Add an input will create fields for you to select an input device. We'll use this later.
To connect external MIDI input/output devices to Windows, you may need to install an environment similar to IAC on MacOS. Read details below. However, most tests shown on this page can be performed on Windows without any additional installation.
The following paragraphs are for MacOS users. Windows and Linux users can happily jump to the next section.
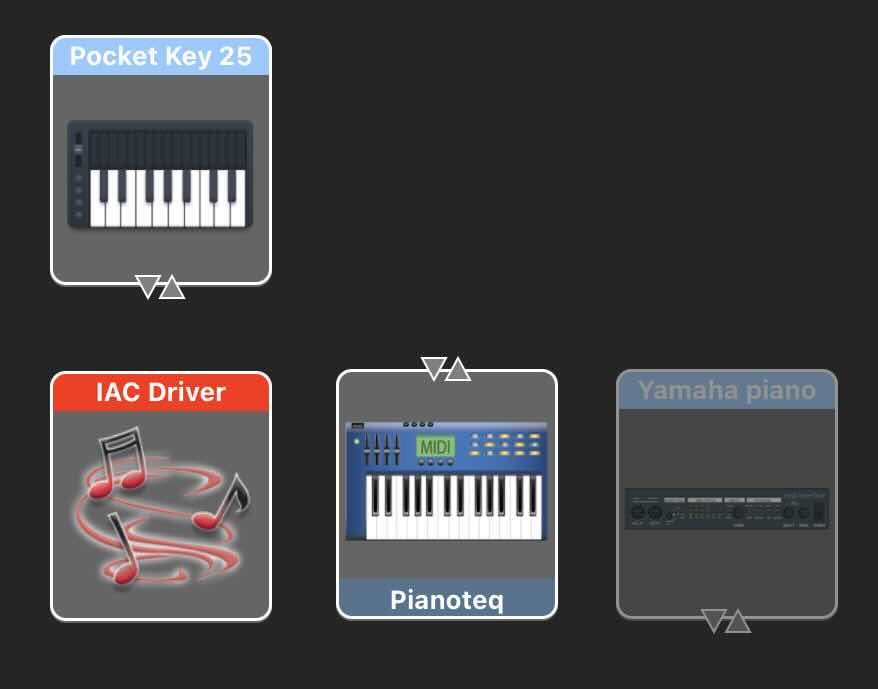
Turn on a MIDI device (synthesizer, piano, etc.) connected to the computer. On my personal Mac, I usually use the Pianoteq synthesiser, which produces a physical model synthesis of various keyboard instruments. It communicates with BP3 via a device called the Inter-Application Communication (IAC) architecture — read this if you need details.
The IAC driver is installed by default on recent MacOS systems. (It is a part of the CoreMIDI framework provided by Apple.) It allows you to create virtual MIDI ports that enable MIDI applications to communicate internally within the same machine. Equivalent devices exist in the Linux and Windows environments, see below.
The IAC also communicates with external MIDI devices via the USB ports, BlueTooth and possibly more network protocols. We'll try it later.
To set up the IAC, run the Audio MIDI Setup application (in the Utilities folder). Ask it to show "MIDI Studio". On my personal computer, it looks like this: the IAC driver, the Pianoteq synthesiser, a Pocket Key 15 keyboard connected to a USB port, and a Yamaha piano connected by standard MIDI cables and a USB MIDI interface. The Yamaha piano appears grey because it is switched off.
On active MIDI devices you will see triangles indicating input/output ports. These are used to connect devices directly by drawing a 'cable' to connect them. We don't need to use these 'connectors' as BP3 communicates via the IAC MIDI ports.
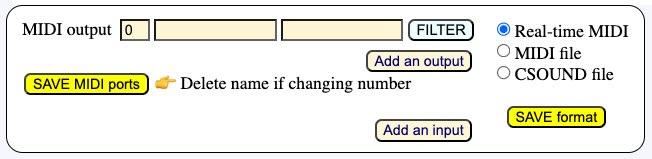
Check output options
(MacOS, Linux and Windows)
The easiest way to proceed now is to run any project in the Real-time MIDI mode, and see if sounds are produced… Whatever the result, at the end of the (potentially silent) performance, you will see a Show all … messages button along with a blinking red signal "=> 1 warning". Click on the button to read detailed explanations of the failure (or success):
🎹 Setting up MIDI system MIDI output = 0: “Bus 1” 👉 the number of your choice
MIDI settings saved to ../temp_bolprocessor/trace_974dd9ab22_-gr.tryTimePatterns_midiport 🎹 Name(s) of MIDI input or/and output changed and will be updated when saving the page of your project
(For MacOS users)
This all makes sense given the Audio MIDI Setup shown above. The Bol Processor scanned all output (and input) MIDI ports. Given port '0' as an output by default, it assigned it to "Bus 1" which the 'port' set up in IAC.
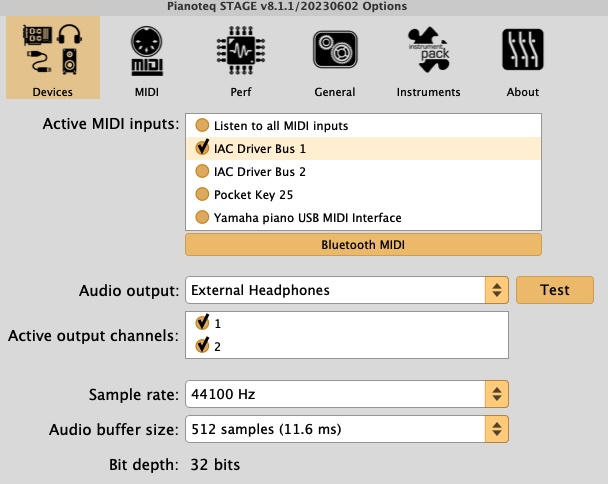
If your synthesiser happens to be connected to "Bus 1", you will hear sounds and the problem is solved. Let us suppose that you are running Pianoteq and hear nothing. Open the settings of Pianoteq and select "Devices". All you have to do is check "IAC Driver Bus 1". You might also check other inputs, including Pocket Key 25 if you want to connect your small keyboard directly to Pianoteq, but these are extra procedures.
Opening Pianoteq settings informed us that it is communicating with IAC, and it suggested to use a IAC 'Bus' for this communication. The 'Bus 1' port is technically called a virtual port.
Screenshot
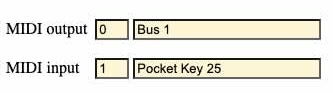
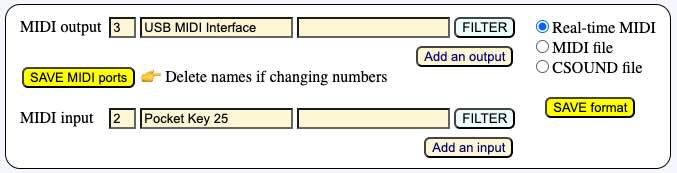
All you need to do to ensure that the connection remains correct when more devices are switched on/off and MIDI port numbers change. The only reliable way is to write the name "Bus 1" as the MIDI output. You can also write "Pocket Key 25" (or whatever is detected as your input MIDI device) to the MIDI input, as we will use it later. Note that MIDI port numbers are now irrelevant, as names take precedence. BP3 will correct them automatically.
Click the SAVE MIDI ports button to store this setting. Clicking on the SAVE format does the same thing, so don't worry about confusing buttons!
To the right of the MIDI port name is an empty field where you can enter a comment. For example, write "Pianoteq synth" to the right of "Bus 1".
Let us now switch on a Yamaha piano which is connected via a USB MIDI interface. The interface I use has a green light that indicates it has power. If the piano is actually communicating with it, we should see a flashing red light. In MacOS, sometimes it is necessary to restart the computer after switching on the piano… But in Windows and Linux the red light flashes immediately.
As soon as the red light flashes, open the Pianoteq settings. Great! We can now see that the Yamaha piano is recognised and connected to the IAC.
The easiest way to connect the Yamaha piano to BP3 is to click PLAY. Whatever happens, we'll get a warning and see the following diagnosis:
🎹 Setting up MacOS MIDI system MIDI output = 0: “Bus 1” 👉 the name of your choice Trying to assign ports to 1 input(s) without names but possibly with numbers MIDI input = 1: “Bus 2” 👉 the number of your choice MIDI input 1 makes BP3 interactive
MIDI settings saved to ../temp_bolprocessor/trace_974dd9ab22_-gr.tryTimePatterns_midiport 🎹 Name(s) of MIDI input or/and output changed and will be updated when saving the page of your project
The MIDI input identified as "Pocket Key 25" is correctly connecting to port '2'. But the Yamaha piano is identified as "USB MIDI Interface". This is the name we need to copy to the MIDI output, then SAVE MIDI ports and PLAY. Another option is to leave the name empty and enter the MIDI output number '3'.
We hear the output on the Yamaha piano, although port numbers were incorrect on the interface. The inconsistency is resolved by the MIDI driver selecting ports by name in order of priority. Port numbers (and names) are updated as soon as you save or reload the project (data or grammar). Then you get:
Why does the name "Yamaha piano" appear in Pianoteq settings, but not in the MIDI ports scanned by BP3? This is a mystery that expert users of a MIDI studio could probably solve… For the time being, just write "Yamaha piano" in the comment field at the right of "USB MIDI interface".
The Pause and Continue buttons
During real-time playback, Pause and Continue buttons are displayed. These are self-explanatory. Clicking the Continue button will resume the performance with the exact timing.
These buttons affect all instances of BP3 that are playing together, if any (see below).
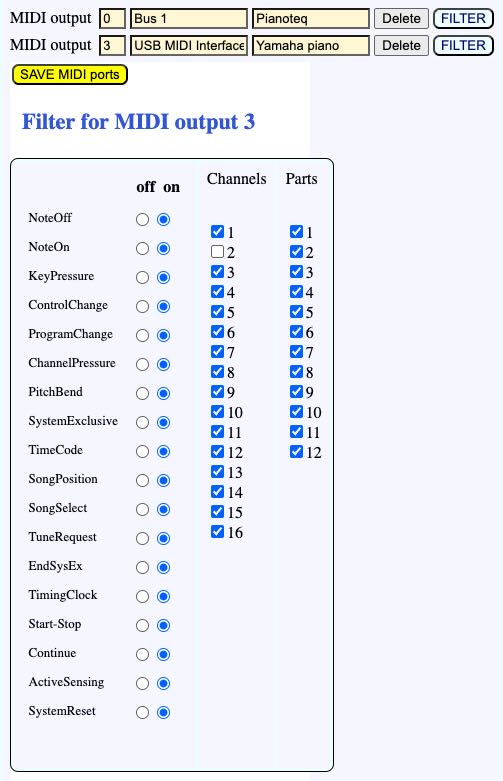
The _part() command
It is possible to send parts of a Bol Processor score to separate outputs. Parts are identified by the "_part(x)" command in which 'x' is an integer in range 1..30. We will be able to handle more than 30 parts if it turns out to be necessary.
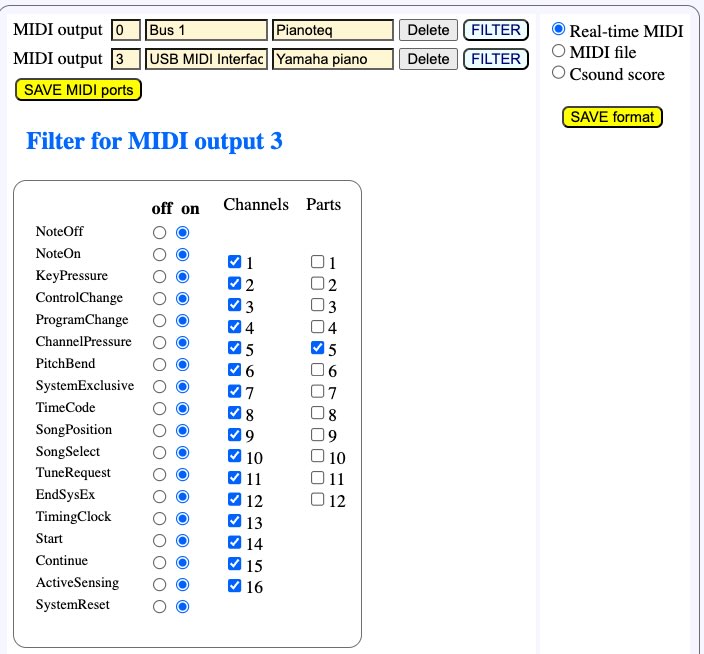
The "_part(x)" command directs MIDI messages to a specific MIDI output, which in most cases will be an instrument. The image on the side shows the mapping of port #3 (USB MIDI interface) to part #2, as set up in its filter.
By default, MIDI outputs "hear" all 30 parts, but here we've restricted this one to part #2.
For MIDI port #0 (Bus 1) we've restricted the output to part #5.
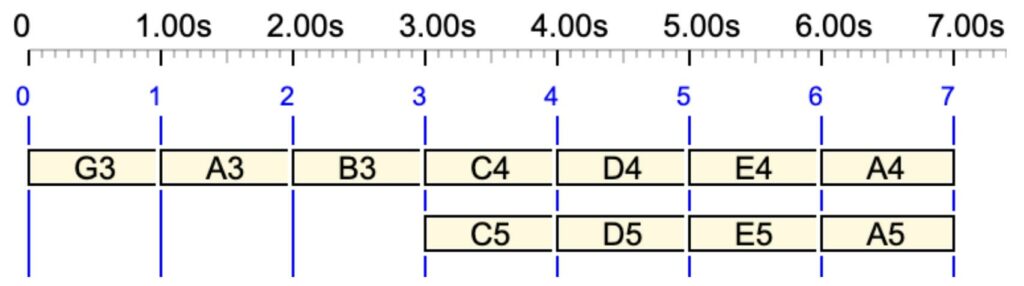
Let us play the following score:
C3 D3
This sequence of notes is heard on both instruments. As there is no "_part()" command in the score, all outputs send the MIDI messages.
Now let us try:
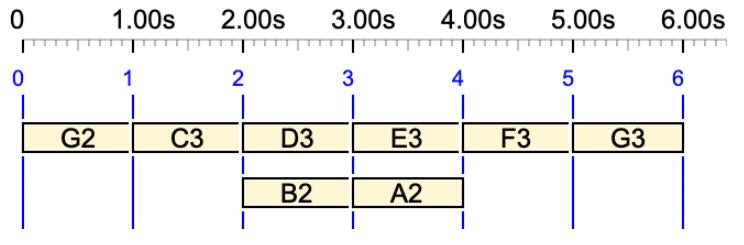
G2 _part(5) C3 _part(2) D3
Note G2 is heard on both instruments. But, as expected, the note C3 is heard on Bus 1 and D3 is heard on the USB MIDI interface.
The "_part()" command has exactly the same syntactic behaviour as "_chan()" and "_ins()". For example, it "follows" the score along the fields of polymetric structures:
In this example, G2 is heard on both instruments. Then C3 is sent to Bus 1, as well as D3 and E3, since they are the first field of the polymetric structure. In the same time, B2 is sent to the USB MIDI interface, then A2 to Bus1. At the output of the polymetric structure, F3 is sent to Bus 1 which was the mapping before the structure. At last, G3 is sent to the USB MIDI interface.
The sound-object graph shows that D3 and B2 are played together, although on different instruments, and E3 and A2 are played together on the instrument connected to Bus 1.
Parts are mostly relevant when importing digitised scores. They are used to declare instruments in MusicXML files. When importing a score, the Bol Processor will optionally place "_part()" or "_chan()" commands in the imported score, so that it can be played on the same set of digital instruments.
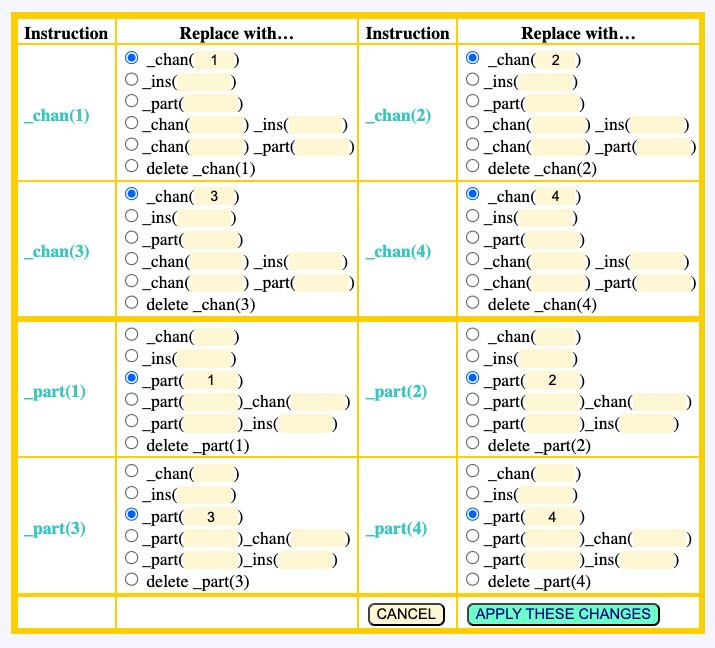
Using "_part()" is a better option than "_chan()" to name an instrument, because MIDI channels can be modified to handle microtonal adjustments. On the Data page, there is a MANAGE _chan(), _ins(), _part() button that opens a dialog for converting parts to/from channels, parts to/from instruments, etc.
An input
Setting up an input follows exactly the same protocol as setting up the output. For example, we can set up the input on "Pocket Key 25” as shown above. “USB MIDI Interface” (the Yamaha piano) is another possible choice. Let us continue with Pocket Key 25.
Windows users can simply plug their external MIDI keyboard (e.g. "Pocket Key 25”) to a USB port of their computer, as it will be automatically recognised and set up by the system.
Connecting an input to BP3 is of little interest if BP3 does nothing with input events. The instructions it can handle are listed in the section List of scripts for dealing with real-time MIDI below. "Wait for note…" means that BP3 will stop playing until it receives a NoteOn of the note in question — even with velocity zero.
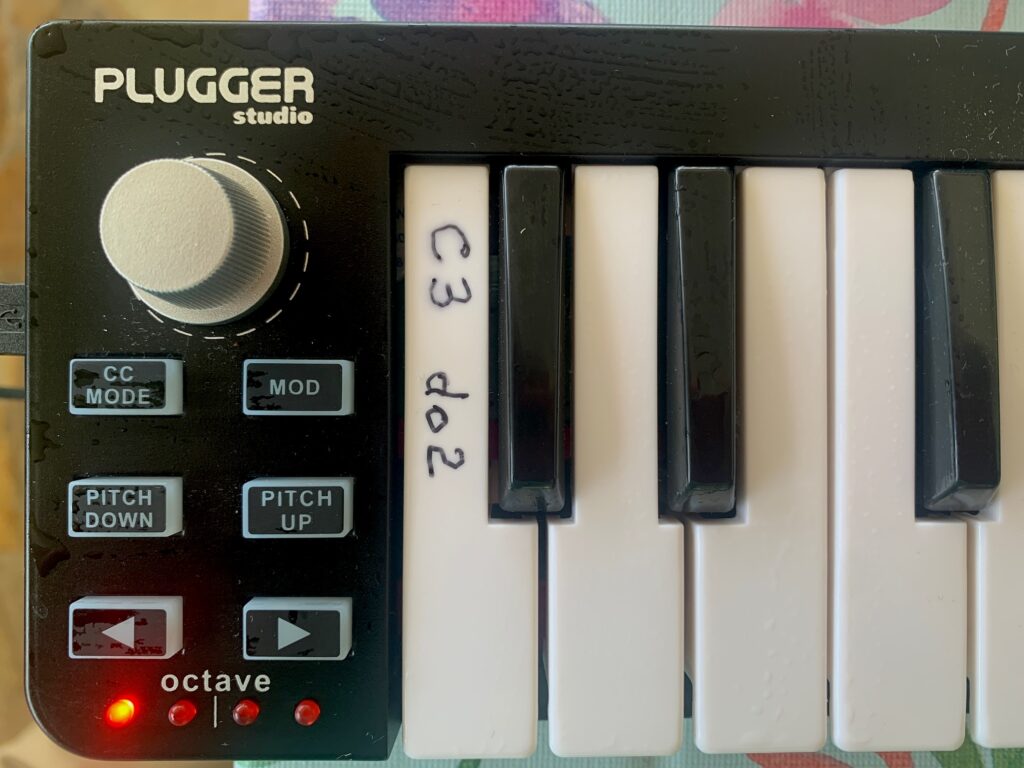
The script command tells that the performance should start when note C3 is received on MIDI channel 1. To avoid any confusion about octave numbers, I have written the name on the lowest key of my Pocket Key 25 (see photo). This confusion is made worse by the fact that the Italian/Spanish/French convention uses lower octave numbers!
So, the labelled key is the one we need to press to start this show. Let's try it…
When the PLAY button is clicked on the Data page, a flashing STOP button is displayed. The machine would wait forever unless the correct MIDI event has been received. The STOP button — or the PANIC button at the top right — can be used to abort the process cleanly. If all goes well, pressing the C3 key should produce this sound:
Harm Visser's '-da.acceleration' example
Notice that the _transpose(12) instruction plays notes one octave higher!
(This little "acceleration" piece was composed by Harm Visser to illustrate the period notation. Read his tutorial.)
Multiple interruptions are of course possible. Try this:
Now the machine will start its performance after receiving a NoteOn of C3. It will then stop after three beats and wait for a NoteOn of C4. A noteworthy detail is that one second after an interruption, AllNotesOff is sent to all MIDI channels and the pedals are set to off. This prevents notes waiting for their NoteOff from being heard. This "All Notes Off" feature can be turned off in the preferences file.
MIDI input filters
Let us play with the continuous improvisation "Mozart’s musical dice game" (called "-gr.Mozart" in the "ctests" folder). If this project is set for real-time MIDI, the improvisation will not stop until we click on the STOP or PANIC button. Inserting a "wait for note…" at the beginning would of course stop the performance at the beginning of every variation. Beware that you will have to write "do2" instead of "C3" due to the note convention!
But let's try something else, using the external keyboard (the Pocket Key 25 or Yamaha piano) to play notes on top of the performance. How strange! We don't hear any notes played on the external keyboard unless it's connected directly to the output device.
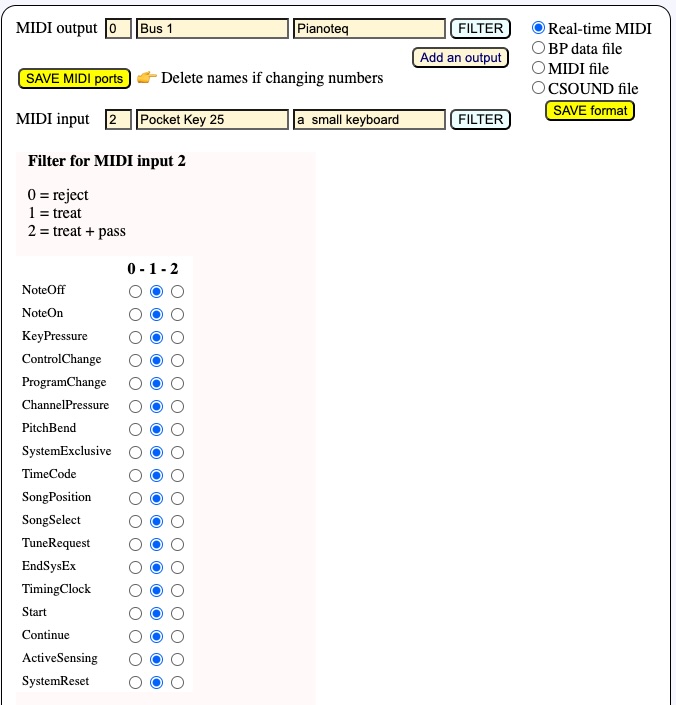
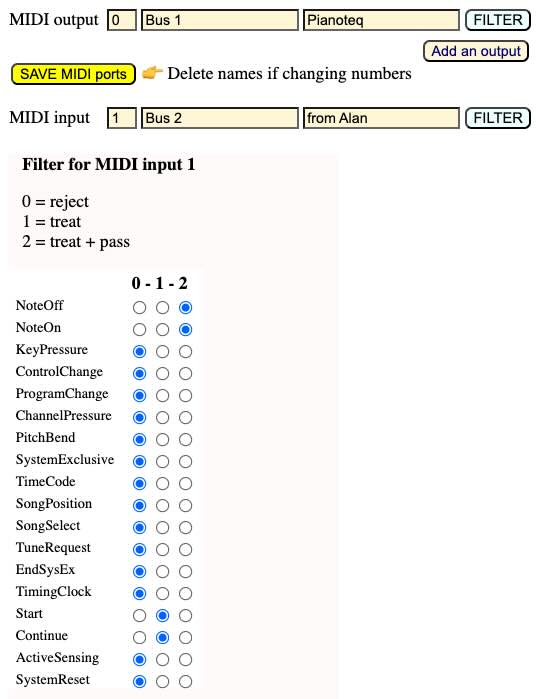
The reason for this becomes clear after clicking on the FILTER button for MIDI input 2:
All types of MIDI events are listed along with how they are processed by BP3. Here we are only interested in NoteOn/NoteOff events. The default setting is '1', which means that they can trigger script commands, but are not forwarded to the MIDI output. This is why 'C3/do2' was able to start the performance, although we could not hear it.
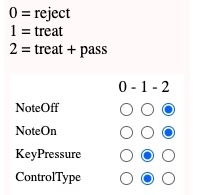
To play notes over the performance, we need to set the status of NoteOn and NoteOff to '2'. Note: If we only set the NoteOn status, BP3 will automatically set the NoteOff status to avoid confusion. Once you have changed the settings, click SAVE MIDI ports, then PRODUCE ITEM(S).
Since the Pocket Key 25 keyboard sends only NoteOn/Noteoff messages, we could as well set other event filters (KeyPressure, etc.) to '0'.
These filter settings are stored, together with the MIDI port names or numbers, in a temporary file whose name depends on both the session number (created by your browser) and the project name. A copy of these settings is stored in the (permanent) folder "midi_resources". This storage makes it possible to launch several instances of BP3 on the same browser or on different browsers, as we will now see.
Several BP3s performing and communicating
From the previous description of interactions via MIDI events — limited for the time being to waiting for a particular note — you may have guessed that a great feature of the Bol Processor BP3 environment is the possibility of running several BP3s, on different machines, or even on a single machine and the same browser… in cooperation with real humans playing MIDI instruments!
Each instance of BP3 can be thought of as a 'musician' with their own compositional skills embedded in a grammar or data (a set of pre-composed musical fragments). We are working on interactions that will allow each musician to modify the behaviour of another musician's grammar, for example by changing rule weights — which may result in some rules being suppressed while others are activated — or changing metronome settings if they need to perform faster/slower, etc. All these features were part of earlier versions (BP2) several decades ago!
Let us start with an extremely simple example using the "wait for note…" script.
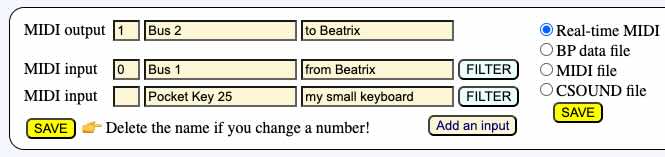
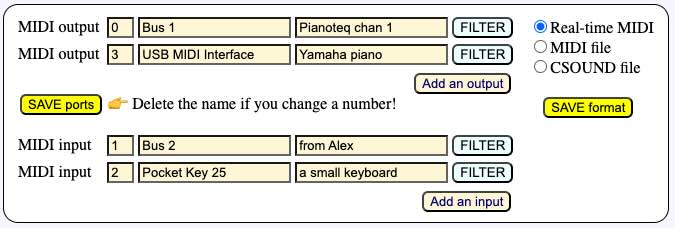
Create two projects that contain only data, for example "-da.Beatrix" and "-da.Alan":
Note that these melodies do not contain the same number of notes, but they will have the same duration (2 beats) because of their polymetric structures.
We want Alan's performance to start precisely after the last note of Beatrix's performance. As we don't want E4 to overlap with F3, we have put a silence '-' before F3. In the following, we'll have a solution to overcome this limitation.
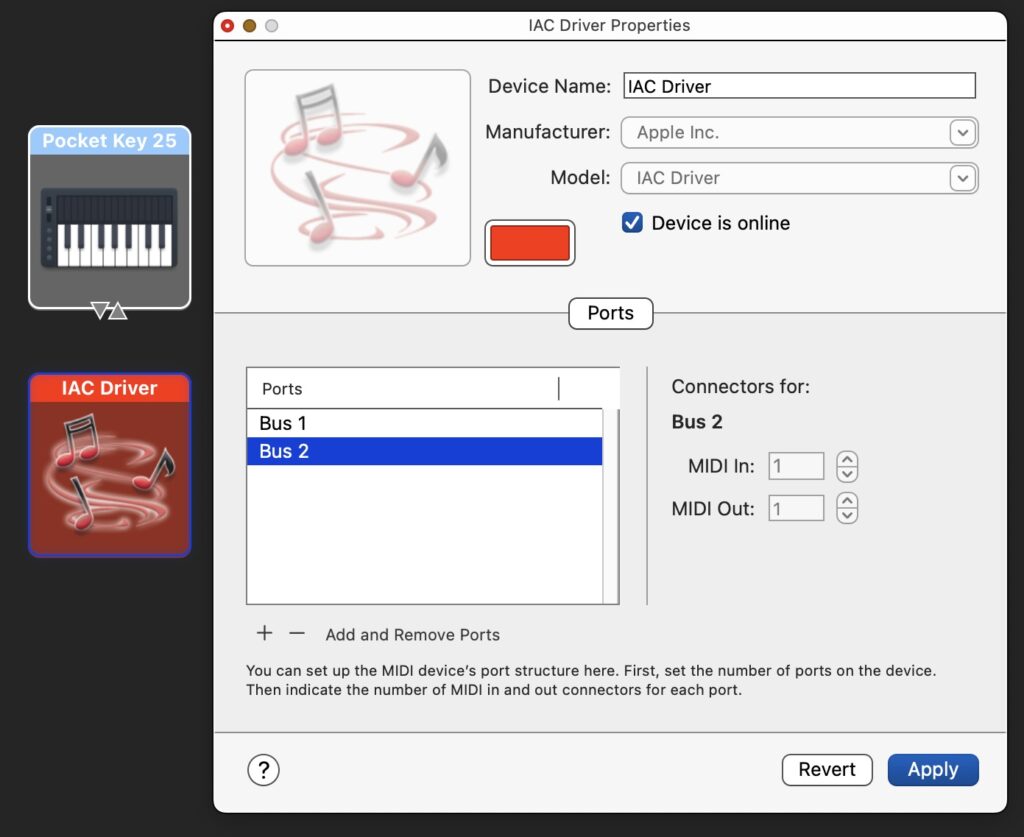
To manage the interaction in MacOS, we need an additional IAC port which is (automatically) named "Bus2". To do this, open Audi MIDI Setup and click on the IAC driver. Then add a port (see picture). You can create as many ports as you wish.
Set both Beatrix's MIDI output and Alan's MIDI input to "Bus2".
Now we want to hear both performances. Alan's MIDI output is sent to "Bus1" and will therefore be audible on the Pianoteq synthesiser.
Windows and Linux users can connect the two performers more easily: send both Beatrix's and Alan's messages to the external MIDI device, and connect Alan's input to the same MIDI device. But… the input filter should receive events and not forward them to the output, which is the same device, otherwise the loop will produce a disastrous bouncing effect!
Back to MacOS, there are two ways to send Beatrix's performance to the Pianoteq synthesiser:
Pianoteq settings make it possible to listen to both "Bus1" and "Bus2" virtual ports.
You can set up the MIDI event filter on Alan's project to route input NoteOn/NoteOff events to the current MIDI output. See above for filters.
To play the performance, click PLAY on Alan's project so that it is ready to perform. Then click PLAY on Beatrix's project. This is the result:
Two phrases played in sequence by two instances of the BP3 (Beatrix & Alan).
No doubt this sounds rather unmusical! In fact, we publish tasteless technical examples to encourage musicians to compose interesting pieces! 😀
Using out-time inaudible notes as signals
The idea of beginning Alan's performance with a silence that is filled by Beatrix's final note E4 is unelegant. Below is a better solution:
The secret is the expression "_vel(0) <<C0>>" which is an out-time expression of note C0 with velocity zero. The velocity ensures that the note won't be heard, and the out-time property gives it a null duration. Any note can be used here provided that it is mentionend in the "_script(wait…)" instruction.
If "_vel(0) <<C0>>" is followed by more notes, it is necessary to reset the velocity to its default value. The solution is to write it between curly brackets, so that _vel(0) only applies to the content of the expression: "{_vel(0) <<C0>>}"
Checking the time accuracy
Let us check that the real-time synchronisation is not affected by delays. We'll now ask Alan and Beatrix to play the same piece of music (one octave apart) in the same time.
In MacOS, Alan will send MIDI events to "Bus2". Beatrix will listen to "Bus2" and send MIDI events to "Bus1" (Pianoteq). Beatrix will set her input filter to the pass option, routing the incoming events to the output. The Pianoteq synthesiser will be set to listen to "Bus1" only.
To start the performance, first click on the PLAY button of Beatrix's project, then on the PLAY button of Alan's project.
Have you noticed that Beatrix is waiting for E3, which does not appear in Alan's score? Oh yes, it does! There is a _transpose(12) command that changes E2 (the first note) to E3. So, it works. This is the performance:
Two superimposed performances (one octave apart), played by two instances of the BP3 (Beatrix & Alan).
Not too bad? Despite the lack of musical interest, we must admit that the superimposition is technically acceptable, even if it is not perfect: there is a delay of about 60 milliseconds on the first note, the time it takes Beatrix's machine to detect that it has received a NoteOn for C3. The subsequent notes are programmed to compensate for this delay, but there are still discrepancies (which can be quantified on the Pianoteq MIDI input). They seem to be caused by delays outside BP3.
You can adjust the delay in Beatrix's project settings "-se.Beatrix". There is a parameter called "Sync delay", which is the number of milliseconds Beatrix's output events should be postponed after the synchronisation. We currently find that 380 ms is a good value.
In fact, the superimposition would sound even better if both performances were triggered by the same event, such as the conductor pressing a key on the external keyboard. This exercise was only intended to show that synchronisation between "virtual musicians" works well.
Working with multiple MIDI inputs
In the previous example, we could decide that Alan's performance will start when he receives a particular note from the Pocket Key 25 keyboard. In this case, we need to click on both START buttons, putting both 'musicians' in wait mode, and the performance will not start until the correct key is pressed on the keyboard.
This case is manageable with single inputs on each instance of BP3. More complicated cases, however, require external 'actors', such as a Pocket Key 25 keyboard sending to all the 'musicians' synchronisation messages, or messages modifying parameters in grammars, changing the metronome value, etc.
To achieve this, the Bol Processor is a able to manage multiple MIDI inputs.
The new game is as follows: both Beatrix and Alan will take turns playing variations of Mozart's musical dice game (see '-gr.Mozart'), one octave apart. They will use the Improvise mode to continue throwing the dice and creating unheard variations. But they will wait for a signal from the other to start playing a new variation.
In short, both musicians will use the same grammar, with only a small change for mutual synchronisation. Their settings must be carefully adjusted:
Select Italian/Spanish/French as a note convention
Check Non-stop improvise
Adjust Pclock = 3 and Qclock = 11 to get the same metronome speed of 220 bpm
Set Sync delay to 380 ms
We don't want both musicians to repeat the same variations. So, set the Seed for randomization to different values, for instance '1' and '2'. Or set it to zero to instruct the machine to seed the random sequence with an arbitrary number of its choice.
In the current version of BP3, the easiest way to send a signal is to send a note with a velocity of zero, which will therefore go unheard. So we need to change the grammar to add these particular notes.
In fact, the same notes should never be part of the score, so that the signal is really sent at the end. This is easy with Mozart's game, for example we can use C# (do#) for the synchronisation. Below are the tops of the grammars used by Beatrix and Alan.
Beatrix '-gr.Beatrix':
-se.Beatrix ORD gram#1[1] S --> _script(wait for do#3 channel 1) _vel(80) A B _vel(0) do#2 gram#1[2] A --> A1 A2 A3 A4 A5 A6 A7 A8 A1 A2 A3 A4 A5 A6 A7 A'8 gram#1[3] B --> B1 B2 B3 B4 B5 B6 B7 B8 B1 B2 B3 B4 B5 B6 B7 B8 ------------------- LIN [Select rules randomly and apply from left to right] etc.
Alan's '-gr.Alan':
-se.Alan ORD gram#1[1] S --> _script(wait for do#2 channel 1) _vel(80) _transpose(-12) A B _vel(0) do#4 gram#1[2] A --> A1 A2 A3 A4 A5 A6 A7 A8 A1 A2 A3 A4 A5 A6 A7 A'8 gram#1[3] B --> B1 B2 B3 B4 B5 B6 B7 B8 B1 B2 B3 B4 B5 B6 B7 B8 ------------------- LIN [Select rules randomly and apply from left to right] etc.
Again, we put do#4 at the end of Alan's performance because it is played as do#3 (one octave lower) due to the _transpose(-12) instruction.
Now we need to set up the MIDI inputs and outputs. Beatrix will send events to "Bus 1" which is the Pianoteq synthesizer. She will receive events from "Bus 2", use them for synchronisation, and forward them to the output.
Alan will send events to "Bus 2" and listen to "Bus 1" for the synchronisation.
This is all perfect on paper, but who is going to start? We have created a chicken and egg situation, so we need a superpower to start the process! Actually, a real human pressing the do#2 key on a Pocket Key 25 keyboard will do.
The interface has a Add an input button. We click it on Alan's project and paste the name Pocket Key 25. We also use the comment fields to remember the use of each port:
MIDI inputs and outputs are identified by their names. The numbers in the leftmost boxes are automatically set by the console during performance.
To start the concert, we'll click START on both projects. The order is irrelevant. Then we'll press a key on the Pocket Key 25. Which key?
If we press the do#2 key, we will certainly trigger Alan's improvisation and the cycle will start. But if we press the do#3 key, nothing will happen because, by default, the filter of the Pocket Key 25's input in "-gr.Alan" does not transmit NoteOns to the output. So Beatrix won't hear it… By setting NoteOn to status '2' (treat and pass) on this filter, it is possible to decide who will start the performance: do#2 for Alan and do#3 for Beatrix.
Here we go (starting with Alan):
Alan and Beatrix (two instances of BP3) playing variations of Mozart's musical dice game
You can interrupt this dual performance at any time by clicking the Pause button (of either project) and resume it by clicking the Continue button. You can also insert musical fragments by running a project such as "-da.tryStopContinue" (see below), if Stop and Continue MIDI events are sent to both "Bus 1" and "Bus 2" ports. In both cases the synchronisation is maintained.
👉 This simple show should convince musicians to create "virtual bands" of BP3s playing different grammars and sending specific synchronisation signals according to which variation has just been produced. Along with human performers who join in the fun!
The "virtual musicians" can be on the same computer or remotely connected via network (BlueTooth) or MIDI cables and USB interfaces. If they are on the same computer, they can be run on different browsers and/or the same browser. In the latter case, BP3 will not allow the same project (grammar or data) to be run in the same session. In general, just like human musicians in an orchestra have individual scores, it makes sense that virtual musicians don't share the same project…
The number of MIDI inputs and outputs in a project is currently limited to 32. It is unlikely that a (human) musician will need more!
Synchronise to a sequence (or list) of notes
The following expression
gram#1[1] S --> _script(wait for C3 channel 1) - _script(wait for E3 channel 1) etc.
synchronises the production to the sequence of notes C3 E3 (whatever the duration and velocity). This creates interesting situations where a "virtual musician" is expected to start playing after receiving a signal (C3) from one partner, then a signal (E3) from another partner.
Note that there is a silence '-' between the two script instructions. If there is no silence, then BP3 will resume playing if either C3 or E3 has been received.
Remember that because of the MIDI channel specification (range 1 to 16), the detection of signals can be selective. They are also inaudible when transmitted by NoteOns with velocity zero.
Crashing the band!
In the example of Alan & Beatrix playing Mozart, the connection seems to create a loop: Beatrix sends events to Pianoteq and Alan ("Bus 1"), who in turn sends events to Beatrix ("Bus 2"). Isn't that dangerous?
The reason it doesn't crash is that Alan's input "fromBeatrix" ("Bus 1") is filtered: NoteOns are received and processed (for synchronisation), but not passed to the output ("Bus 2"), i.e. to Beatrix. You can try to change the filter of input "Bus 1" on Alan's project, setting NoteOns to status '2' (treat + pass): you will get a superb crash after a flood of notes! ➡ This probably will not happen because BP3's MIDI drivers have been equipped with an anti-bouncing mechanism.
Working with multiple MIDI outputs
The Bol Processor currently accepts up to 32 MIDI inputs and outputs.
Example of a project using two inputs and two outputs:
A setup with two MIDI outputs and two MIDI inputs
The procedure for adding outputs is the same as the one for adding inputs: click on the Add an output button, then enter the name of the MIDI device if you know it exactly, otherwise leave it blank and let the machine connect it by default to the next available output, while suggesting other options:
🎹 Your real-time MIDI settings: MIDI output = 0: “Bus 1” - Pianoteq MIDI output = 3: “USB MIDI Interface” - Yamaha piano MIDI input = 1: “Bus 2” - from Alex MIDI input = 2: “Pocket Key 25” - a small keyboard
🎹 Setting up MacOS MIDI system MIDI output = 0: “Bus 1” 👉 the name of your choice MIDI output = 3: “USB MIDI Interface” 👉 the name of your choice MIDI input = 1: “Bus 2” 👉 the name of your choice MIDI input 1 makes BP3 interactive MIDI input = 2: “Pocket Key 25” 👉 the name of your choice MIDI input 2 makes BP3 interactive
🎶 More MIDI output options were available: MIDI output = 1: “Bus 2” MIDI output = 2: “Pocket Key 25”
🎶 More MIDI input options were available: MIDI input = 0: “Bus 1” MIDI input = 3: “USB MIDI Interface”
The fact that a MIDI input or output is "available" does not guarantee that it will do what we want it to do. For example, sending MIDI messages to the Pocket Key 25 keyboard will actually do nothing.
Filtering MIDI outputs
In the example above, MIDI output 3 (the Yamaha piano connected to the USB MIDI Interface) has the filter shown on this picture.
The channel filter specifies that the Yamaha piano will get all MIDI channels except those emitted on MIDI channel 2. Filtering MIDI channels makes it possible to send events exclusively to different instruments.
MIDI events can also be filtered by type. The idea is the same as for MIDI input filters, see above.
👉 If you do not hear any sound in real-time MIDI, you may consider checking the output MIDI filters before you kick the piano or screw up its cables! 😀
Using standard MIDI control
MIDI has standard control messages, namely Start, Continue and Stop, which can be used to coordinate multiple "virtual musicians" (instances of BP3). The advantage is the clarity of the data and the grammars programmed for interactions. The disadvantage is that these messages are not assigned to specific MIDI channels. This can be a problem with a large number of "virtual musicians". They also introduce a delay of about 250 milliseconds due to the time it takes for the MIDI device to process them.
Control messages can be used in two ways. The first, which we will now examine, is to "listen" to these messages via a script command. The second (see next section) is to respond to them as interruptions in the performance.
Let us look at a trivial example (of no musical interest), again with Beatrix and Alan playing together. This time, they take turns playing their items (simple sequences of notes).
It is important that the "Respond to Stop/Continue" option is unchecked in both the Alan and Beatrix project settings.
In short, he will play three notes (E3 D3 C3), then send a START to Beatrix and wait for a CONTINUE from Beatrix, then on receipt play the final three notes A2 B2 C3.
This is Beatrix's data:
_script(wait for Start) E4 D4 C4 _script(MIDI send Continue)
Start and Continue should be "heard" by Beatrix. Automatically, Stop will have the same status.
Beatrix's project sends its output to "Bus 1", the Pianoteq synthesizer. Its input is connected to the virtual port "Bus 2".
Alan's project sends its output to the virtual port "Bus 2", and its input is connected to "Bus 1".
We'll start the performance with Beatrix. Her machine will stay waiting for START. Then we'll start Alan's part, which will play three notes, then send a START message to Beatrix, who will play her part, and return to Alan, via a CONTINUE message, for the final part…
This all sounds logical, but it doesn't work! We do hear Alan's E3 D3 C3, but then nothing… The first reason is that Beatrix should be able to hear Alan's START command, which is no longer a NoteOn as in the previous examples. This means that the filter of her input "Bus 2", from which she receives Alan's MIDI messages, must be set correctly. The Start event should be received, see picture on the side. Also remember that NoteOn and NoteOff should be received and transmitted to the output (the Pianoteq synth).
Well, now we hear Alan's E3 D3 C3 followed with Beatrix's E4 D4 C4, but then… nothing! 😢
Careful analysis is needed to solve the problem. However, this is simple logic. Remember that Alan is playing on "Bus 2", which is not connected to any MIDI device. If we hear Alan's production, it is because it is received by Beatrix on "Bus 2" and then forwarded to "Bus 1" (the Pianoteq synth). The problem is that the final part A2 B2 C3 is sent to Beatrix, but she has already stopped listening because her own data is finished!
You can imagine a band in which one musician plays an improvisation and then gives a signal to another musician to start their own improvisation, but the careless musician has already vacated the place believing that the programme was finished. The solution is to tell the musicians not to go away until they receive a STOP signal. Maybe a signal from a conductor (here using the Pocket Key 25 keyboard), maybe a signal from the musician who is in charge of ending the performance. So we'll tell Alan to send a STOP signal at the end of his performance, and Beatrix to wait for Alan's STOP signal. Below are the revised scores.
// Alan E3 D3 C3 _script(MIDI send Start) _script(wait for Continue) A2 B2 C3 _script(MIDI send Stop)
// Beatrix _script(wait for Start) E4 D4 C4 _script(MIDI send Continue) _script(wait for Stop)
The MIDI messages Start, Continue, Stop have been used here to facilitate the reading of scores (or grammars), but these can be replaced by NoteOns with durations and velocities zero on different MIDI channels when working with a larger number of actors.
By the way, using MIDI messages Start, Continue and Stop can be problematic with physical or virtual MIDI devices. My Yamaha piano, for example, does not transmit these messages. So, when connected to an input, it will only send 3-byte messages such as NoteOn/NoteOffs. In the Windows environment, the Microsoft GS Wavetable Synth also does not transmit any message at all. The best way to exchange messages is via virtual MIDI ports created by "loopMIDI" (see below). In Linux, virtual ports such as 'VirMIDI 0-0' (see below) do not seem to transmit these Start, Continue and Stop messages.
For geeks:In the Bol processor, scripts are appended to the next following sound object. For example, _script(wait for Start) is appended to note E4 in Beatrix's score. But what about scripts at the end of a score? The secret is that BP3 creates an invisible MIDI event (ActiveSensing) at the end of each element to which it can append the final scripts.
Using control messages to interrupt a performance
This is the second way of using control messages. Let's try to stop a performance with a standard Stop MIDI message, play a few notes and then continue the performance with a standard Continue MIDI message.
We create a project "-da.tryStopContinue" as follows:
Running this project will interrupt a performance, for example "-da.Watch_What_Happens_by_Oscar_Peterson". For this to work, the "Respond to Stop/Continue" option must be checked in the Oscar Peterson data project.
Let us decide that the performance will be played on the Pianoteq synthesiser connected to "Bus 1" on a Mac.
The "-da.tryStopContinue" will send its data to a virtual port, for instance "Bus 2". To this effect, the "-da.Watch_What_Happens_by_Oscar_Peterson" project will have an input port listening to "Bus 2", accepting all messages and transmitting at least NoteOn/Noteoff.
Another solution is to set up another output port on the "-da.tryStopContinue" project, that sends all data to "Bus 1". The output to "Bus 2" will only send the Stop and Continue messages. The input port listening to "Bus 2" on the Oscar Peterson project will only accept Stop and Continue, and not transmit anything.
👉 It is a good practice to use the filters for restriction of message management to the necessary tasks.
Now, play the Oscar Peterson performance, and at any point start "-da.tryStopContinue". The performance will pause and you will hear the external musical phrase. The performance will then resume. You can, of course, do this several times and insert any variety of musical fragments. For example:
Beginning of Oscar Peterson's "Watch What Happens" with two interruptions
List of scripts for dealing with real-time MIDI
The list below will be kept up to date as there are many scripts on the agenda. These instructions are not case-sensitive.
Input scripts
When a note is specified, be sure to use the same note convention as in the project, e.g. C3 or do2 or sa3, etc.
Wait for note channel c
Wait for a NoteOn of the specified note on channel c (1…16)
Wait for Start
Wait for a Start MIDI message (250)
Wait for Continue
Wait for a Continue MIDI message (251)
Wait for Stop
Wait for a Stop MIDI message (252)
Wait forever
Wait until STOP or PANIC button is clicked
Velocity param Kx = note channel c
Set parameter Kx (0 < x < 128) to the velocity (range 0…127) of the specific note on channel c (1…16)
Control param Kx = #y channel c
Set parameter Kx (0 < x < 128) to the value (range 0…127) of MIDI controller #y (0 < y < 128) on channel c (1…16)
Output scripts
Hold for x milliseconds
Delay all subsequent events by the specified duration x (integer).
Send Start
Send Start MIDI message (250)
Send Continue
Send Continue MIDI message (251)
Send Stop
Send Stop MIDI message (252)
Scripts on top of a grammar
(To be continued)
Capture incoming events
The _capture() command allows incoming MIDI events to be recorded to a 'capture' text file. See the Capture MIDI input page for explanations.
Alternatives to IAC
Here are the equivalents of Apple's IAC (Inter-Application Communication) for each system:
Windows environment
On Windows, you can use software like loopMIDI or virtualMIDISynth to create virtual MIDI ports. These tools work similarly to the IAC Driver on macOS:
loopMIDI: Created by Tobias Erichsen, loopMIDI is a popular choice for creating virtual MIDI ports on Windows. It allows you to create and manage several virtual ports which can be used by applications to communicate with each other.
These tools integrate with software applications that support MIDI, providing a seamless way to connect various MIDI applications without needing external MIDI hardware.
Linux environment
On Linux, ALSA (Advanced Linux Sound Architecture) provides capabilities to create virtual MIDI devices through its sequencing API.
snd-virmidi: This ALSA MIDI driver provides virtual MIDI ports for sending and receiving MIDI between applications running on the same system. It's part of the standard ALSA module set and can be configured to provide multiple ports.
To set up virtual MIDI ports on Linux using ALSA, you typically need to load the snd-virmidi module. You can do this by running:
sudo modprobe snd-virmidi midi_devs=2
This command loads the snd-virmidi module and sets it up to provide two virtual MIDI devices (you can increase the number of devices by changing the midi_devs parameter). The virtual ports, namely 'VirMIDI 0-0' and 'VirMIDI 0-1' , can then be accessed by MIDI applications on the Linux system. Please note that they do not appear to transmit the Start, Stop and Continue messages.
👉 This is done automatically by the "install_bp3.sh" shell script installing BP3 on Linux/Ubuntu (download here).
👉 An earlier version of this page recommended w64devkit. This was a wrong choice, as its downloadable files are signalled with viruses or malicious code.
Look at the warning displayed at the top right of any page of the Bol Processor. In the Windows environment you can read:
Top right warning in Windows environment indicating that a 'gcc' installation is required.
The installation of MinGW will allow "gcc" to run on a Windows machine. This may not be necessary if it has already been installed by another application. In this case, there will be no such warning at the top right of Bol Processor pages:
Clicking on the "run the compiler" link will create the "bp.exe" console. After reloading the page you are ready to use BP3:
👉 The PANIC button is used to get silence when you are running more than one instance of BP3.
If you get a warning that the file may contain malicious code, don't take the risk. Try another file!
Install MinGW-w64:
Open the MinGW file with 7-Zip, telling it to extract files and store them to a folder, by default "x86_64-13.2.0-release-win32-seh-ucrt-rt_v11-rev0" in your Downloads folder.
Save the path to this folder in a text file, for instance (if the user is named "berna"): C:\Users\berna\Downloads\x86_64-13.2.0-release-win32-seh-ucrt-rt_v11-rev0\mingw64
👉 For geeks and expert Windows users: It is not good practice to keep executable files in the Downloads folder, as they may be deleted when optimising disk space. You should move them to a suitable location like other applications. I keep the Downloads location for the demo.
Set up the Environment Path:
Right-click on 'This PC' or 'Computer' on the desktop or in File Explorer, and select 'Properties'.
Click on 'Advanced system settings' and then 'Environment Variables'.
In the System Variables section, find and select the variable 'Path', then click on 'Edit'.
Click on 'New' and add the path to the directory 'bin' of your MinGW-w64 installation, such as "C:\Users\berna\Downloads\x86_64-13.2.0-release-win32-seh-ucrt-rt_v11-rev0\mingw64\bin" if you haven't changed the location.
Click 'OK' to close all dialogues.
Verify Installation:
👉 The BP3 interface does this verification automatically. If ‘gcc’ responds you will be offered to (re)compile the console. The following instructions are for an additional check.
Open Command Prompt (cmd.exe) and type: cd C:\MinGW\bin gcc --version
The first command opens a Unix "shell". The second command should output the GCC version installed and include 'x86_64', indicating it's set up for 64-bit. Ignore the win32 segments you see in file and folder names. They are there to confuse you!
Additional Tips
Choosing a Shell: MinGW-w64 works with standard Windows command prompt and also with more Unix-like terminals like Git Bash or Cygwin if those are already installed.
Using Make: To use 'make' with MinGW-w64, make sure that package 'mingw32-make' is selected during installation. It might be named differently like 'mingw-w64-make' based on the version. You might need to rename 'mingw32-make.exe' to 'make.exe' in the bin directory to make it recognizable as 'make'.
By following these steps, you should be well-equipped to compile 64-bit applications — not only BP3 — using GCC on Windows via MinGW-w64. This setup is useful for developers who need a lightweight GCC environment without needing a full Linux setup or the bulk of Visual Studio.
These publications explain the theoretical basis and research behind the Bol Processor project throughout its long lifetime. They also highlight the algorithmic foundations of the software design, particularly with regard to the polymetric model and the time-setting of sound objects.
👉 Follow the links to access pages containing abstracts and informative AI reviews.
Kippen, James & Bernard Bel (1992) https://hal.science/hal-00256386v1 Bol Processor Grammars In Mira Balaban, Otto Laske et Kemal Ebcioglu (eds.) Understanding Music with AI, American Association for Artificial Intelligence Press, Menlo Park CA: 366-400.
Modelling music with grammars: formal language representation in the Bol Processor. In A. Marsden & A. Pople (eds.): Computer Representations and Models in Music, London, Academic Press, 1992, p. 207-238.
Abstract
Improvisation in North Indian tabla drumming is similar to speech insofar as it is bound to anunderlying system of rules determining correct sequences. The parallel is further reinforced by the fact that tabla music may be represented with an oral notation system used for its transmission and, occasionally, performance. Yet the rules are implicit and available only through the musicians’ ability to play correct sequences and recognise incorrect ones. A linguistic model of tabla improvisation and evaluation derived from pattern languages and formal grammars has been implemented in the Bol Processor, a software system used in interactive fieldwork with expert musicians. The paper demonstrates the ability of the model to handle complex structures by taking real examples from the repertoire. It also questions the relevance of attempting to model irregularities encountered in actual performance.
Excerpts of an AI review of this paper (Academia, June 2025)
Summary of the Work
The manuscript explores the use of formal grammar theories to model improvisational structures in North Indian tabla drumming. Drawing an analogy to language, the authors discuss how grammar-based representations can capture the rhythm, structure, and constraints of tabla musical sequences, which often rely on mnemonic syllables (“bols”) rather than Western script. By introducing and detailing the Bol Processor software, the authors demonstrate how the tool can generate, analyze, and compare tabla phrases in ways that blend both deterministic and probabilistic approaches. Throughout the work, real-world examples from performances and teaching traditions bolster the theoretical explanations.
Strengths
Clear Theoretical Rationale
The authors provide a thorough background for why linguistic concepts—particularly grammatical formalisms—are suitable for analyzing tabla compositions. They effectively frame the similarities between language rules and musical rules, especially regarding how musicians differentiate “correct” from “incorrect” sequences.
Comprehensive Treatment of Formal Grammars
The discussion includes multiple types of grammars (context-free, context-sensitive, marking of structural positions, and pattern grammars) and shows how each can be adapted or extended to capture nuances of tabla music. The step-by-step explanations of grammar derivations, contexts, parsing, and membership tests are detailed and instructive.
Practical Demonstration via the Bol Processor
By anchoring the discussion in a working piece of software, the manuscript transcends theory and illustrates practical methodology. Concrete examples of how the Bol Processor is used—both in generation (modus ponens) and membership checks—highlight the value of the tool for ethnomusicological fieldwork and analysis.
Engagement with Complex Musical Realities
The manuscript acknowledges that musical performance often deviates from neatly defined theoretical models. The authors address how irregularities and “maverick” variations might still be captured or reconciled within the formal framework, although at the cost of increasingly complex grammars.
Probabilistic Extension
The move from purely deterministic grammars toward probabilistic grammars is a notable contribution, especially given improvisational contexts. Assigning weights to production rules captures more realistic musical scenarios, enabling the software to suggest typical (rather than merely possible) musical phrases.
Overall Assessment
The manuscript provides a robust, methodologically sound illustration of how formal grammars can be adapted to model and analyze the complex world of North Indian tabla improvisation. Its detailed exploration of grammar types and parsing approaches is commendable and is supported by real-world musical examples that demonstrate both the potentials and the evolving nature of such computational models. The Bol Processor, as presented, appears to be a valuable contribution not only for ethnomusicologists and computational musicologists but also for any scholar interested in structural approaches to musical improvisation. The incorporation of probabilistic reasoning further deepens the system’s applicability to performance-based context and highlights how formal language models can be refined through interactive feedback with expert practitioners.