Installing the Bol Processor BP3 does not require any programming skills. Just use the installers for MacOS and Windows, or the installation scripts for Linux.
To use the Bol Processor BP3, you first need to install a local Apache HTML/PHP server on your desktop computer. This server runs a dedicated "web service" that is restricted to your computer. Only PHP (with its GD Graphics option) needs to be running, as no database is used by the Bol Processor interface.
On MacOS and Windows we recommend MAMP or XAMPP, both of which are Apache servers with pre-installed features. On Linux, XAMPP is the only choice. The procedure is given on the pages that show the installation of BP3 in the different systems, see below.
Once you've installed MAMP or XAMPP, installing Bol Processor is almost a one-click process.
MacOS users can quickly do the installation using an installer called BolProcessorInstaller.pkg. Follow instructions on this page.
Windows users can quickly do the installation using an installer called BolProcessorInstaller.exe. Follow instructions on this page.

Linux users can quickly do the installation using dedicated scripts. Follow instructions on this page.
👉 Once you've installed the Bol Processor BP3, visit this page to familiarise yourself with how to use it.
The file structure of your installation
👉 Only for geeks!
Let us assume that your installation was successful. It created a "htdocs/bolprocessor" folder.
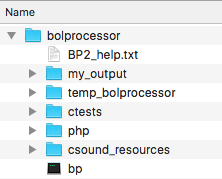
The file structure inside this folder is shown on the left. There is nothing related to Bol Processor outside of this folder.
This image includes "bp" which is the compiled version of the BP3 console for MacOS. The same is called "bp.exe" in Windows and "bp3" in Linux. Neither "bp" nor "bp3" will be visible after the installation because both will be created by the compiler. In Windows, "bp.exe" is installed so that no compilation is required.
The "temp_bolprocessor" and "my_output" folders are automatically created when the interface is run. The contents of the "temp_bolprocessor" folder is cleared of all files/folders older than 24 hours.
Another folder called "midi_resources" is also created to store the settings for the real-time MIDI input and output ports.
Two additional folders, "csound_resources" and "tonality_resources", are created by the installation and filled with data shared by all projects.
Running the interface will also create "BP2_help.html" in the "php" folder using "BP2_help.txt" as its source.
The "ctests" folder — which we call a workspace — contains sample material used to check the operation of Bol Processor and to illustrate some musicological issues. It is updated by the installation scripts each time you upgrade to a new version.
If you create new material in the "ctests" workspace it won't be deleted by upgrades. However, if you modify files that come from the distribution, they will revert to the current distribution version on each upgrade. It is therefore a good idea to keep a copy of the "ctests" folder, as you are likely to modify some of its data files while using the program. You may want to restore the original versions later. You can also create your own workspaces (in tree structures) using either the BP3 interface or your computer's file manager.
This installation is checked with Ubuntu +Linux Lite 7.0 running on an HP Intel Core i5-6200U (64-bit, 8 Gb RAM).
Install XAMPP
The installation of BP3 should take place after the installation of the local Apache server XAMPP. Follow instructions here: https://www.apachefriends.org/
XAMPP creates a /opt/lampp/htdocs/ directory that will contain "bolprocessor". The "bolprocessor" folder will contain (language C) source files for the "bp3" console, the "MakeFile" to compile them, and all the data files. It will also contain a "php" folder filled with PHP pages and some related files for running the interface.
If you wish to open XAMPP automatically at startup, read this page. (This can be done later.)
These zip files are updated regularly. Major updates are announced on the BP developers list and uploaded to their GIT repositories. Make sure that they can be found in your Downloads folder: /home/linuxlite/Downloads
Install the Bol Processor
Safely do the installation using the shell scripts "linux-scripts" downloaded here. Current version: 3 January 2025, size 13112 bytes. Unpack and copy these scripts to the /home folder:
cd /home/linuxlite/Downloads/ unzip linux-scripts.zip -x "__MACOSX/*" sudo chmod -R 775 linux-scripts cd linux-scripts sudo cp -a . /home/ cd /home/ sudo chmod +x *.sh
Scripts "modify_xampp.sh", "prepare.sh", "unpack_bp3.sh", "install_bp3.sh" and "get_ready_bp3.sh" have been copied to the /home folder.
Four more scripts: "update_console.sh", "update_interface.sh", "update_data.sh" and "restart_xampp.sh", have been copied to the /home folder. They will be used later.
The installation procedure is similar to that for MacOS and Windows, but includes a few actions specific to Linux.
Run the scripts in the following order. 👉 You will be asked for your password the first time, as they need to be run in "admin" mode (the "sudo" command).
sudo /home/modify_xampp.sh will adjust XAMPP settings.
sudo /home/prepare.sh will install required resources on your machine, and create two virtual MIDI ports if they are not yet existing.
sudo /home/unpack_bp3.sh will unpack the zip files.
sudo /home/install_bp3.sh will create the /opt/lampp/htdocs/bolprocessor/ directory and fill it with the contents of BP3 packages. Files/folders already existing will simply be updated.
sudo /home/get_ready_bp3.sh will set up permissions and owners for using the console. The owner is "daemon" (the same one used by XAMPP) and permissions are "775". 👉 The content of "bolprocessor" is strictly private. No risk setting up permissions!
Avoid running the same script more than once, although this should not create duplicates or unwanted effects.
Once the Bol Processor BP3 is installed and running, you should delete the "zip" files in the Downloads folder. This will allow downloading new versions.
Compile the 'bp3' console
Start the XAMPPApache server. You can send the terminal command:
sudo /home/restart_xampp.sh
Point your browser at localhost/bolprocessor/php/. This will display the home page of the Bol Processor.
If you see this frame in the image at the top right of the page, your life will be easy! All you have to do is click on the link to compile the console, which will take less than a minute.
f you don't see the link to compile, and instead a mention that 'gcc' is not responsive, you are in great trouble! This suggests a bug in the interface (contact us) or in your installation.
Install Csound
Csound is not required to run the Bol Processor, as you can work with MIDI files and real-time MIDI. However, it will give you access to a different approach to sound synthesis, and it will handle microtonality in its own way.
If you wish to install Csound, simply type the following commands:
sudo apt update sudo apt install csound
Then verify the installation and check the path to the console:
csound --version which csound
By default, the Bol Processor sets the path to "usr/bin", which seems to be standard on Linux. It is given by the "which csound" command.
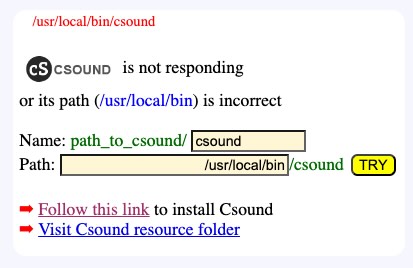
The BP3 interface will be able to figure out the location of "csound" and fix its path accordingly. If it does not respond, you will be asked to change the path and perhaps the name of the Csound console (see image).
👉 Currently, the Csound orchestra file "0-default.orc" does not work on Linux. We're trying to fix this… In the settings of your projects, enter "BP2test.orc" as replacement, or select other files such as "new-vina.orc".
😀 Enjoy Bol Processor BP3 on Linux!
Restarting XAMPP after a crash
If you blow up the memory, for example with a quantization that is too low for the size of a piece played in realtime MIDI, the XAMPP server may freeze: the browser will refuse to display pages.
To restart XAMPP, go to the terminal and run the following script:
sudo /home/restart_xampp.sh
Updating to new versions
👉 If you update the "bp3" console, you should also update the "php" interface, as the two are linked.
(1) Update the "bp3" console: Delete the graphics-for-BP3.zip file if it exists in your Downloads folder. Download https://github.com/bolprocessor/bolprocessor/archive/graphics-for-BP3.zip Run the (superfast!) script: sudo /home/update_console.sh This script deletes the 'bp3' console to force a compilation of the new version.
(2) Update the "php" interface: Delete the php-frontend-master.zip file if it exists in your Downloads folder. Download https://github.com/bolprocessor/php-frontend/archive/master.zip Run the (superfast!) script: sudo /home/update_interface.sh Note that this script will preserve the "_settings.php" file (if it exists), which contains your project settings.
(3) Update the set of examples: this will only update the contents of the "ctests" folder. If you have created folders and files for your personal data, these will not be affected. However, if you have modified a sample file without changing its name, it will be reverted to its distribution version. Delete the bp3-ctests-main.zip file if it exists in your Downloads folder. Download https://github.com/bolprocessor/bp3-ctests/archive/main.zip Run the (superfast!) script: sudo /home/update_data.sh
👉 Please send your suggestions or modified files to our contact.
Relocating "bolprocessor"
The Bol Processor can be installed outside the "htdocs" folder created by XAMPP (on your boot drive). You might want it near related projects, or use extra space from an external hard drive. There may also be situations where creating files on the boot drive is restricted.
Fortunately, the process of relocating is very simple.
If you have already created a "bolprocessor" folder by running the installer, drag it to the desired location and delete it from the "htdocs" folder. If not, create an empty "bolprocessor" folder in the desired location.
Then, open a terminal and point it to the "htdocs" directory. You can type the instruction "ls -al" to see the contents of "htdocs", which is normally empty.
Let's say you've created an empty folder "bolprocessor" inside a folder called "MUSIC" on an external drive called "EXT". You first need to find the path to the external drive. Plug in the drive, then type "lsblk". Look for the device name (e.g., "/dev/sdb1") and its mount point, e.g. "/media/username/EXT", where "username" is your own user name.
The command to create the symbolic link would then be:
Make sure that the symbolic link you created points to the correct location: you will now see a "bolprocessor" icon in the "htdocs" folder. Double-click it, it should open the destination folder.
You can now safely run the install scripts and proceed to compile the 'bp' console. Updates to new versions will be the same way.
👉 Never change the names of the "bolprocessor" folder and symbolic link, otherwise the installation will fail.
The first time you run the Bol Processor, XAMPP may ask your permission to display files outside its "htdocs" folder. Please contact us if you're experiencing issues with this relocation!
You can use the same technique to relocate some data files outside the "bolprocessor" folder.
Uninstall the Bol Processor
Uninstalling the Bol Processor and all the data downloaded or created for its use, is very simple: delete the "htdocs/bolprocessor" folder, or the relocated "bolprocessor" folder and the symbolic link pointing to it.