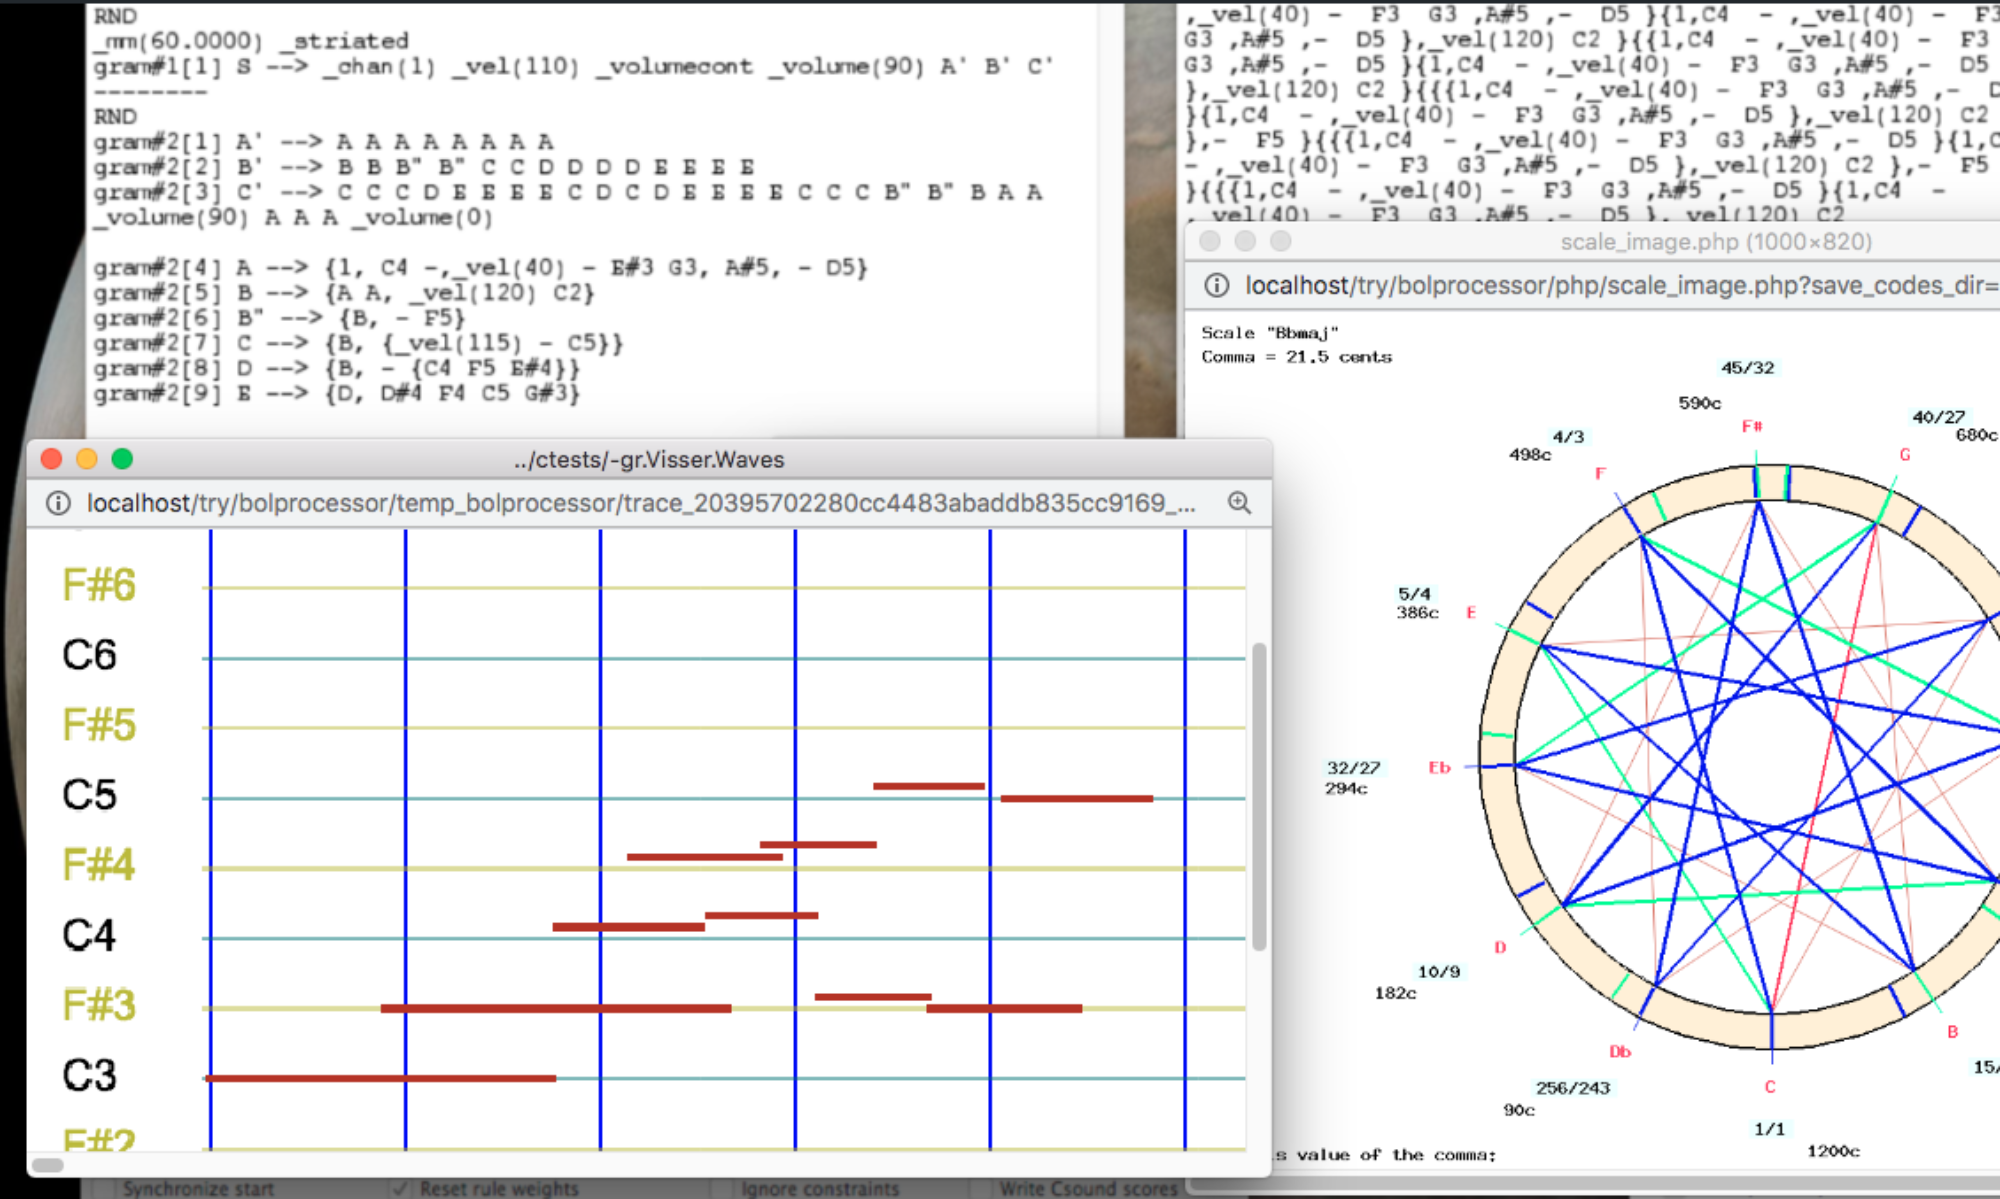
In the current version of the Bol Processor, sound-objects contain either a stream of MIDI codes or a few lines of Csound score, or both. Each terminal is either interpreted as either a simple note (a NoteOn/NoteOff sequence) or linked to a sound-object, provided that one with the same name exists in a sound object description file (e.g. "-so.MySounds").
When an item is played in real time using MIDI, a MIDI file or Csound, any terminal not listed in the associated sound object description file is ignored. The same applies to variables that were not rewritten or erased at the end of the production process.
In earlier versions of BP3 (before 3.15), these unused symbols were erased before constructing the phase table containing the list of sound events. At present, they are treated as silent sound objects. While these objects carry neither MIDI nor Csound instructions, they have the same metric characteristics as a simple note: a duration of one unit, a pivot at the beginning for its location, and relocatability.
Silent sound-objects are of little or no utility in the MacOS, Windows and Linux implementations of BP3. They are intended for environments using the WebAssembly (WASM) architecture. The idea is to use the Bol Processor's sophisticated time-setting features to send the structure to external devices and create sounds of great design. Read this page for more information.
Examples of data creating silent sound-objects can be found in "-da.trySilentSoundObjects". The resulting graphs are shown below.
The terminal alphabet of this data project includes 'a', 'y', 'z', but only 'a' is found in "-so.trySilentSoundObjects". The note convention is English.
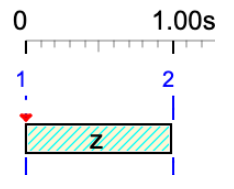
z
'z' is treated as a silent sound-object. It is displayed as a hatched rectangle. Its duration is 1 unit.
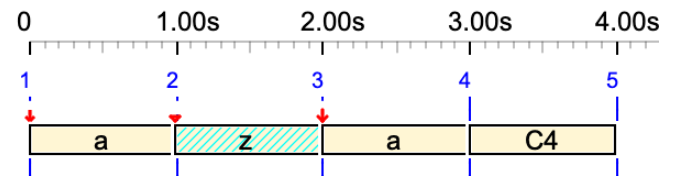
a z a C4
In this sequence, the silent sound-object 'z' occupies 1 unit but it does not produce any sound.
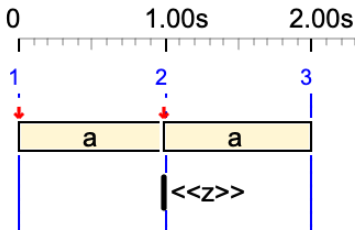
a <<z>> a
Here, 'z' is an out-time silent sound-object (no duration). No sound and no duration.
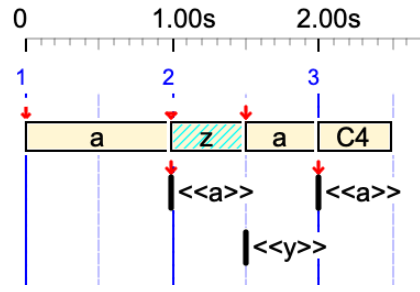
a <<a>> _tempo(2) z <<y>> a <<a>> C4
'z' has 1/2 beat duration, due to the tempo. 'y' is an out-time silent sound-object.
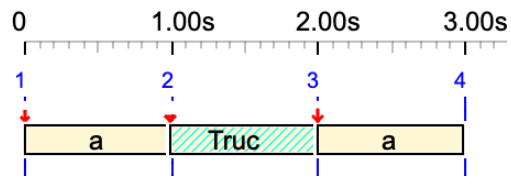
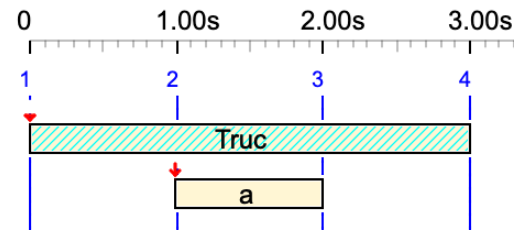
a Truc a
Variable 'Truc' is converted to a silent sound-object. Its duration is 1 unit.
{a Truc a, z C4}
In this polymetric expression, 'z' is resized to have the same symbolic duration as C4.
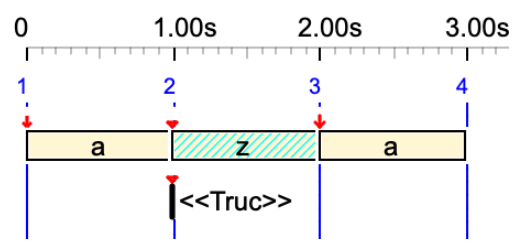
a <<Truc>> z a
Variable 'Truc' is converted to an out-time silent sound-object.
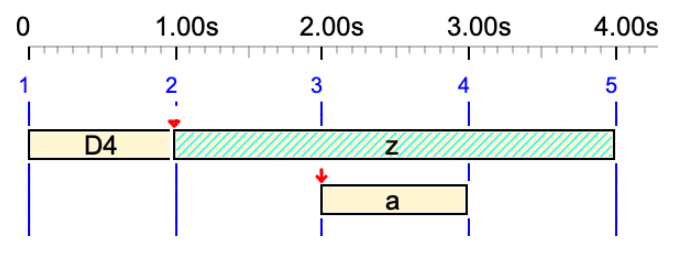
D4 z& a &z
Silent sound-object 'z' is tied to itself. 👉 Read the Tied notes page.
Truc& a &Truc
Variable 'Truc' is converted to a silent sound-object and tied to itself.
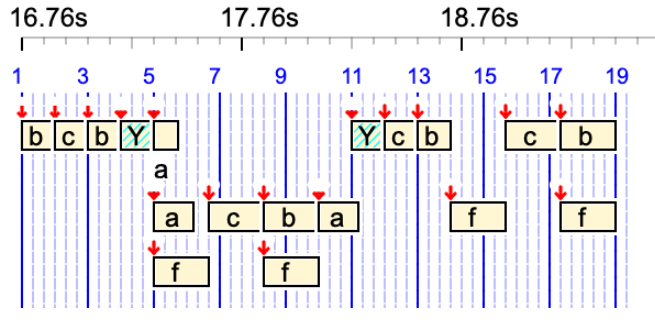
The conversion of variables to silent sound-objects may have an impact on grammars using substitution rules in which an erase rule cannot be used at each substitution. Check for instance "-gr.koto3":
Variable 'Y' hasn't been erased and it occupies a one-unit time segment without producing any sound.
This page is about the polymetric notation used in the Bol Processor project and, most likely, other software environments. This advanced tool is used to represent the time structure of events, which can be simple notes, sound-objects, or more generally time-objects that can be instantiated as video fragments, sequences of robotic actions, and so on.
In a polymetric structure, rests (or 'silences') are represented by integer ratios (their symbolic duration), for example ‘6’ for "six beats" or '4 2/3' for "four and two third beats". Small integers can be replaced with hyphens, for example '---' for '3'.
In some (but not all) polymetric structures, rests with explicit durations can be replaced with undetermined rests (notated '…' or '_rest'), the value of which is calculated by a (deterministic) algorithm in the console (file 'polymetric.c'). This is an important feature because it enables the notation to be simplified without compromising the accuracy of the time. Take a look at Charles Ames' example, for instance.
A polymetric structure containing at least an undetermined rest is called 'minimised" for this reason. Examples of minimised structures are found on the Polymetric structures page.
The topic of this page is about 'reverting' the algorithm that assigns explicit durations to undetermined rests in the Bol Processor console. Geeks will find this algorithm in the 'polymetric.c' file, and they can set the 'trace_und' variable to '1' to trace its operation.
Examples of minimisation
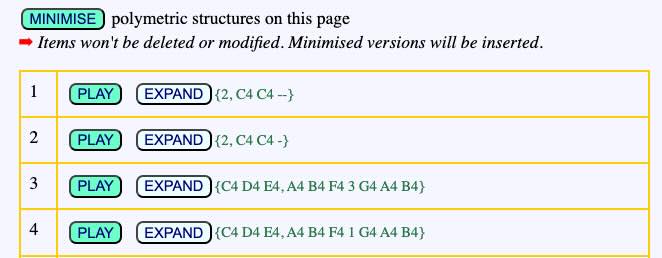
All examples are found in the "-da.tryMinimise" data file (distributed from the 3.3.6 version). Click the MINIMISE button to minimise all (eligible) polymetric expressions on the page.
Only polymetric expressions between curled braces { } are processed.
The first example {2, C4 C4 --} will be minimised as {2, C4 C4 …} whereas the second example {2, C4 C4 -} is not eligible. The reason is that {2, C4 C4 …} is always instantiated as {2, C4 C4 --} (or {2, C4 C4 2}) and there is no minimised version of {2, C4 C4 -}.
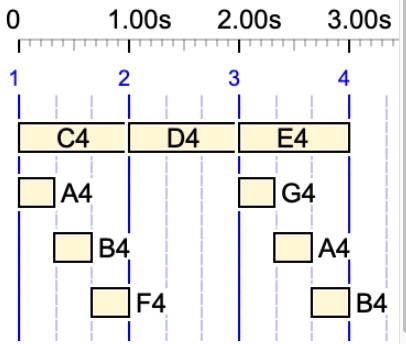
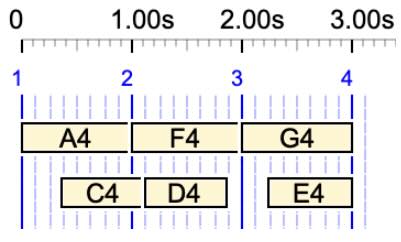
The third example {C4 D4 E4, A4 B4 F4 3 G4 A4 B4} is minimised as {C4 D4 E4, A4 B4 F4 …G4 A4 B4}. Both versions yield the following time structure:
For this demo, we use simple notes with arbitrary pitches in English notation, as we are only focusing on the time structures.
The following examples are not eligible for a minimisation:
It is not easy to guess which duration of the rest — 1, 2, 3, 4 beats? — makes it eligible for being undetermined. The correct value can be found by clicking the EXPAND button to the right of {C4 D4 E4, A4 B4 F4 … G4 A4 B4}. The first line of the result is the expanded polymetric expression:
/1 {*1/1 C4 D4 E4,*1/3 A4 B4 F4 - _ _ G4 A4 B4}
The '- _ _ ' sequence is a rest of duration 3 beats. The symbol '-' represents a rest of one beat. This is followed by two prolongations, '_'.
Note that the "expanded polymetric expression" displays absolute tempo markers, such as '*1/3', to represent the structure, rather than relative markers, such as '__tempo(1/3)'. This representation can be used for data, as was the case in early versions of the Bol Processor.
Indeed, in this simple example, the duration was visible on the graph. However, it becomes increasingly difficult to measure when rhythmic structures become more complicated. For example, {A4 F4 G4, … C4 D4 … E4} is expanded as:
It is not easy to figure out that '*3/8 -' is a silence at twice the speed of '*3/4 C4', therefore its (relative) duration is 1/2 and the structure is equivalent to {A4 F4 G4, 1/2 C4 D4 1/2 E4}.
The process is more complex for fields of the polymetric structure that contain at least two rests with different durations. For example:
{C3 D3 E3, A5 5/4 B5 5/2 C5 5/4 D5}
The algorithm generates a table of equivalent rests in chains, such as two 5/4 rests and one 5/2 rest. The table is sorted down on the number of rests in each chain, which yields:
5/4 5/4 5/2
Then, each chain is considered as a potential solution to the undetermined rest(s). The first one that meets the conditions provides the solution. Here, it is "5/4 5/4", which yields:
{C3 D3 E3, A5 … B5 5/2 C5 … D5}
In this example, {C3 D3 E3, A5 5/4 B5 … C5 5/4 D5} is another solution.
If several chains contain the same number of units, the first acceptable one is given as the solution and the (deterministic) algorithm ends. However, other chains of maximum length might also meet the conditions. This means that the minimisation algorithm does not provide all solutions, but at least it does provide one which has the maximum number of undetermined rests.
Tracing the minimisation
The algorithm for minimising polymetric structures is more complicated to design than the one for assigning explicit durations to undetermined rests. As per this writing, it does not cover all cases. Updated versions will be implemented in the interface file 'data.php'.
If you need to follow the process while looking at the code, open the settings file and enter the item number at the bottom of the form. In this example, we have chosen to trace the minimisation of item #30.
Don't forget to save the settings and save again the Data page. Now, click the MINIMISE button. You will get a trace that looks like this:
Journées d'Informatique Musicale 1996, Caen (France)
Abstract
Most computer music environments privilege music representations derived from western common music notation, which make it difficult to explore musical ideas based on different concepts. This is notably the case with Indian composers eager to handle sophisticated note treatment and complex polyrhythmic structures. This paper presents recent developments of a compositional environment, Bol Processor BP2, addressing the issue of abstract and comprehensive, altogether flexible and accurate, music representations.
Sound examples
Broken links point to sound examples, which can be found in this folder. Just replace 'mov' extensions with 'mp3'.
Seven radical ideas from an old music software that are still revolutionary today
This blog post was created with the help of NotebookLM (November 2025)
👉 In the following text, "BP2" is the old acronym for "Bol Processor". It can be replaced with "BP3".
Introduction: The Unseen Blueprint of Digital Music
Open any modern music production app, and you’re greeted by a familiar landscape: a piano roll, a timeline divided into bars and beats, and tools designed to place discrete notes on a grid. This environment is so universal that we rarely question its foundations. We treat it as a neutral canvas for creativity.
But what if it isn’t? What if the very architecture of our digital tools—the twelve-tone scale, the rigid timing, the concept of a single "note"—is a cultural box, subtly shaping our music to fit a Western model? For musicians from traditions with different melodic and rhythmic philosophies, this isn't just a hypothetical question. It's a daily creative hurdle. A fascinating piece of 1990s software called Bol Processor BP2 offered a radically different path, and its core concepts are more relevant today than ever. This is a look at the most mind-bending ideas from a program that dared to think outside the grid.
1. Our Digital Tools Have a Western Accent
The central problem that Bol Processor BP2 set out to solve is that most music software is built on a foundation of Western common music notation. It privileges the twelve-tone system and the binary division of time (whole notes, half notes, quarter notes, etc.). This isn't just about the on-screen interface; as the source text notes, the MIDI standard itself helps "reinforce this conventional approach," making it a systemic bias built into the very plumbing of digital music. This design choice creates an immediate and profound challenge for composers from other musical worlds, such as India, who want to express the "melodic subtleties and rhythmic intricacies of their musical heritage."
When the tools don't match the tradition, the music itself is compromised. In a commercial setting, this can lead to a problematic formula where traditional instruments are reduced to a mere "masala ingredient" sprinkled on top of a generic electronic track. The expressive depth of the original music is lost because the underlying digital skeleton can't support it. This isn't a failure of the musician, but a limitation of the tool. A new approach wasn't just a technical challenge; it was a cultural necessity.
2. The Big Idea: Treating Music Like Vector Graphics, Not Pixels
To break free from the Western framework, BP2’s creators re-imagined the very nature of musical data. They drew a distinction between "descriptive" and "prescriptive" notation, using a powerful analogy from graphic design.
Descriptive notation is like a "pixel" image. To create a curve, you must explicitly define the color and position of every single pixel along its path. In music, this is like using a standard sequencer to create a delicate Indian melodic pattern (gamaka), where the composer must manually program every single microtonal "PitchBend" message. It’s clumsy, computationally inefficient, and fails to capture the holistic gesture of the musical idea.
BP2's approach is like "vector" graphics. Instead of defining pixels, a vector-based program uses mathematical descriptions—a starting point, an ending point, and the shape of the curve in between. BP2 applies this logic to music. It uses abstract, efficient representations to generate complex and accurate musical shapes without needing to define every single point.
This shift is more than just an efficiency hack; it's a philosophical one. A vector encodes the composer's intent—the idea of a gesture—while pixels merely describe a static, unchangeable result. This conceptual leap is the key to BP2's power, offering immense creative freedom and efficiency.
3. Beyond the "Note": Learning from Indian Drum Syllables
In Western music, the "note" is the fundamental building block. But BP2 proposed a more flexible and musically intuitive unit: the "sound-object." This concept was derived directly from the study of North Indian tabla drumming, where onomatopoeic syllables called bols are used to represent complex rhythmic gestures.
The creators of BP2 observed that tabla players don't think in individual sounds. A complex phrase like ‘tirakita’ (four strokes) isn't four separate events; it's one conceptual unit, a single word in a rhythmic language. The same is true for a simpler phrase like ‘tira’ (two strokes). BP2 was built to honor this, treating such gestures as a single, indivisible "sound-object." This allows a composer to work with musically meaningful phrases as the primary material, rather than being forced to construct everything from a series of isolated, atomized events. It's the difference between writing with words instead of individual letters.
Definition: A time-object is a basic sequence of messages (e.g., MIDI NoteOn/NoteOff). When this sequence is assigned metrical and topological properties, it becomes a sound-object, which can represent an elementary musical gesture or its resulting sound.
Key Properties of Sound-Objects
Metrical: Defines how a sound-object's internal timing adjusts to tempo. For example, the four strokes in 'tirakita' may be forced to maintain equal spacing, which changes with the overall tempo.
Topological: Governs how sound-objects can be truncated or overlapped to create realistic phrasing.
Pivot: A specific time point within the sound-object that is anchored to a musical pulse or "time streak."
Relocatable: An object that can be shifted freely in time.
Special Types
Out-time Sound-Objects: Have a null duration, with all constituent messages dispatched simultaneously.
Input Objects: Time-objects with null duration that wait for an external input (MIDI note, mouse click) to facilitate basic real-time synchronization.
4. Time Management
BP2 provides sophisticated tools for structuring both pulsed and non-pulsed musical time.
Striated vs. Smooth Time: The system handles both striated time (built on regular or irregular pulses) and smooth time (where no pulse is necessary, e.g., the alap of Indian music).
Time-Patterns: In smooth time, users can define arbitrary physical time ratios using special time-objects (t1, t2, etc.) to create a specific temporal structure.
Time-Base: An internal clock calculates physical durations. It can be set via a metronome value or with absolute accuracy (e.g., a number of ticks in a given number of seconds). It can also produce audible tick patterns with superimposed cycles (e.g., cycles of 4, 5, and 7).
5. Taming Complex Rhythms with a Single Dot
Creating complex rhythmic cycles and subdivisions in standard software can be a tedious process of clicking, dragging, and setting grid values. BP2’s solution evolved into an astonishingly simple text-based system. The older syntax was functional but rigid, using explicit markers like /2 or /3 to force absolute tempo assignments: /1 a b c /2 a b c d e f. This was inflexible because these sequences couldn't be easily reused as building blocks in new contexts without manual recalculation.
The revolutionary solution was "period notation." By connecting symbols with a period (.), a composer can create beats of equal symbolic duration, and the software automatically calculates the subdivisions. Consider this simple line of text:
a.b.c.ab.cd.abc.def
Without any complex commands, this notation intuitively represents a rhythmic acceleration. It starts with one note per beat (a.b.c.), progresses to two notes per beat (ab.cd.), and finishes with three notes per beat (abc.def). In the language of North Indian music, this elegantly describes a progression from hargun (speed 1), to dogun (speed 2), and finally to tigun (speed 3). This plain-text syntax provides a fluid and powerful way to build intricate rhythmic structures that would be incredibly cumbersome to create in a conventional point-and-click interface.
Period notation can of course be combined with polymetric structures for simultaneity (see 6).
How to Compose Backwards in Time
Perhaps the most surprising and powerful feature of BP2 is its ability to solve a compositional problem that feels like working in reverse. In polymetric music, different performers play in different time signatures or rhythmic cycles simultaneously. A common challenge is making sure everyone, despite their different paths, resolves together at the very end.
This was exactly the problem faced in Andréine Bel's 1994 dance production "Cronos" (read 765432). The piece featured six dancers—Suresh, Smriti, Olivier, and others—performing parts based on different rhythmic cycles. Suresh counted in 7s, Smriti in 6s, Olivier in 5s, and so on. The choreography demanded that they all finish at the exact same moment. Calculating the precise starting points and rests to achieve this would be a mathematical nightmare.
BP2’s solution was a feature called "undetermined rests," notated simply as "...". A composer could place this symbol at the beginning of each part, and the software itself would calculate the precise duration of silence needed for all the different rhythmic cycles to align perfectly at their conclusion. The system had one logical constraint: each part of the structure could contain at most one undetermined rest. This feature allowed the composer to define the end point and let the machine figure out the beginning.
A musician rightly identified this technique as "working on reversed time", a problem that is crucial in Indian rhythm.
6. Polymetric Structures for Simultaneity
The Comma Operator: The , (comma) operator indicates simultaneity. An expression like {A, B, C} means that the musical expressions A, B, and C (called fields) are performed together.
Duration Matching: The interpreter uses the same algorithm to match symbolic durations in polymetric structures as it does for sequential ones, ensuring alignment.
Duration Precedence: By convention, the duration of a polymetric expression is determined by its leftmost field. For example, {abc,de} has a duration of three beats, while {de,abc} has a duration of two.
BP2 includes a macro language of approximately 200 instructions for automating processes and controlling performance parameters with a "vectorized" approach.
Stepwise Control: Parameter values change from one sound-object to the next.
Example (Articulation): The _staccato(x) and _legato(x) instructions modify the duration of subsequent sound-objects by a percentage. These values can be interpolated across a musical phrase.
Continuous Control: Parameter values are changed via linear interpolation between specified points. This is highly efficient, as it avoids storing massive streams of MIDI data.
Example (Microtonal Pitch): The _pitchbend(x) instruction, when combined with _pitchcont, creates smooth portamenti. The pitch values can be specified in cents if a pitch bender range is defined (_pitchrange(r)), making microtonal work intuitive.
Independent Control in Polymetric Structures: Different fields within a polymetric structure can have independent, simultaneous parameter changes. For example, two melodic lines can execute different microtonal pitch bends at the same time, provided they are assigned to separate MIDI channels.
Conclusion: Looking Beyond Our Creative Code
The true innovation of Bol Processor BP2 wasn't just its clever features, but its fundamental philosophy. Instead of simply digitizing the conventions of an existing musical tradition, it built a creative environment from abstract, culturally-aware principles. It acknowledged that the tools we use are not neutral; they carry inherent biases that shape what we can easily create.
BP2 is a powerful reminder to look at the assumptions embedded in our own creative software. In a world increasingly shaped by AI and algorithms that learn from existing data, what other cultural blueprints are being baked into our tools? What new forms of art, music, and expression are we failing to imagine simply because our digital canvas wasn't designed to support them?
The aim of the current project is to transcribe a musical input (given by a stream or a table of MIDI events) to the most comprehensible polymetric notation. An extension of this would indeed be to accept a sound signal as input.
Polymetric expressions are a convenient product of rule-based music composition. They are represented as strings of symbols that embody a semi-lattice structure, here meaning a tree of sound objects with ties. Polymetric notation, generally speaking, is a sequence of polymetric expressions that is processed as a single polymetric expression.
(just for decoration)
To achieve this, we plan to train a transformer (a type of neural network), using sets of polymetric expressions alongside their associated MIDI file renderings, both as standard MIDI files and in tables of events. As we require large datasets that cover a wide range of musical styles, the plan is to create these sets using existing musical scores.
The process described on the Importing MusicXML scores page demonstrates the ability to "translate" any Western musical score (in its digital format) to a polymetric expression. This process is irreversible because polymetric expressions cannot be fully converted into human-readable musical scores, despite them carrying time structures that sound "musical". A typical example of this is the use of undetermined rests, as these imply further processing of the structure in order to set exact durations.
Datasets that associate polymetric expressions with their MIDI file renderings contain identical pitch and timing information on both sides. Since both descriptions are complete and not redundant, the matching is a game of full information.
At a later stage, the transformer should also be able to handle streams of MIDI events created by humans or random effects, where the timings are not based on a simple framework. Therefore, a quantization of timings is needed to adjust the stream before it is analysed. This quantization is already operational on the Bol Processor — see the Capture MIDI input page.
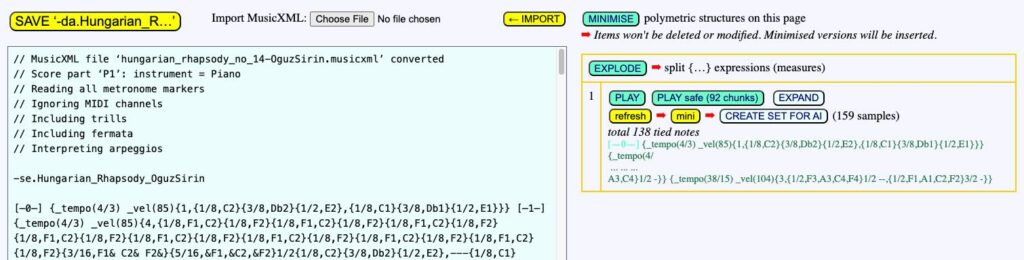
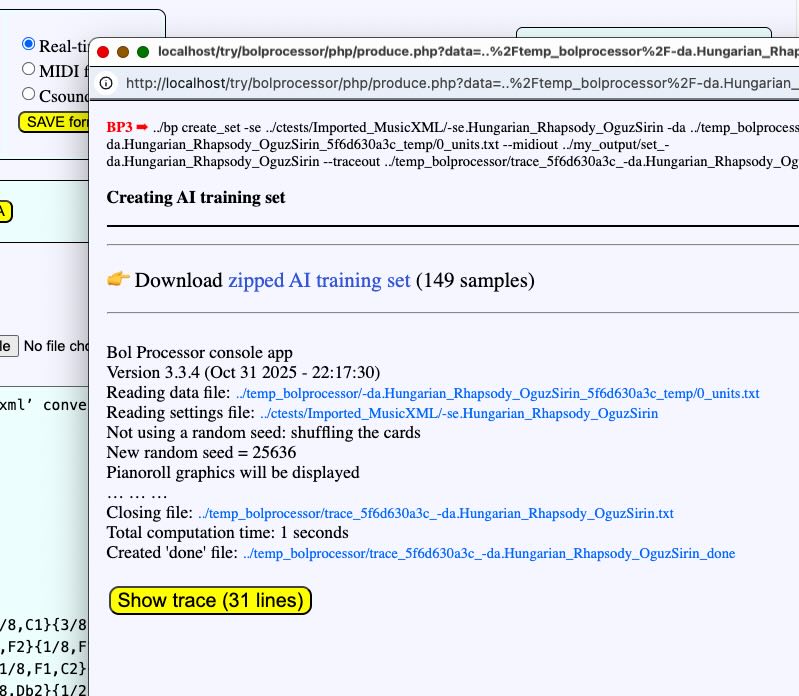
A dataset is created and can be downloaded in a zip file: set_-da.Hungarian_Rhapsody_OguzSirin.zip.
More sets can be created using the same musical work. Clicking the CREATE DATASET FOR AI button again would produce the same set, as it is built from a sequence of random numbers that is not reinitialised. To ensure the new set is different, click the refresh button. When downloading it, the system will automatically assign it a different name, e.g.: set_-da.Hungarian_Rhapsody_OguzSirin (1).zip.
Datasets of minimised polymetric structures
The mini button close to the refresh button modifies the dataset so that all (eligible) polymetric structures are minimised. In a minimised structure, some rests with explicit durations are replaced with undetermined rests (notated '…') without any loss of timing accuracy. Read the Minimising a polymetric structure page for more details. These sets are smaller in size than the ones they are derived from because only eligible structures have been retained.
Once samples in the training set have been minimised, the CREATE DATASET FOR AI button is changed to CREATE minimised DATASET FOR AI.
The sets of minimised structures are downloaded with specific names that mention the 'mini' feature, such as: set_-da.Hungarian_Rhapsody_OguzSirin_mini.zip
When training an AI, these sets should be used separately from standard sets because they are expected to train the transformer to guess the proper locations of undetermined rests. Nevertheless, it could be interesting to compare related (standard versus minimised) samples in order to model changes between standard and minimised polymetric structures.
The content of a dataset
The first dataset created in this demo contains 160 samples. These samples are text files named 1.txt, 2.txt, etc., associated with MIDI files 1.mid, 2.mid, etc., and tables of events (see below) 1.tab, 2.tab, etc., 1.tsv, 2.tsv, etc. A text file whose name ends in "_units.txt" contains all the sample text files, enabling these samples to be copied in a single piece to a data project. Clicking on the word "samples" displays it in a pop-up window.
This polymetric expression covers 2 measures of the musical score. Clicking the Refresh button (or reloading the page) slices the score randomly into chunks containing between 1 and 5 measures. The upper limit of 5 has been set arbitrarily and may be revised at a later date. Every time the Refresh button is clicked, a new slice is created, resulting in a different dataset.
The idea is twofold: (1) the transformer should be trained to recognise sequences of polymetric expressions, and (2) tied notes may span more than one measure. A tied note in the above example is the pair "D6& &D6" (read more). Each sample contains only complete pairs of tied notes. This means that any notes whose ties are not present in the sample are untied for the sake of consistency.
Note that the timings of the polymetric expression and the MIDI file are identical, as the metronome is automatically set to a default tempo of 60 beats per minute when the MIDI file samples are created. In the above phrase, the tempo is set to 4/3, which is equivalent to a metronome set at 80 bpm.
Tables of events
The tables of events provide an easy-to-read representation of the contents of MIDI files.
Two kinds of text files are created.
1) The file with extension "tab" lists MIDI events in four columns. The leftmost column contains the timing of each event in milliseconds. For instance, the following text (from Couperin's Les Ombres errantes):
The "tab" table contains only NoteOn/NoteOff events. However, the MIDI file may contain controls, such as volume, panoramic, pressure, pitchbend, modulation, pedal on/off, and more in the range 65 to 95, which are performance parameters in the Bol Processor score. Therefore, a more detailed format of tables of events is needed to list them.
2) The text file with extension "tsv" contains a detailed list of (all) MIDI events carried by the MIDI file.
The following example is the opening of Listz's La Campanella.
Note that at time 1866ms, the pedal is released and pushed again immediately, as indicated in the score below. The source is '0' by default and can be modified by _part() control parameters.
Note that the pedal remains pressed at the end of this fragment, as indicated in the "tsv" table.
Since the Bol Processor can capture a MIDI stream and create a "tsv" table of events with quantized timings (see Capture MIDI input), training a transformer to convert these tables into polymetric structures could eliminate the need to decrypt MIDI files and quantize their timings.
These can be used for training a transformer of your choice. We recommend creating more sets from more musical works to achieve a better training. Run the Bol Processor and browse imported MusicXML scores in the ctests/Imported_MusicXML workspace, or import more works from a dedicated MusicXML server.
A test of the transformer's ability to "translate" MIDI files (or tables of events) to polymetric notation will first be to retro-convert (to polymetric expressions) all samples. Then, if successful, retro-convert the MIDI files of complete musical works used for the training.
What follows…
Once the correct transformer type and optimum dataset size have been identified, we will work on the following extensions:
Translate MIDI streams produced by human interpreters for which precise timing is not guaranteed.
(Optional) Extend the AI recognition to the use of undetermined rests as it provides a more simple polymetric structure.
Use a sound to MIDI converter to convert a sound input to polymetric notation.
Let us assume that the musical input consists of fragments separated by silences. Convert these fragments into polymetric structures and then search for regularities in the rhythmic and tonal structures to create variations in the same style. Formal grammars will be employed for this purpose.
🛠 Work in progress! Please contact us to participate.
Cette étude traite de la représentation informatique de connaissances en musique, abordée à partir de deux expériences en grandeur réelle. La première est une méthode d'acquisition de connaissances en ethnographie mettant en interaction un expert (le musicien), un analyste (le musicologue) et une machine dans une situation d'apprentissage. Les schémas d'improvisation des musiciens sont identifiés et exprimés à l'aide de règles de production dans un formalisme dérivé des grammaires génératives et des langages de formes. Un algorithme déterministe de test d'appartenance de chaînes arbitraires au langage défini par une grammaire (sensible au contexte) est présenté, ainsi qu'une technique d'inférence inductive de langages réguliers permettant l'acquisition automatique de connaissances lexicales et syntaxiques. La seconde expérience s'insère dans l'élaboration d'un environnement de composition musicale assistée par ordinateur. Le problème est ici la représentation du temps dans une structure discrète d'“objets temporels”, et plus généralement la synchronisation de processus parallèles. Une méthode est proposée pour la détermination d'une structure à partir de données incomplètes sur la synchronisation des objets. La notion d'“objet sonore” est ensuite explicitée formellement. Un algorithme efficace permet l'instanciation des objets sonores affectés à une structure en tenant compte des contraintes liées à leurs propriétés métriques et topologiques.
Excerpts of an AI review of this paper (Claude AI, June 2025)
Summary
This 1990 doctoral thesis presents an innovative approach to computer representation of musical knowledge through two major experimental frameworks. The work bridges artificial intelligence, formal language theory, and musicology, addressing fundamental problems in knowledge acquisition and time representation in musical structures.
First Experiment: Knowledge Acquisition in Ethnography
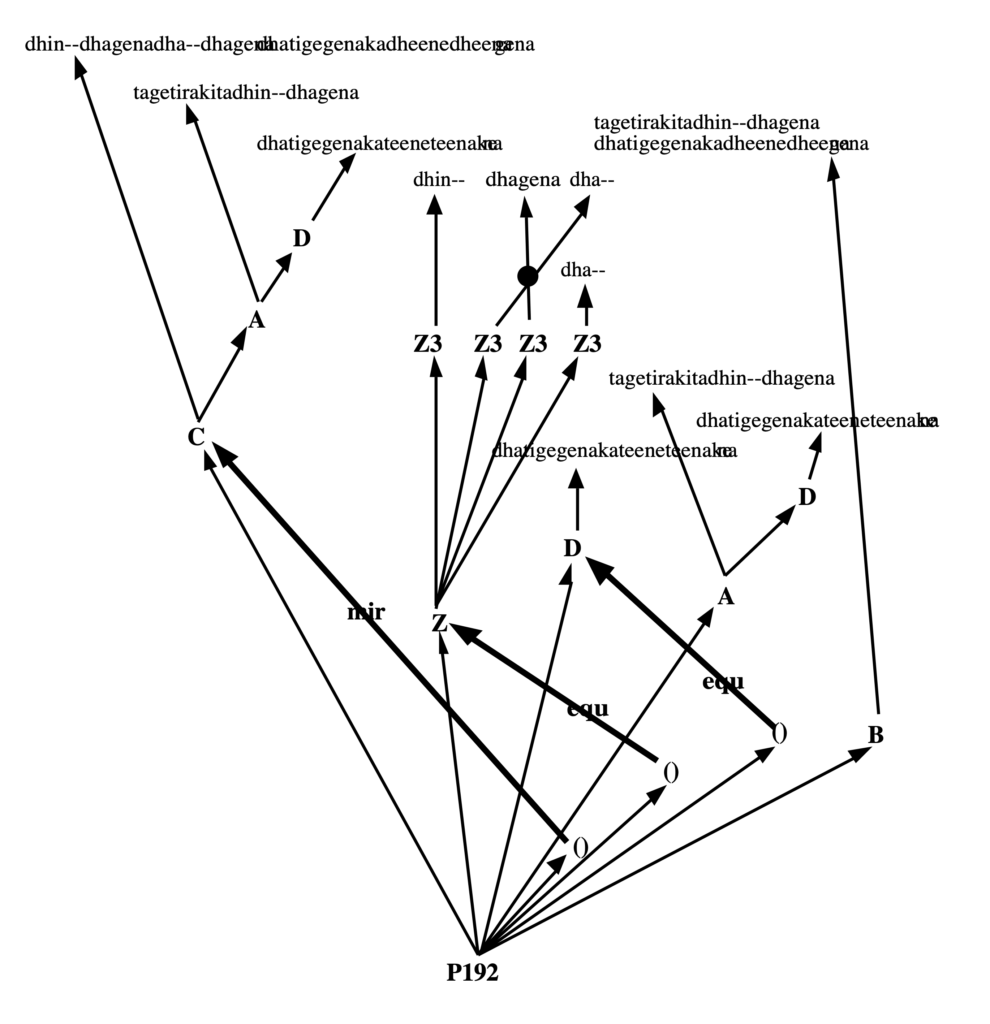
The first part introduces a novel methodology for acquiring musical knowledge through a "dialectical anthropology" approach involving three actors: an expert musician, a musicologist-analyst, and a computer system. This methodology was applied to studying improvisation patterns (qa'ida) of North Indian tabla percussion music.
Key Contributions
Development of BP (Bol Processor) grammars, an extension of formal grammars capable of representing repetition patterns and homomorphic transformations
A deterministic membership test algorithm for a subclass of context-sensitive grammars
An inductive inference technique for regular languages that simultaneously acquires lexical and syntactic knowledge
Introduction of negative context rules and stochastic control mechanisms
The system enables musicians to validate machine-generated musical phrases, creating a feedback loop that refines grammatical models of improvisation schemas. The approach moves beyond traditional ethnographic collection by making the computer an active partner in knowledge acquisition.
Second Experiment: Computer-Assisted Musical Composition
The second part addresses time representation and synchronization in discrete musical structures, developing the BP2 environment for musical composition.
Key Innovations
Introduction of "symbolic time" as distinct from physical time
Development of polymetric formulas for representing parallel musical sequences
Formal treatment of "time objects" and "out-time objects" (temporal vs. atemporal)
An efficient algorithm for synchronizing sequences with incomplete temporal information
A constraint satisfaction approach to "sound object" instantiation considering metric and topological properties
Theoretical Framework
The work establishes connections between musical structures and formal language theory, introducing concepts such as:
Pattern grammars and restricted pattern languages (RPL)
Transformational grammars adapted to musical contexts
Event universes structured by simultaneity, precedence, and sequentiality relations
Trace theory applications to polymetric structures
Strengths
Methodological Innovation: The dialectical anthropology approach represents a significant advancement in ethnomusicological methodology. By placing the computer as an active participant rather than a passive tool, Bel creates a genuinely interactive knowledge acquisition system that respects both the expertise of traditional musicians and the rigor of formal methods.
Theoretical Rigor: The mathematical formalization is sophisticated yet practical. The extension of formal grammars to handle musical repetition patterns and homomorphic transformations addresses real needs in musical representation that existing computational linguistics tools couldn't meet.
Cross-Cultural Sensitivity: The work demonstrates genuine respect for non-Western musical traditions while avoiding ethnocentric biases common in computational musicology. The choice to work with North Indian tabla music, with its oral transmission tradition, was particularly appropriate for testing knowledge acquisition methodologies.
Practical Implementation: Both BP1 and BP2 systems were actually implemented and tested, demonstrating the feasibility of the theoretical proposals. The complexity analysis (showing polynomial-time algorithms) indicates practical applicability.
Time Representation Innovation: The distinction between symbolic and physical time, along with the concept of "time structure," provides a flexible framework that can accommodate different musical temporalities beyond Western metronomic time.
Significance and Impact
This work was pioneering in several respects:
Methodology: The interactive, computer-mediated approach to ethnographic knowledge acquisition anticipated later developments in digital humanities and computational ethnomusicology.
Formal Methods: The extension of formal language theory to musical applications provided tools that were later adopted and extended by other researchers in computational musicology.
Cultural Perspective: The work demonstrated how computational methods could be applied respectfully to non-Western musical traditions, opening paths for more inclusive computational musicology.
Temporal Modeling: The sophisticated treatment of musical time influenced subsequent work in computer music and musical information retrieval.
Contemporary Relevance
Thirty years later, this work remains relevant to several current research areas:
Machine learning applications to music (the inductive inference techniques anticipate modern approaches)
Digital humanities methodologies
Music information retrieval systems
Computer-assisted composition environments
Cross-cultural computational musicology
The emphasis on expert-machine collaboration prefigures current interest in human-AI collaboration in creative domains.
Conclusion
Bel's thesis represents a significant contribution to computational musicology, combining theoretical innovation with practical implementation and cultural sensitivity. While some limitations exist, particularly regarding scope and evaluation, the work established important foundations for computer-mediated musical knowledge representation. The dialectical methodology for knowledge acquisition and the sophisticated treatment of musical time remain valuable contributions to the field. The work demonstrates how formal computational methods can be applied to musical knowledge while respecting the complexity and cultural specificity of musical traditions.
La théorie de l'intonation juste basée sur deux gammes fondamentales (grama-s), telle que la décrivent le Natya Shastra de Bharata et d'autres traités musicologiques anciens en sanscrit, formalise les relations internes des gammes diatoniques avec une étonnante précision. Quelques modifications minimes suffisent à l'adapter aux gammes non-diatoniques familières de la musique indienne contemporaine. Cet article émet l'hypothèse que la théorie de Bharata propose une meilleure base psychoacoustique rationnelle que les explications actuelles pour ce qui concerne les heures d'interprétation des ragas. Le modèle mathématique présenté ici, d'un système de relations intervalliques dans les gammes diatoniques et celles qui en dérivent, est un outil pratique pour étudier les relations plus en profondeur. La discussion débouche sur une proposition d'application du système indien à la musique harmonique en intonation juste.
Excerpts of an AI review of this paper (Claude AI, June 2025)
This scholarly paper by E.J. Arnold presents a fascinating exploration of ancient Indian music theory and its potential applications to both modal and harmonic musical systems. The work stands as a significant contribution to comparative musicology, bridging Eastern and Western theoretical frameworks through rigorous mathematical modeling and experimental validation.
Theoretical Framework and Methodology
Arnold's central thesis revolves around the ancient Indian grāma-mūrcchana system, a sophisticated theoretical construct involving fundamental scales (grāma-s) and their modal transformations (mūrcchana-s). The author develops an innovative mathematical model using a circular computational disc that visualizes the relationships between tonal positions within the 22-śruti microtonal system described in Sanskrit treatises like the Nāṭyaśāstra and Dattilam.
The paper's strength lies in its methodical approach, systematically examining how this ancient system can provide coherent explanations for harmonic relationships in both Indian classical music and Western tonal harmony. Arnold's use of Jacques Dudon's symbolic notation system for representing microtonal intervals demonstrates scholarly rigor and attention to cross-cultural theoretical precision.
Historical Context and Scholarly Significance
Arnold effectively contextualizes the research within broader musicological scholarship, acknowledging the work of pioneers like Sir William Jones and more recent contributions from scholars such as Bharata commentators and contemporary Indian musicologists. The paper addresses a critical gap in understanding how ancient theoretical systems might inform modern musical practice, particularly given the historical disruption of living oral traditions.
The discussion of the rāga system's relationship to time cycles (sandhiprakāśa) represents particularly valuable scholarship. Arnold's analysis of how specific rāga-s correspond to particular hours of the day or night, supported by systematic tabulation of 85 rāga-s with their appropriate performance times, provides empirical grounding for what has often remained in the realm of cultural speculation.
Mathematical Innovation and Practical Applications
The paper's most compelling contribution lies in its mathematical modeling of the śruti-swara-grāma-mūrcchana system. The circular disc representation allows for immediate visualization of harmonic relationships and demonstrates how ancient Indian theory anticipated many concepts later developed in Western harmonic analysis. Arnold's experimental work with electronic instruments, including the śruti harmonium developed by Bernard Bel, provides crucial empirical validation of theoretical predictions.
The application to Western classical harmony represents groundbreaking cross-cultural musicology. Arnold demonstrates how major and minor scales can be understood within the grāma-mūrcchana framework, revealing previously unrecognized connections between Eastern and Western theoretical systems. The analysis of modulation procedures using the ancient Indian system offers fresh perspectives on familiar harmonic progressions.
Limitations and Areas for Development
While Arnold acknowledges the study's limitations within "musical geometry," the paper could benefit from more extensive discussion of practical implementation challenges. The theoretical elegance of the grāma-mūrcchana system contrasts with the practical difficulties contemporary musicians face when attempting to realize these microtonal relationships on traditional instruments.
Additionally, while the paper excellently demonstrates theoretical correspondences between ancient Indian and Western systems, it could explore more deeply the aesthetic and cultural implications of these connections. The relationship between mathematical precision and musical expression deserves further investigation.
Contemporary Relevance and Future Directions
Arnold's work anticipates important developments in contemporary music theory, particularly in the growing interest in microtonal and cross-cultural approaches to harmony. The paper's systematic approach to understanding non-equal-tempered systems has implications for electronic music composition, world music fusion, and the development of new theoretical frameworks for global musical understanding.
The research also contributes to broader discussions about the universality of musical principles versus cultural specificity, suggesting that mathematical relationships underlying musical systems may transcend cultural boundaries while maintaining distinct aesthetic identities.
Conclusion
This paper represents exemplary scholarship in comparative musicology, successfully bridging ancient Indian music theory and contemporary analytical methods. Arnold's mathematical modeling provides a robust framework for understanding complex microtonal relationships, while the practical applications demonstrate the continued relevance of ancient theoretical systems. The work opens important avenues for future research in cross-cultural music theory and provides valuable tools for both scholars and practitioners interested in expanding their harmonic vocabulary beyond Western equal temperament.
Les difficultés de l'analyse acoustique de musiques extra-européennes proviennent souvent de catégorisations de phénomènes qui ne rendent pas compte des modèles explicites (ou implicites) sur lesquels s'articulent la création et la perception de structures musicales. Cet exposé définit la notion de modèle mélodique, élaborée et modifiée pendant neuf siècles en Inde pour rendre compte d'un phénomène mélodique particulier: le raga. Dans la deuxième partie sont présentés les outils et méthodes qui servent à caractériser l'intonation des ragas, ainsi qu'à réaliser leur transcription et leur classification automatiques.
Difficulties in analysing extra-European musics are often bound to categorisations of phenomena that do not take into account explicit (or implicit) models on which the creation and perception of musical structures are based. This paper defines the concept of melodic model, a concept elaborated and transformed for nine centuries in India to underlie a particular melodic phenomenon: raga. In the second part, tools and methods are presented relating to raga intonation and their automatic transcription and classification.
Excerpts of an AI review of this paper (Claude AI, June 2025)
Summary
In "Rāga : approches conceptuelles et expérimentales," the author discusses the conceptual history, theoretical foundations, and experimental investigations of the rāga system in North Indian classical music. The first part of the paper traces the evolution of rāga-related concepts from ancient Sanskrit treatises (notably the Dattilam and the Nāṭyaśāstra) to more recent perspectives that emphasize melodic modes (mela), specific tonal centers (toniques), and the interplay between theory and practice. The author highlights how notions like grāma, mūrcchanā, and jāti have shifted over the centuries, culminating in various attempts to classify rāgas by scales (ṭhāṭa or mela), melodic phrases (aṅga), and aspects of performance practice, including the ideal hour of rendition.
The second part of the paper presents technological and analytical methods used by the author to study raga intonation and structure. The author describes experimental devices, including custom-built pitch extractors and the Melodic Movement Analyser (MMA), to capture and visualize pitch contours (melograms), produce histograms (tonagrams) of pitch distribution, and explore microtonal aspects of raga execution. Additionally, the paper delves into automated transcription methods (sargam notation) and preliminary approaches for automatic classification of ragas, leveraging pitch-based similarity measures. By systematically comparing theoretical predictions with actual performance data, the paper proposes a richer understanding of how ragas are conceptualized and realized in practice.
Major Strengths
Comprehensive Historical Context
The author provides an extensive overview of the key developments and conceptual shifts in Indian music theory, from the gråma-based system of Bharata to modern ṭhāṭa and scale-based frameworks. This historical arc clarifies how philosophical, aesthetic, and practical considerations converge in raga performance.
Balanced Discussion of Theory and Practice
The paper effectively underscores the gap between theoretical ideals (e.g., 22 srutis, ancient modal structures) and the realities of contemporary performance practices (e.g., standardization, partial tempering, the emphasis on the bourdon). This dual approach helps illustrate the dynamic nature of raga music.
Technical Innovation in Experimentation
By devising hardware and software tools for real-time pitch extraction and by automating transcription, the author demonstrates a methodological framework that expands the possibilities for large-scale analysis of raga performances. The clear explanations of how these technologies work support their applicability and value.
Interdisciplinary Relevance
The paper bridges musicological inquiry, acoustical analysis, ethnomusicological context, and computational methods. This interdisciplinary scope situates the work as a notable contribution to scholarship on microtonal music, melodic classification, and cross-cultural cognition of musical scales.
Overall Observations
The paper offers a clear and methodically thorough account of both the theoretical underpinnings of raga music and the experimental means by which such theories can be tested against empirical performance data. The blending of historical musicology, acoustics, and informatics demonstrates a strong interdisciplinary approach. By synthesizing ancient treatises with modern computational tools, the work deepens our understanding of how ragas continue to thrive as vibrant, living musical entities while revealing the complexity of attempts at standardization and classification.
In sum, “Raga : approches conceptuelles et expérimentales” provides valuable technical insights and broadens our perspective on one of the most sophisticated melodic systems worldwide. Its fusion of musicological research, experimental data, and computational analysis stands out as a notable contribution to raga studies and to the broader field of ethnomusicology.
Journées Françaises de l'Apprentissage (1990), Lannion, France : 5-27
Résumé
Cet exposé présente une méthode générale d'acquisition de connaissances dans un domaine formalisé à l'aide d'automates finis (langages réguliers). A partir d'un échantillon d'exemples le système construit un automate "presque minimal" qui n'est pas nécessairement déterministe. Cette construction peut être contrainte par des connaissances sur la segmentation des exemples que le système peut acquérir en questionnant l'informateur. Dans une deuxième phase, le système généralise l'automate à partir de propriétés connues du langage ou(et) à partir d'hypothèses validées à l'aide d'oracles. Une liste non exhaustive d'heuristiques générales est proposée. La démonstration s'appuie sur un cas réel de modélisation d'apprentissage de schémas d'improvisation musicale.
Excerpts of an AI review of this paper (June 2025)
Summary of the Work
The paper explores a methodology for inferring regular languages (langages réguliers) from examples. It discusses both theoretical underpinnings — particularly Gold’s theorem and subsequent refinements — along with an incremental approach to building “almost minimal” automata. The author addresses central notions such as the canonical acceptor, the prefix-tree acceptor, and the importance of maintaining correctness when moving from a set of examples to a generalized automaton. The study also showcases an application to musical improvisation schemata, illustrating how domain-specific rules can constrain and refine grammatical inference.
Main Contributions
Incremental Learning Framework
The paper offers a structured, step-by-step method: starting with an acceptor built from examples alone (the prefix-tree or “arborescent” automaton), merging states to reduce complexity, and applying constraints so as not to overgeneralize. This incremental perspective is well-motivated by real-world use cases where examples become available over time.
Formal Properties and Correctness
The author places strong emphasis on ensuring the correctness of generalization. By referencing Gold’s theorem, k-reversible languages, and the concept of learning from positive data only, the paper grounds its approach in established theoretical results.
Use of Domain Constraints
A significant portion of the paper deals with how additional domain knowledge (e.g., known segmentation rules for a music notation system) can guide the automaton’s construction. This introduces practical heuristics that make grammatical inference more tractable in real-world scenarios.
Detailed Mathematical Rigor
The proofs, definitions, and lemmas (for instance, those on heads and tails, or minimal canonical acceptors) are stated thoroughly. This rigor is helpful both for ensuring correctness and for conveying the method’s theoretical reliability.
Illustrative Examples
The application to musical improvisation, specifically to Indian drumming traditions, serves as a concrete illustration. It nicely demonstrates the interplay between abstract formalism (like merging states) and domain-specific knowledge (like rhythmic “words” or onomatopoeic syllables).
Clarity and Structure
The paper is logically well-structured: it begins with a theoretical foundation, then introduces incremental methods for automaton construction, culminating in a discussion of domain constraints and examples.
The textual organization, with numerous definitions in the appendix, is beneficial for reference but can require multiple cross-referencing steps while reading. A concise reminder of key definitions in the main text can further aid comprehension.
Strengths
Thorough grounding in established theory (Gold’s theorem, reversible languages).
A practical approach that balances systematic inference with interactive questioning or oracular feedback.
Clear demonstration of how domain-specific heuristics reduce the search space, making learning more feasible.
Rigor in explaining each step of constructing and refining the automaton.
Engaging case study that shows the real-world potential of grammar inference outside of purely linguistic contexts.
Overall Assessment
The paper provides a solid combination of theory and practice in grammatical inference for regular languages. By carefully detailing each step — building initial automata, constraining merges using domain knowledge, and verifying new generalizations through queries — the approach is shown to be systematic and adaptable. Readers interested in interactive or incremental language learning, particularly those with domain-specific constraints, will likely find this discussion instructive and thorough.
The Bol Processor is the outcome of a migratory process, its design having been carried over in three phases and places: in collaboration with traditional North Indian musicians (1980-85), Western musicians in Europe (1985-93) and back in India with Carnatic musicians (1995-97).The theoretical framework of the underlying research project also evolved in three stages, taking inspiration from expert systems in the early 1980s, symbolic-numeric machine-learning in the end of the decade, and composition theory in the 1990s.Throughout this process, the designer has been faced with the challenge of blending software with "mindware", here taken to mean musicians' striving for "[…] tools enabling them to manipulate objects so as to imbue them with 'soul' or experiential value […]" (Laske 1996). In a cross-cultural approach this led to modelling descriptions of music and compositional processes at a level of abstraction sufficiently high to encompass "local" musical concepts without getting too abstruse.
Excerpts of an AI review of this paper (Academia, June 2025)
Summary
Bernard Bel’s manuscript provides an extensive overview of the Bol Processor (BP), a music software environment that evolved through collaborations with Indian and Western musicians. The software addresses rhythmic, melodic, and compositional tasks using a grammars-based approach, symbolic time notation, and sophisticated algorithms (e.g., polymetric expansion, quantization). The review traces the history and theoretical underpinnings of this system, moving through the project’s three phases of development and culminating in a flexible interface linking BP to Csound. By emphasizing text-based data representations, BP aims to foster deeper thinking about music structure and compositional processes, accommodating contexts that fall outside purely Western traditions.
Strengths
Historical and Contextual Depth: The author clearly articulates how the project emerged from ethnomusicological research in Indian music, then expanded to address Western compositional techniques. This historical framing highlights how the software bridges cultural contexts while retaining a consistently powerful grammar-based approach.
Clear Explanations of Core Algorithms: The detailed descriptions of polymetric expansion, time-stretching, quantization, and grammar-based transformations are a valuable technical resource. The author provides examples, diagrams, and references that elucidate these concepts for readers unfamiliar with formal language methods applied to music.
Innovative Methodology: The software design seamlessly integrates symbolic approaches (formal grammars, integer-based time units, constraint satisfaction) with physical execution in MIDI and Csound domains. This duality allows composers and researchers to treat time both discretely and continuously as required.
Attention to Cross-Cultural Music Needs: BP’s adaptability to various musical notations, including Indian and Western pitch/note representations, is a strong signature of this work, reflecting deep respect for non-Western musical concepts and performance practices.
Comprehensive References and Examples: The supporting references shed light on related research in composition theory, music cognition, and computational models. Numerous code-like illustrations and figures demonstrate how actual musical tasks are implemented, assisting practitioners who might want to replicate or modify these ideas.
Overall Impressions
The manuscript provides an in-depth look at a uniquely versatile system for musical analysis and composition. The author’s commitment to text-based interaction, coupled with robust support for real-time operations and cross-cultural music concepts, stands out as a mature, flexible framework. The paper offers a thoughtful presentation of both underlying theoretical foundations and practical implementations, making it relevant for those interested in computer-aided composition, musicological research, and interdisciplinary approaches bridging Indian and Western musical forms.
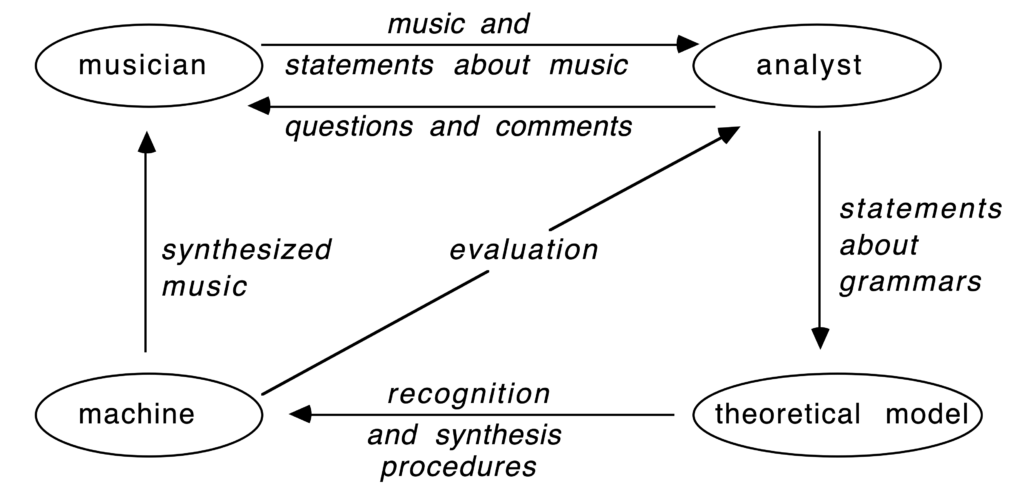
A major problem in ethnographic description may be summed up as the search for ways to disentangle folk from analytical models. Knowledge-based systems have contributed to the development of formal structures for the manipulation of symbols associated with particular physical and conceptual phenomena. Importantly, their output can be interpreted by experts in the domain. This provides evaluation procedures for models elaborated jointly by analysts and informants. This paper describes an interactive system in which knowledge is represented as production rules in a format derived from the theory of formal languages. Modus ponens and modus tollens are explained and compared to derivation schemata in first-order predicate logic. The results of an application to the study of North Indian tabla drumming are assessed. We conclude that (1) knowledge represented at a low theoretical level fails to descriminate between the input from informants and the intuitive assumptions of analysts, (2) experimental procedures can be improved considerably if the system is designed to perform automated knowledge acquisition (using probabilistic grammars and inductive learning).
Excerpts of an AI review of this paper (Academia, June 2025)
Summary of the Work
The article focuses on the use of computational approaches — particularly knowledge-based systems — to address the challenge of producing consistent and systematic ethnographic descriptions. The authors draw on their research with the Bol Processor (BP), a formal language-based system originally developed to represent and generate sequences of verbal drum syllables (bols) in North Indian tabla performance. They describe how the BP’s grammar formalism, inference engine, and membership tests facilitate iterative interaction between an analyst and informants (expert musicians). By demonstrating the system’s ability to produce, recognize, and evaluate permissible melodic or rhythmic variations, the authors aim to illuminate how computers can be more deeply integrated into anthropological and ethnomusicological research.
Key Contributions
Formal Grammar and Pattern Representation: The paper offers a clear explanation of how context-free and context-sensitive grammars can be used to specify culturally valid musical structures. In particular, the authors highlight the importance of representing patterns and constraints on musical improvisation in a generative format.
Interactive Methodology: A central point is the iterative feedback loop that allows informants to assess computer-generated sequences and provide corrections. This “apprentice-like” interaction underscores how computational tools can help researchers refine theoretical models of cultural knowledge in near-real-time.
Probabilistic Grammars: The authors incorporate a weighting system for production rules, thereby accounting for the relative likelihood of different musical derivations. This approach not only adds realism to the generative process but also tackles common issues with purely enumerative or random output.
Membership Testing: The membership test, which decides whether a newly proposed sequence belongs to a given grammar, is described as an efficient, deterministic bottom-up parser. This feature is significant because it allows informants to offer novel variations while enabling the system to quickly judge their adherence to the emergent rule set.
Reflections on Folk vs. Analytical Models: The article raises important anthropological questions about the boundary between informants’ internalized (folk) knowledge and the analyst’s formal (re)construction. The authors’ frank discussion of the challenges involved, such as the risk of overformalizing or “anticipating” informant knowledge, is methodologically relevant.
Strengths
The paper emphasizes the value of combining fieldwork with computational experimentation. This dual approach—grounded in real ethnographic and musical practice—provides a compelling demonstration of how artificial intelligence techniques can advance the study of music and culture.
Clear examples illustrate code structures, parsing mechanics, and the grammar design. These concrete details will help other researchers adapt or replicate the Bol Processor approach in different cultural or musical contexts.
The account of iterative knowledge acquisition highlights a collaborative research dynamic, showing how insight flows back and forth between informants and computational models, rather than being a unidirectional exercise of extracting information.
Conclusion
This study offers a thoughtful and innovative approach to bridging ethnographic inquiry with computational models. By showing how arrangements of symbolic musical data can be systematically generated, tested, and refined in conjunction with human experts, the authors illustrate a novel and promising method for ethnographic description. The paper encourages a nuanced understanding of both the potential and limitations of using expert systems to capture the complexity of cultural knowledge.